Sandbox creation and use |
Actions after sandbox creation and refresh
A sandbox is a copy of your Sage People production org. You'll typically use it for developing new functionality, testing, and training. The sandbox lets you do this without risking your production data or processes. To ensure you can use your sandbox effectively, work through the actions on this page and complete those applying to your org.
Refreshing your sandbox
-
Raise a support case. The support team confirms you're not testing your current sandbox and that it can be overwritten. The support team can also help you restore administrator access to the sandbox.
-
Log in to the sandbox. Use the URL https://test.salesforce.com
If you can't access your Sandbox, log a support case.
Actions after refresh
When we've refreshed your sandbox and you have access, follow the guidance relevant to the type of testing you want to do.
US Advanced Benefits (PlanSource)
Failure to disconnect your sandbox from PlanSource can result in data corruption in PlanSource.
If you use US Advanced Benefits with PlanSource, ensure you disconnect the sandbox from the PlanSource production environment. Not disconnecting risks sending invalid team member details to PlanSource and interrupting the single sign-on (SSO).
If you have the Benefits(US) package installed, you must disconnect from the US Advanced Benefits provider, PlanSource. Do this before updating Team Member email details. You can disconnect the sandbox by disabling the single sign-on (SSO) capability for PlanSource. Disconnecting prevents the sandbox from updating the PlanSource production environment with invalid details and interrupting SSO.
Disconnect PlanSource single sign-on
-
In the App Launcher, select Benefits(US)
-
Select the Settings tab.
-
On the Settings page:
-
Change Client Id to N/A
-
Change Client Secret to N/A
-
In the Single Sign-On Settings section, find Employee SSO Start Point. Delete the open id numbers at the end of the field
-
-
Select Save.
Configuration before making updates:

Configuration after making updates:

To remove the Plan Source Sync URL completely, remove all text within Employee SSO Start Point field box and select Save.
Email scrambling and unscrambling
A working production org can send automated emails to employees, candidates, and outside contacts for a range of purposes. The sandbox refresh disables some of the emails automatically, while others are unchanged. Check to make sure your sandbox is behaving as you want it.
Automatic scrambling
Creating or refreshing a sandbox org scrambles email addresses for users set up in the system. This prevents users accidentally sending out emails from the test system and prevents system access for users who do't need it.
A scrambled email address displays as:
OR as a standard email address with .invalid appended at the end:
Required unscrambling
When creating or refreshing the sandbox, the support team use the Sage People admin user. They grant access to the person who requested the sandbox refresh. Before other HR Portal users can access the sandbox, you must unscramble their email addresses to return them to standard email addresses:
Grant other users access to the sandbox in the sandbox
-
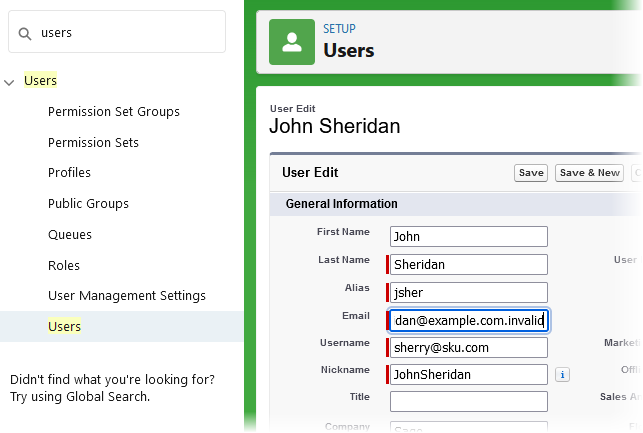
Go to Setup and in Quick Find enter Users.
-
Find the users you want to access the sandbox.
-
For each user, select Edit and correct the email address, returning it to standard form:
-
The user receives an email to confirm the change to their sandbox user record.
-
The user selects the link in the email to confirm the change.
-
Reset the user's password as you do for a user change in the production org.
Preventing unwanted emails
There are several actions you can take to stop your sandbox sending unwanted emails. Choose those most appropriate to your planned use of the sandbox.
If you have the Benefits(US) package installed, you must disconnect the sandbox single sign-on (SSO) capability from the US Benefits provider, PlanSource. Do this before updating Team Member email details. See US Advanced Benefits (PlanSource).
Scramble alternative addresses
A sandbox refresh scrambles the email address registered in the user record but it leaves other team member home and work email addresses unchanged. To prevent unwanted emails to team members, you can complete one or both of the following actions:
-
Run a data load update for the team member object, replacing email addresses with an invalid format. For example, by adding .zzz at the end of the email:
-
Modify action event settings to unlink the Action Event Pattern from everything except the Test policy
Disable team member to user synchronization
If you choose not to Scramble alternative addresses Sage People recommends disabling Team Member to User synchronization. Personal or alternative email fields can appear in the Team Member/User Synchronization field set. Email deliverability can also be on. When both conditions are true, Sage People substitutes unscrambled alternative email addresses during a sandbox refresh. Disabling team member to user synchronization prevents this.
-
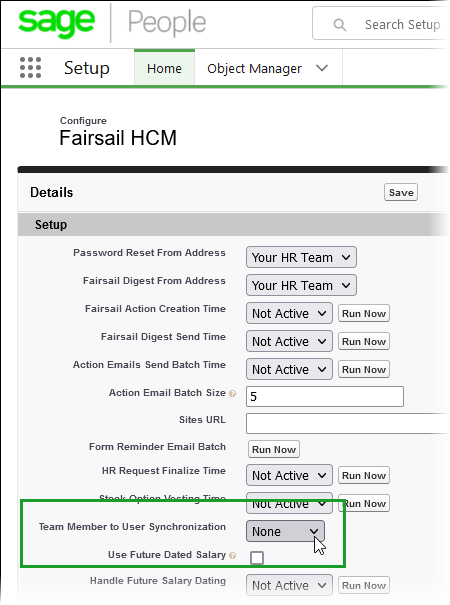
Go to Setup and in Quick Find enter Installed Packages.
-
Find Sage People Human Capital Management and select Configure.
-
On the Configure page, find Team Member to User Synchronization and select None:
Restrict email deliverability
To stop the sandbox sending emails during testing and other configuration:
-
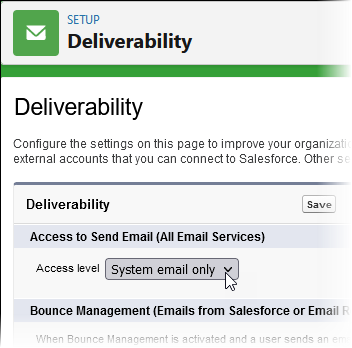
Go to Setup and in Quick Find enter Deliverability.
-
For Access level, select the picklist and choose System email only:
Don’t select No access. No access prevents the system sending verification code and password reset emails, and this can result in complete loss of access.
-
Select Save.
Modify action event settings
To stop Action Events sending unwanted emails from your sandbox, you can change the configuration of individual Action Events. You can also unlink Action Event Patterns from policies.
You can amend Action Events configured to Send To Email Addresses. Do this by either by removing the email addresses or changing them to send to a test user.
If you're testing specific functionality, you can prevent unwanted emails. Do this by unlinking the Action Event Pattern from all policies except the policy associated with your testing.
To unlink the Action Event Pattern:
-
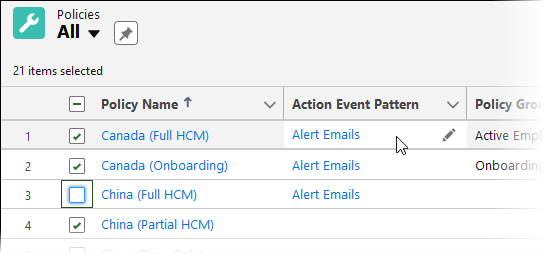
Select the Policies tab.
-
On the Policies home page, select to view All.
-
Ensure the view includes the Action Event Pattern field. If it doesn’t, select List View Controls > Select Fields to Display. Add the field to the view.
-
Select all policies except the policy you’re using for testing.
-
In the Action Event Pattern field for one of the selected policies double-click:
Sage People displays the Action Event Pattern dialog:
 Note
NoteIf the Action Event Pattern dialog doesn't appear, check the Action Event Pattern field in the Policies list view. Make sure it shows the Edit pencil, not a lock. If the field displays a lock, ensure you've added the Action Event Pattern field to the Policy Layout page layout. You need to include the field on the page layout to make it editable on the list view.
-
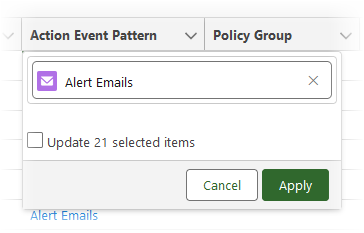
In the Edit Action Event Pattern dialog, clear the Action Event Pattern field by selecting the X to make it blank. You’re going to remove all Action Event Patterns from all policies except the policy you’re using for testing.
-
Select the checkbox to update all selected items.
-
Select Apply.
The system highlights the Action Event Pattern column for all selected policies. Ensure the selection is as you want it.
-
Select Save.
Action Event Patterns are now unlinked from your policies.
Modify action role email addresses
Update any action roles that send to a designated email account. Remove that email address or replace it with an email address linked to a test account. Action roles typically use a group email account accessible by several people.
Action roles are displayed in a related list on HR Department and Work Location detail pages. Select an Action role to display details and select Edit for the action role to change the associated email.
Modify workflows, process builders, and flows
Ensure you deactivate all workflows, process builders, and flows configured to send emails, or change the email addresses to a test user.
Disable Action Digest
When creating a Sandbox, Deliverability is off by default. With Deliverability off and email addresses scrambled, you can leave Installed Package settings, including the Action Digest send time, as they are.
If you've set Deliverability for your sandbox to All Email and team member addresses remain unscrambled:
-
Go to Setup and in Quick Find enter Installed Packages.
-
Find Sage People Human Capital Management and select Configure.
-
On the Configure page find Fairsail Digest Send Time, select the picklist, and choose Not Active.
-
Select Save.
Scramble candidate email addresses
If your org includes Sage People Recruit, ensure you delete or scramble Candidate email addresses to prevent unwanted emails during sandbox testing.
Connected apps and API integrations
Your sandbox doesn't copy connected apps and API integrations built in your production environment during creation or refresh. If you want to use the sandbox to test these integrations you must reconfigure them.
Salesforce sites
Salesforce changes sites URLs when we create your sandbox, but your org configuration still references the production Site URLs. This can affect:
-
Request Prefix in HCM and Recruit form definitions
-
PDF Templates
To change Site Links in HCM Forms:
-
Go to Setup and in Quick Find enter Sites.
-
On the Sites page, copy the Site URL for HCM Forms.
For example, http://sandbox-companyname-hr.force.com/hr
-
Select the HCM Form Definitions tab and on the HCM Form Definitions page select to view All.
-
Select the first form Definition Name.
Sage People displays the HCM Form Definition page.
-
In the Form Definition Details section, select XML Edit.
-
Paste the copied Site URL in the Request Prefix field and add / (forward oblique) at the end.
-
Select Save.
-
Repeat for all configured HCM Forms.
If you’re using Recruit, repeat for the Recruit forms Sites URL. You can find Recruit form definitions listed on the Form Definitions tab.
To change Site links in HCM PDF Templates:
-
Go to Setup and in Quick Find enter Sites.
-
On the Sites page, copy the Site URL for PDF templates.
For example, http://sandbox-companyname-hr.cs39.force.com/PDF
-
Go to Setup and in Quick Find enter Installed Packages.
-
Find Sage People Human Capital Management and select Configure.
-
On the Configure page, find the Sites URL and paste the copied value.
-
Select Save.
To change Site links in Recruit PDF Templates:
-
Go to Setup and in Quick Find enter Sites.
-
On the Sites page, copy the Site URL for Recruit PDF templates.
For example, http://sandbox-companyname-hr.cs39.force.com/RecruitPDF
-
Go to Setup and in Quick Find enter Installed Packages.
-
Find Sage People Recruit and select Configure.
-
On the Overall tab, find the Base URL and paste the copied value.
-
Select Save.
Static resources
To ensure static resources are visible in your sandbox, check static resources used by:
-
Internal Communications
-
Stylesheets
-
HR Noticeboards
If the resource URL includes /resource after ...force.com you need take no further action because the system dynamically updates the URLs.
The system may not dynamically update static resources with other forms of URL and these need uploading to ensure they’re visible in your sandbox.
To display the static resource URL:
-
Go to Setup and in Quick Find enter Static Resources.
-
Select the resource name.
-
On the Static Resource Detail page, select View File.
-
The static resource is displayed in a new browser tab with the URL:

Payflow exports
If you have Payflow services configured to export data you can disable the services so that they do not run on your sandbox.
To find which services are likely to need disabling:
-
Select the Payflow Services tab.
-
Select a view to display all services and ensure the display includes these fields:
-
Batch Start Cron Command
-
Outgoing Server
-
Outgoing Emails
-
Disable exports for Payflow services with values in any of these fields.
To disable Payflow exports:
-
On the Payflow Services list view, select the name of a service with a value in any of these fields:
-
Batch Start Cron Command
-
Outgoing Server
-
Outgoing Emails
-
-
On the Payflow Service Console, select Configure.
-
On the Payflow Configure page scroll to the SFTP Credentials section at the bottom of the page.
-
Delete the Username and select Update Credentials.
-
Scroll up the Payflow Configure page and select Download Configure.
-
On the Download Configure page:
-
Scroll to the Automatic Processing section and delete the value from Batch Start Cron Command
-
In the Managed File Transfer section, delete the value from Outgoing Server
-
-
Select Save.
If there are multiple payflows, you can disable payflow exports. Do this by using Data Loader and exporting from the Payflow Service Object (fpay__Payroll_Service__c ) with the following query:
-
Select Id, fpay__Outgoing_Server__c, fpay__Batch_Start_Cron__c FROM fpay__Payroll_Service__c
Remove all values except for the ID field and upload to the org using "Insert Nulls"