You can display payslips in the Sage People mobile app if you have an active Payflow integration to your payroll provider. Payslips for mobile requires Payflow package version 32.3 or higher.
For information on implementing Payflow for your organization,
Follow these steps to enable payslips for mobile:
-
Assign the Payflow permission set
-
Enable the Payslips process for mobile
-
Enable Payslips in the policy
-
Configure payroll field sets
Assign the Payflow permission set
-
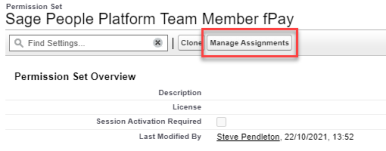
In Salesforce Lightning Experience, go to Setup and select Users, then select Permission Sets.
-
Find the Sage Platform Team Member fPay permission set and click to open it.
-
Click the Manage Assignments button at the top of the page.
-
Click Add Assignment, and select the users you want to have access to the app.
-
Click Next. Sage People displays the Select an Expiration Option For Assigned Users screen. Here, you can set an expiration date for the permission set assignment.
-
Set the expiration date:
-
If you want the permission set assignment to be permanent, the system selects No expiration date by default. Click Assign to continue
-
If you want to assign the permission set for a period of time, select one of the options:
-
1 Day
-
1 Week
-
30 Days
-
60 Days
-
Custom date. Use the date picker to select the expiration date
-
Click Time Zone to choose a time zone if you want to set it to something other than your time zone. Then click Assign.
Sage People displays the Assignment Summary and confirms the Permission set assignment.
-
-
Click Done.
Enable the Payslips process for mobile
Ensure you've enabled a Payslips process for your organization. For help with creating one, see Creating a New WX Process.
-
In Salesforce Lightning Experience, select the App Launcher and open the WX Services item.
In Salesforce Classic, select the All Tabs button and open the WX Services tab.
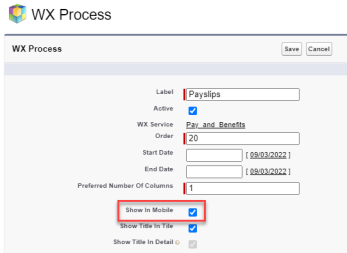
- Open the service that hosts the Payslips process.
- Click the process name to open the process instance page, then click Edit.
-
Enable Show In Mobile for the process.
-
Select Save.
Enable payslips in the policy
You need to enable the Payslips setting in any policies you assign to your app users. This is for those you want to view payslips.
-
In Salesforce Lightning Experience, click the App Launcher and find the Policies item.
In Salesforce Classic, click the Policies tab.
- In the Policies list, click the policy you want to edit.
-
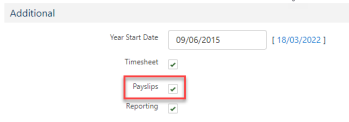
Click Edit. Scroll down to the Additional section, and select the Payslips checkbox.
- Select Save.
Configure payroll field sets
You control the detail fields that display on the payslips page by the content of field sets in the Connector Line object.
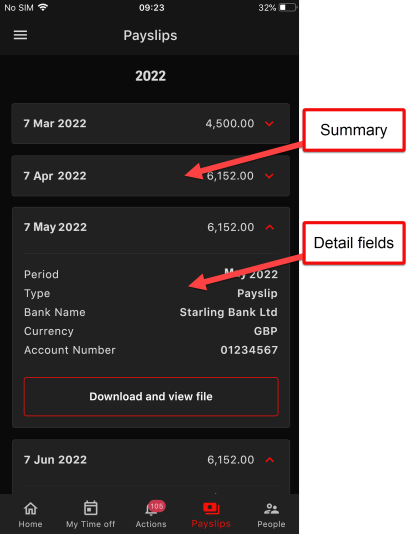
By default, the summary line displays the date you created the payroll line item. You can customize the information you include on the payslips page. Do this by adding or removing fields from the following field sets:
-
Payroll Line Summary
-
Payroll Line Details
To adjust the fields that show for the payslips process:
-
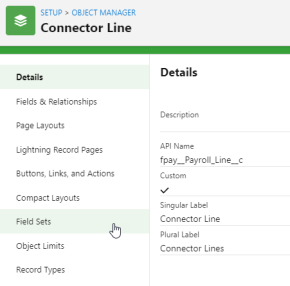
In Setup, go to Object Manager.
-
Search for Connector Line (API name
fpay__Payroll_Line__c). -
Select the object and go to Field Sets.
-
Add items to the following field sets as you need.
The field sets the payslips page uses in the mobile app are as follows.
Field Set What it's used for Payroll Line Summary Defines what the system displays in the summary line for a payroll item in the mobile app.
We recommend you include the following fields in this field set:
-
Pay Date: use this to display the correct pay date for each payslip in the summary line
-
Amount: use this to include the pay amount for each payslip in the summary line
NoteIf you include the Amount field, but don't populate the amount for a payroll line item, the summary line displays "Document". Users can open the payroll item to view and download the document.
Payroll Line Details Defines the detail fields the system shows when a user expands a payroll item.
Fields you include in this fieldset display when users expand the pay item. Add fields that can be useful for team members to see. For example:
-
Period
-
Type
-
Account Name
-
Account Number
-
Currency
NoteIf a field exists in both field sets, the field only displays once.
-