Most orgs are configured so that new items uploaded to Recruit objects, such as candidate resumes, are automatically saved as Salesforce files, rather than attachments. For items held as attachments you can use a batch process to convert existing attachments associated with Recruit objects to Salesforce files.
If your organization uses the Sage People push upgrade service the attachments to files conversion process is run for you. The detail in this section is relevant if you conduct your own package upgrades.
Why files?
-
Each file provides a single source for version control and association with multiple records.
-
Files offer a higher level of security by enabling the use of embedded links to reference files, rather than sending items as attachments to emails.
-
Files require a File Owner, typically a dedicated service account set up for the role. Nominating a dedicated service account helps avoid unauthorized access to, or deletion of items such as candidate resumes.
-
Salesforce Lightning does not work with attachments.
You can find more information about the advantages of using files in Salesforce help: in your org select Salesforce help and search for Salesforce files.
-
The conversion batch can be configured to start at a time to suit your requirements.
-
Bear in mind that orgs with large numbers of attachments to convert can take several hours to process.
-
Because of the potential duration of the conversion process and because email notifications are disabled throughout, avoid running the conversion in the days approaching a payroll run.
-
Batch size is limited to 100,000 items per 24 hour period; the batch automatically restarts on the following day when the limit is reached.
-
Production environments by default have a file creation limit of 200,000 per 24 hour period, giving sufficient capacity for the maximum 100,000 batch size.
-
If you are testing the conversion in a sandbox, Salesforce-imposed defaults limit the number of created files to 2,500 per 24 hour period. Exceeding this limit causes the batch to fail. You can raise a request with Salesforce to increase your sandbox limit, or extend the time available for testing, manually restarting the batch each day until the conversion is complete. If you request an increased limit, Sage People suggests a value of 150,000 to create space for other testing activity.
-
Attachments greater than 10MB are not converted by the batch process. These items must be converted manually by downloading and uploading.
-
Any errors encountered are reported by email to the user running the batch. You can reduce the chance of errors by:
-
Ensuring there are no attachments showing a size of 0 (zero) bytes. A post install script automatically attempts to delete these files but any remaining must be deleted manually.
-
Ensuring there are no files with a file extension but no file name. Each instance raises a separate error and must be manually corrected.
-
Modifying any validation rules likely to cause failures because they do not operate on historical records - typically records created before the validation rule was introduced. Add this condition to the Error Condition Formula of your validation rule to prevent the rule from applying to any records created before the validation rule:
&& DATEVALUE (CreatedDate) >= DATE (yyyy,mm,dd)
where yyyy.mm.dd is the date the validation rule was created.
-
DocuSign user?
If your organization uses DocuSign with Recruit, for example to provide an eSignature service for offer letters, ensure DocuSign is configured to send files in place of attachments:
- Log in to the DocuSign account
- Go to Connect > Salesforce > System Settings
- Select Use Content Files
If Use Content Files is not checked the Recruit conversion batch runs, but DocuSign continues to generate attachments. DocuSign attachments must then be converted to files by running the Recruit conversion batch again until Use Content Files is checked.
As well as providing automated conversion of attachments to files the Sage People Winter 22 release delivered some related changes:
-
When emailing resumes from an application you can no longer select to include all attachments - this checkbox has been removed. Resumes and other attachments are sent exclusively as links.
-
The Apex Class FormDataComponentController has been deprecated. This class was used by custom forms.
Before installing the Recruit package:
-
Ensure your org is configured to upload files, not attachments.
Without this setting, although the conversion batch converts existing attachments to files, new uploads will continue to be uploaded as attachments.
-
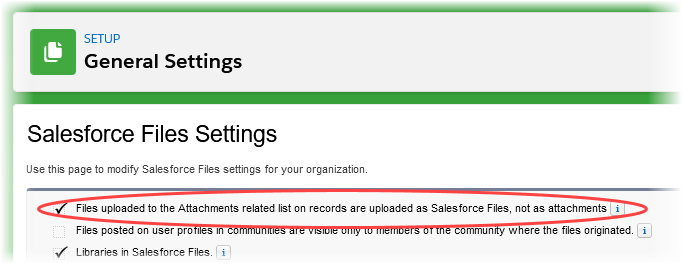
Go to Setup and in Quick Find enter General Settings
-
Ensure Files uploaded to the Attachments related list on records are uploaded as Salesforce Files not as attachments is checked:
-
-
Ensure your org has a File Owner defined.
Following a change introduced by Salesforce in 2020, all records created by guest users are owned by a designated File Owner, not by the guest user. The File Owner is typically a dedicated Service Account set up for the role. Installing the Recruit package runs a series of post-install scripts to convert the ownership of any existing guest user files from the guest user to your site's File Owner.
-
Go to Setup and in Quick Find enter Installed Packages.
-
Find Recruit and select Configure.
-
On the Configure page for Recruit, select the Overall tab.
-
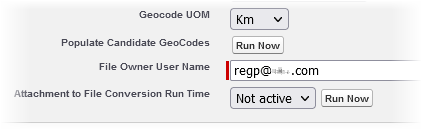
Scroll to the bottom of the page and check File Owner User Name is populated:
-
-
Disable email notifications until after the installation process has completed. This stops your org generating unwanted email notifications triggered by custom workflows in response to changes made by converting files owned by the guest user to ownership by the File Owner.
Because of this requirement Sage People recommends running the installation over a period of low system use, such as a weekend.
-
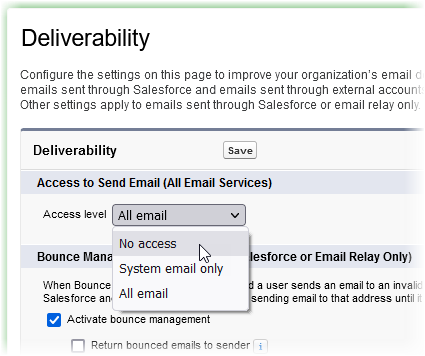
Go to Setup and in Quick Find enter Deliverability.
-
Take a note of the Access Level setting so you can reset it after the installation process.
-
Select the picklist and choose No access:
-
Select Save.
-
-
Set your org to enable Audit field updates.
- Go to Setup and in Quick Find enter User Interface.
- On the User Interface page scroll down to the Setup section and check Enable "Set Audit Fields upon Record Creation" and "Update Records with Inactive Owners" User Permissions.
- Select Save.
This setting enables a creation date to be set for the converted files.
-
Create a Permission Set with a single setting:
-
Go to Setup and in Quick Find enter Permission Sets.
-
Select New.
-
In Label enter RecruitFileConversion.
-
In License select Salesforce
-
Select Save.
Sage People creates the new Permission Set and opens the Permission Set setup page.
-
Scroll to the System section and select System Permissions.
-
In the System Permissions section select Edit.
-
Find and check Set Audit Fields upon Record Creation.
-
Select Save.
-
You are asked to confirm. Select Save.
-
Now install the Winter 22 Recruit package.
When installed and you have received the ...Install Successful email:
-
Confirm the Guest User Migration has run successfully:
- Go to Setup and in Quick Find enter Apex Jobs.
-
In the list of Apex Jobs look for the Apex Classes GuestUserMigrationBatch:
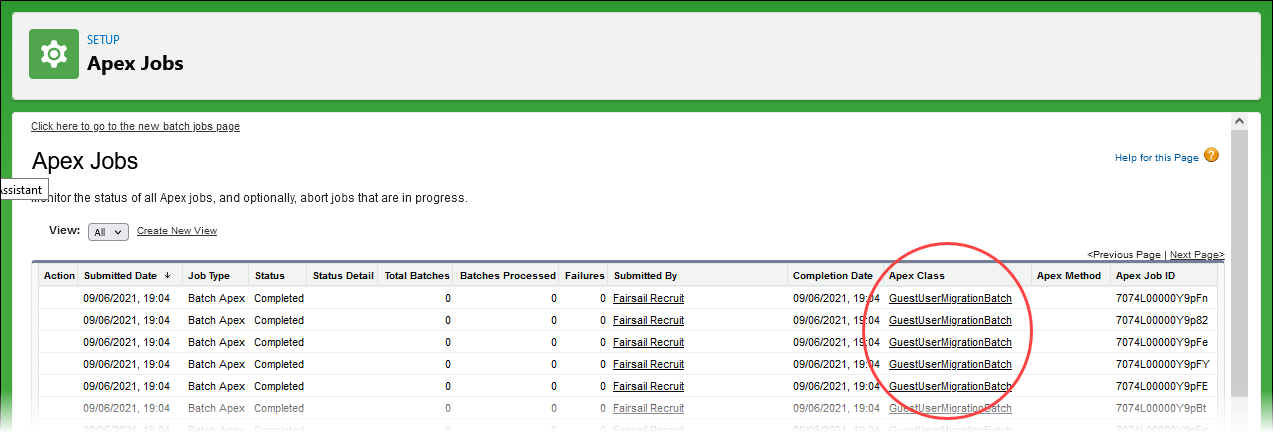
One batch runs for each of the 19 Recruit objects.
If records owned by the Guest User were found Total Batches shows the number of records found.
If no records owned by the Guest User were found on an object, Total Batches shows 0.
- For each of the GuestUserMigrationBatch lines, ensure the Total Batches and Batches Processed values are the same.
-
Assign the Permission Set created before you started the installation to the user who is going to run the file conversion:
-
Go to Setup and in Quick Find enter Permission Sets.
- Select the Label for the RecruitFileConversion Permission Set.
- On the Permission Set Overview page select Manage Assignments.
- On the Assigned Users page select Add Assignments.
- Select the User you want to run the file conversion.
-
Select Assign.
Sage People displays the Assignment Summary page for the Permission Set with your user assignment listed.
- Select Done.
-
- Reset email notifications to the value they had before starting the upgrade:
Go to Setup > Email > Deliverability.
Select the Access Level picklist and choose the correct value for your organization, typically All email.
Select Save.
-
Run the file conversion.
Because of the potential duration of the conversion process and because email notifications are disabled, avoid running the conversion in the days approaching a payroll run.
When you are ready to run the conversion:
- Go to Setup and in Quick Find enter Installed Packages.
- Find the Recruit package and select Configure.
-
On the Overall tab, scroll to the bottom of the page to Attachment to File Conversion Run Time:
-
Select the Not active picklist and choose a time to start the conversion.
You can choose any time in the next 24 hours; select a time when you expect minimal activity on your org, such as after close of business on a day before a non-working day. The batch starts at the time you choose.
Do not select Run Now unless you want the batch to start immediately.
When the conversion batch is running Run Now is disabled.
Run Now is re-enabled when the attachments to files conversion process has completed - selecting it at that stage does not cause issues.
Any errors occurring while the batch is running are reported in a daily email sent to the user who launched the batch.
Errors can include:
-
An attachment has failed to convert. The ID of the failed item is included in the email - use the ID to locate the attachment, download and upload it manually.
-
-
When the conversion has completed, remove the Permission Set from the user and delete the Permission Set:
-
Go to Setup and in Quick Find enter Permission Sets.
- Select the Label for the RecruitFileConversion Permission Set.
- On the Permission Set Overview page select Manage Assignments.
- On the Assigned Users page select the user assigned to the Permission Set.
-
Select Remove Assignments.
You are asked to confirm.
- Select OK.
- Select Done.
- Go to Permission Sets.
-
For the RecruitFileConversion Permission Set select Del.
You are asked to confirm.
- Select OK.
-
- When you have deleted the Permission Set, reset your org to disable Audit field updates:
- Go to Setup > User Interface > User Interface.
- Scroll down to the Setup section and uncheck Enable "Set Audit Fields upon Record Creation" and "Update Records with Inactive Owners" User Permissions.
- Select Save.