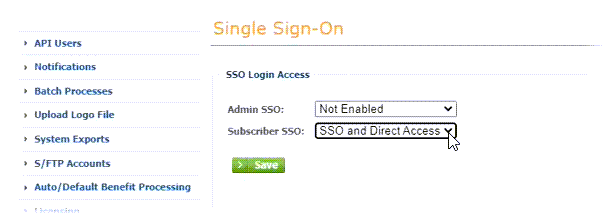
Start by enabling SSO in your PlanSource environment:
-
Login to PlanSource as an administrator.
-
Go to System > Single Sign-On.
-
On the Single Sign-On page select the picklist for Subscriber SSO and choose SSO and Direct Access:
-
Select Save.
Production orgs configured with a standard My Domain suffix of .my.salesforce.com are supported with PlanSource master settings and do not need further configuration. For these orgs, ignore the following steps.
For orgs configured with a My Domain suffix of .cloudforce.com follow these steps:
-
Login to PlanSource as an administrator.
-
Go to System Administration > System > Single Sign On
-
Select the OpenId tab.
-
Complete the fields as follows:
Field
Description
Enable Checkbox. Checked.
When you enable enhanced domains for your org, your cloudforce.com My Domain name is automatically converted to a my.salesforce.com domain and Enable must be unchecked.
Client Initiation URL Record the displayed value to use as the Employee SSO Start Point when configuring Sage People. Redirect URL Leave the value as displayed. Issuer URL Enter the value of the Current My Domain URL including the leading https:// as retrieved from the Sage People org.
Use Discovery Checkbox. Select. Use subject claim mapping Checkbox. Select. Subject claim modification type Picklist. Select Remove Prefix Subject claim modification text Enter: https://login.salesforce.com
Use mTLS (SSL mutual authentication) Checkbox. Do not select. Send scope to token endpoint Checkbox. Do not select. Send nonce with authorization Checkbox. Select. -
Select Save.
