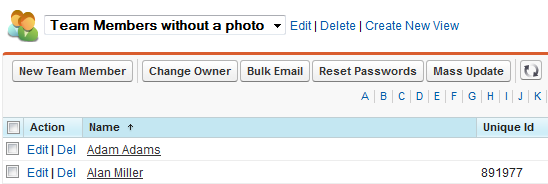
You can create a new view by:
-
Copying an existing view by saving it under a new name, editing it to make the changes you want.
-
Creating a new view from scratch.
To copy and rename an existing view:
-
At the top of the list page or tab home page hosting the view you want to copy, select the View picklist, select the view on which you want to base your new view, and select Edit:

Sage People opens the Edit View page.
-
In View Name enter a new name for your new view to prevent the original from being overwritten, or the new view being saved with the same name as the original.
-
Make the changes you need to create your new view.
-
Select Save As.
If you have not entered a new name for your view:
-
Selecting Save As saves the new view with the same name as the original and both will appear in the list of available views. You can change a view name by selecting it, selecting Edit, and renaming it.
-
Selecting Save instead of Save As overwrites the original view.
-
To create a new view for a list page or tab home page from scratch:
-
At the top of the page for which you want to create a new view select Create New View:

Sage People displays the Create New View page:
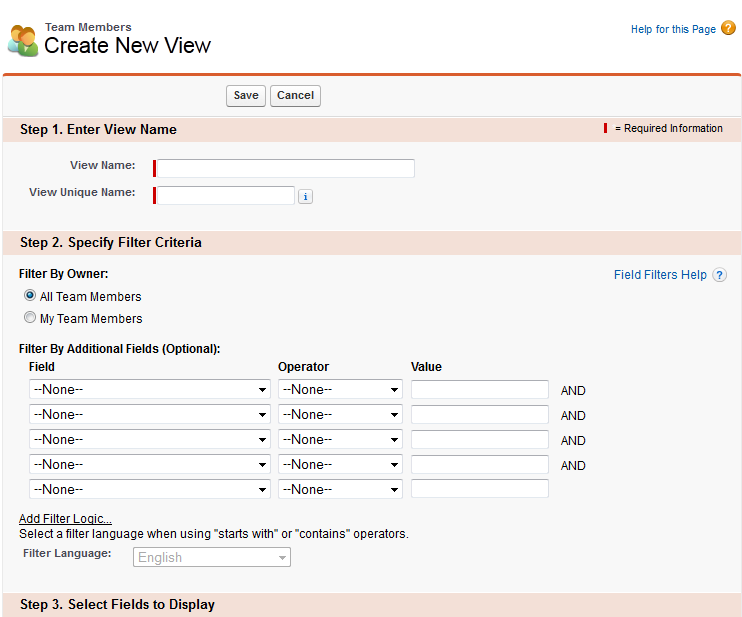
The exact content of this page depends on the kind of record you are viewing.
-
Complete the fields in the Step 1. Enter View Name section as follows:
Field Description View Name Enter the name to appear in the View picklist View Unique Name If you have Customize Application permission, enter a unique name to be used by the system. The View Unique Name:
-
Must begin with a letter.
-
Must use only alphanumeric characters and underscores.
-
Must not end with an underscore.
-
Must not use two consecutive underscores.
If you leave this field blank, Sage People constructs a unique name from the View Name you have entered.
-
-
Complete the fields in the Step 2. Specify Filter Criteria section as follows:
Field Description Filter By Owner Select the radio button corresponding to the set of records you want to filter against. The options vary depending on the kind of record. For Team Member views you will see:
-
All Team Members
Select to create a view that filters data for all Team Members.
-
My Team Members
Select to create a view that filters data for Team Members reporting to you.
Filter By Additional Fields Select your filter criteria. This is optional. The fields and values available to you vary depending on the kind of record. You can apply multiple filters to act on your data.
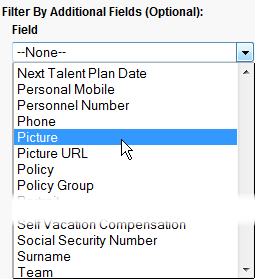
As an example, to create a view to display all Team Members without a photo:
-
In the first Field select the picklist and choose Picture:
-
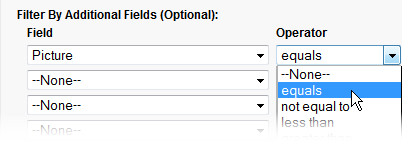
In Operator select the picklist and choose equals:
-
As we're filtering for those Team Members without a photo, leave Value blank:

-
-
Complete the fields in the Step 3. Select Fields to Display section as follows:
Field Description Available Fields Select the fields you want to display by selecting them, then select Add:
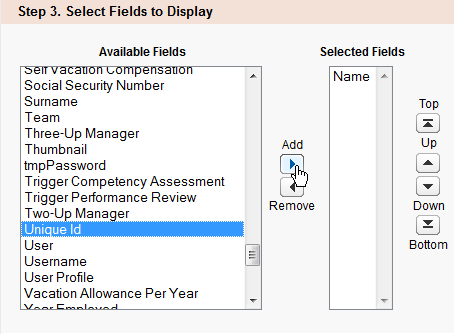
You can choose up to 15 different fields to display in your view. You can display only the fields that are available in your page layout. When you select a long text area field, up to 255 characters are displayed in the list view.
Use Remove to take fields off the Selected Fields list.
Use the Up, Down, Top, and Bottom arrows to sort your selected fields into the order you want the view to display.
-
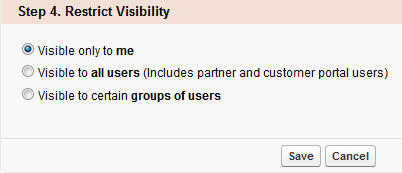
Complete the fields in the Step 4. Restrict Visibility section as follows:
Field Description Restrict Visibility Select the radio button corresponding to who you want to be able to use the view you are creating:
-
Select Save.
The view you created is displayed and added to the picklist of views for you to use again:
