The Competency Library stores competencies for assessments and development needs.
To create a new competency:
-
Select the Competency Library tab.
Sage People displays the competency Library Home page.
-
Select New.
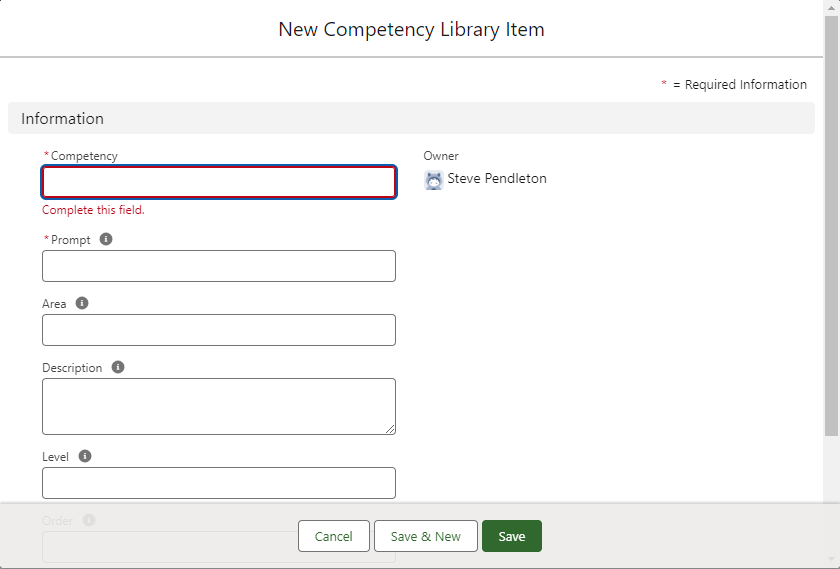
Sage People displays the New Competency Library Item page:
-
Complete the fields as follows:
Field
Description
Competency
A name for the competency.
Prompt
A brief description of the competency to be displayed as a prompt when entering an assessment of the competency in an online questionnaire.
Area
The name of the group hosting the competency. Enter the name of the Area if these are used by your organization.
Description
A text description of the competency. This is typically an expanded version of the content of Prompt.
Level
The level of this competency within a job family. Enter a level if these are used by your organization.
Order
A number assigned to the competency to control the order in which it is displayed in an online questionnaire. 1 for first, 2 for second and so on.
Picture
The unique identifier for an image associated with this competency. Pictures can be displayed next to the competency, for example in the WX Recognition process.
Pictures must be available to your Sage People org. Icons are hosted on the Documents tab, which is only available in the Salesforce Classic interface, not in the Salesforce Lightning Experience.
-
To use an image you already have available in your org, switch to Classic and go to the Documents tab. Navigate to the image, select View file, and copy the unique identifier from the browser address bar. The unique identifier is the string of 15 characters and numbers at the end of the URL. Paste the identifier in Picture.
-
To use a new image:
-
Select your user icon and then select Switch to Salesforce Classic.
-
Go to the Documents tab. If it is not displayed on your tab bar, select + All tabs, and then select Documents.
-
On the Documents Home page, select the Folder where you want to upload the logo and select Go!.
-
On the folder listing page, select New Document.
-
On the Upload New Document screen, complete the fields as follows:
Field What to enter Document Name Enter a name for the document. The name is displayed in the list of Documents. Document Unique Name Automatically completed based on the name. Indicate Document is Internal Checkbox. Check to add a flag to indicate to document viewers the document is for internal use only and should not be shared with people outside the organization. Does not apply any security policy on the document. Externally Available Image Checkbox. Check to enable users to add images to documents that can be accessed by anyone, such as in logos in email template letterheads.
Folder Picklist. Defaults to the folder where you selected New Document. Description Optional. Enter a description of the document, displayed in the list of documents. Keywords Optional. Enter keywords that can be used to search for this document. -
In the 2. Select the File section, for File to upload, select Choose File and follow your browser prompts to select a file from your computer.
-
Select Save.
-
Select View file.
-
From the browser address bar, copy the unique identifier, which is the string of 15 letters and numbers at the end of the URL.
-
When you are finished with the Documents tab, from the page header select Switch to Lightning Experience.
-
-
-
Select:
- Save to save and close the New Competency Library Item page.
- Save & New to add another competency.
