Any data to be uploaded must be prepared in the correct format. Ideally, use the Sage People Template Generator to create the template files you use to hold the data you want to upload.
If you create your own template files, make sure that the API field names specified in the first record of a file to be uploaded are complete with object prefixes as appropriate to ensure that fields are fully and correctly identified; for example:
-
Use
fHCM2__Employment__c.fHCM2__Start_Date__cas an API field name, NOT just fHCM2__Start_Date__c
The procedure for uploading data for Team Member, Employment Record, and Salary data (typically, current data) differs from that for other records. You must upload current data before attempting to upload history data.
When your data file is ready:
-
On the Data Loader home page, select Team Member, Employment and Salary:

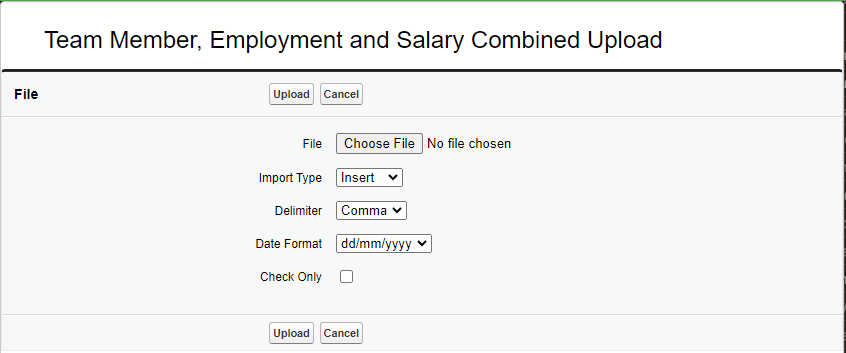
Sage People displays the Team Member, Employment and Salary Combined Upload page:
-
Complete the fields as follows:
Field Description File
The file you want to upload. Select Browse... to find and select the file.
Import Type
Picklist. Select the picklist and choose from:
-
Insert
-
Update
To modify existing records. Update adds data to existing records. Use update if the file contains just new values for existing team members.
-
Upsert
To add new records and modify existing records with a single file. Use Upsert if the file contains a mix of updates to existing records and new records to insert.
Delimiter
Picklist. The separator used between fields in the file. Select the picklist and choose from:
-
Comma
-
Tab
-
Pipe
Date Format
Picklist. The format used to represent dates in the file. Select the picklist and choose from:
-
dd/mm/yyyy
-
mm/dd/yyyy
Dates must be consistently represented in either dd/mm/yyyy or mm/dd/yyyy format. Do not mix formats in a single file. The separator between date components is not important; you can use slash (/), stop (.), hyphen (-), or underscore (_). But the Data Loader expects to find dates represented in the form:
<2 digits><separator><2 digits><separator><4 digits>
...and will fail to load the file if dates do not comply.
Check Only
Checkbox. To validate the data file before loading.
If checked, the file is validated and not loaded. Use this setting to trap errors and fix the causes before attempting to load a file.
If unchecked, the Data Loader attempts to load the file immediately after checking if no errors are found.
-
-
Select Upload.
Sage People displays a confirmation message. The message adjust according to the Import Type:
-
When using Insert as the Import Type:
Message text: You have selected Import type 'Insert' to add new records. The data load cannot be reversed. Do you want to proceed?
-
When using Update as the Import Type:
Message text: You have selected Import type 'Update' to modify existing records. The data load cannot be reversed. Do you want to proceed?
-
When using Upsert as the Import Type:
Message text: You have selected Import type 'Upsert' to add new records and modify existing records. The data load cannot be reversed. Do you want to proceed?
-
-
Select:
-
Yes, Confirm to proceed with the data load
-
Cancel to abandon the data load and return to the Data Loader Home page.
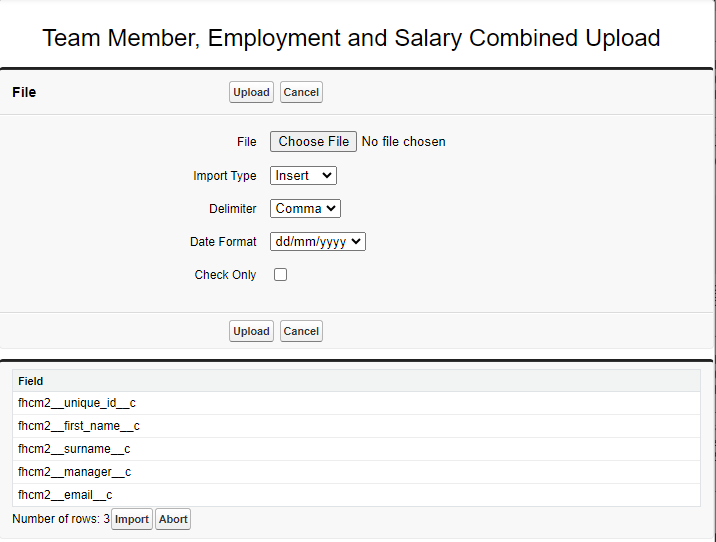
Sage People attempts to read the file and lists the file headers and number of rows in the File Details section:
-
-
In Field check:
-
The correct fields are listed.
-
The correct number of data records is displayed against Number of rows.
-
-
If Field confirms that the data file contains the data you want to load, select Import to upload the data. Otherwise, select Abort.
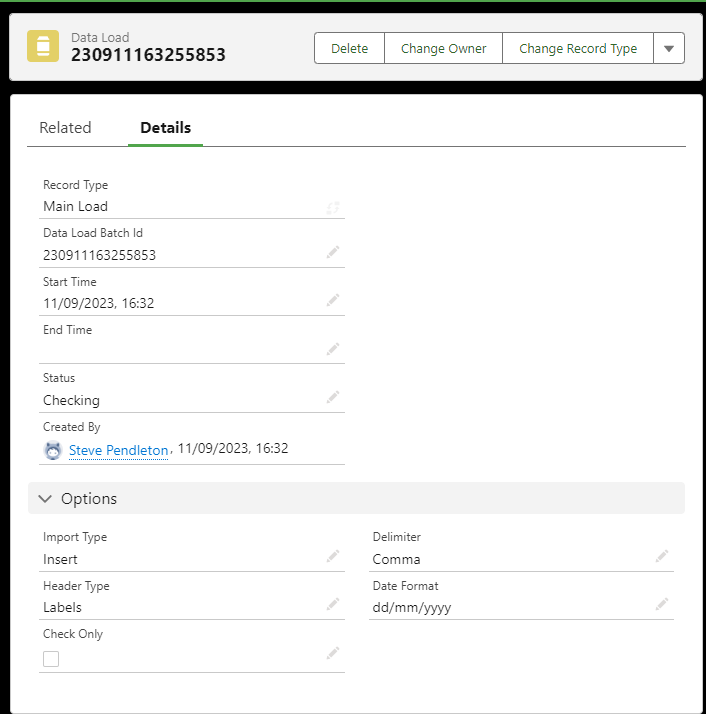
When importing, Sage People displays the Data Load Detail page:
You can use the Data Load Detail page to:
-
Follow the progress of the data load - see Status.
-
View any errors generated as part of the data load process. The error list is loaded as a text file attachment in the Notes & Attachments related list, and also sent to the email address of the user running the upload.
-
Re-run the data load.
Data Load Detail pages also provide a range of additional information and options for data loads.
-
-
Open the email sent to the email address of the user running the upload.
-
If errors were identified when an import ran, they are listed in an ErrorList text file attached to the Data Load Detail page in the Notes & Attachments related list, and in the email. Any errors result in an aborted upload - you must fix the cause of the errors and re-run the upload.
-
If you were running a Check Only upload and no errors were found, the email subject is Check Complete and the email confirms Operation Complete and the number of rows identified in the file. You can now uncheck Check Only and re-run the upload.
-
If you were running an upload with Check Only not checked and no errors were found, the email subject is COMPLETE and the email confirms Operation Complete and the number of records imported.
Note If you see the error Page Not Available, this is likely due to your system having the clickjack protection setting enabled. You can add the URLs *.vf.force.com and *.lightning.force.com to your trusted domain list to navigate this issue. -


