Any data to be uploaded must be prepared in the correct format. Ideally, use the Sage People Template Generator to create the template files you use to hold the data you want to upload.
If you create your own template files, make sure that:
-
Each record includes the Unique Id (fHCM2__Unique_Id__c) field to uniquely identify the team member to which the record applies.
The procedure for uploading data for single objects (typically, history data) differs from that for team member, employment record, and salary data. You must upload current data before attempting to upload history data.
Ensure files containing history data do not contain current values as well. For example, a current salary loaded incorrectly as part of a salary history record would be stored against the same date as a current salary loaded correctly as part of an Employment record current data load, leading to duplication and potential confusion.
-
There are special requirements when loading data for some objects:
-
Absence Carryover Bucket
The Absence Carryover Bucket object has the required field:
- Absence Accrual Name of the absence accrual associated with the absence carryover bucket.
This field enables Sage People to identify the correct record for the Absence Carryover Bucket object.
When creating the file for initial data upload using the Insert option, make sure you include:
-
The labels for these fields in the first line of the file:
-
fHCM2__Absence_Accrual__c
The absence accrual name.
-
Expiry_Date
The Expiry Date of the absence carryover bucket.
-
Amount
The Amount of the carry over you want to load for the absence carryover bucket.
-
-
Data for each of these fields in each record.
When updating existing data using the Update option, make sure you include:
-
The labels for these fields in the first line of the file:
-
fHCM2__Absence_Accrual__c
The absence accrual name.
-
Unique Id
The name of the absence carryover bucket.
-
Expiry_Date
The Expiry Date of the absence carryover bucket. Can be excluded if you are not updating any expiry date values.
-
Amount
The Amount of the Carry Over you want to load for the Absence Carryover Bucket. Can be excluded if you are not updating any Amount values.
-
-
Data for each of these fields in each record.
-
Beneficiary
The Beneficiary object has three required fields:
-
Unique Id of the team member holding the benefit.
-
Benefit record type of the benefit associated with the beneficiary.
-
Benefit start date of the benefit associated with the beneficiary.
These fields enable Sage People to identify or create the correct record for the Beneficiary object.
When building the template, make sure you include labels for these fields in the first line of the template file like this:
Unique Id,Benefit Start Date,Benefit record type,Amount Benefit,Dependant name,Beneficiary Start Date,Beneficiary End Date
You can also include the optional field:
-
Dependant name
-
The order of the fields in the first line of the template file is not important.
-
-
Job History: use the Set processed date on old Job Histories button on the HCM Configure page.
Job history is a table linked to the employment record. Job history stores the history of key job details for a team member. Job history records are automatically generated when a change is made to Job Effective Date in the employment record. Selected fields held in the team member and employment records are then used to supply values for the job history.
When implementing Sage People, existing employment history can be used to populate job history.
You can also create a new job history record manually and give the record an effective date in the future. The related change is processed on the Effective Date. If you need to make a new job history record for past employment history, adding a new employment record gives you more control over the dates than adding a new job history record.
By default, job history tracks changes to these fields:
-
Manager
-
Job
-
Job Title
-
Job Profile
-
Function
-
Grade
-
Salary Band
You can extend this list with more fields if you need to track them too.
Job Effective Date is set by:
-
Creating a new team member. The Start Date value is mandatory and is copied to the Job Effective Date for both the team member and employment records.
-
Entering a job change. Job Effective Date is a mandatory field and is copied to both the team member and employment records.
-
Finalizing an employment change request (HR request). The HR request effective date is copied to the Job Effective Date for both the team member and employment records.
-
Creating a new job history record directly, with an explicit Job Effective Date which can be in the future.
Each of these actions creates a new job history record.
To configure job history:
-
To add fields to the Job History object:
-
Go to Setup > Object Manager, and select the Job History object.
-
From the sidebar, select Fields & Relationships, and then select New.
-
Create any new custom fields on this object with the same name and same type as in the Team Member or Employment Record object:
- Unlike fields in the HR Request object, Job History object does not require a prefix. If you have a field called Product in the Employment Record, it is created as E_Product in the HR Request object, and as Product in the Job History object.
-
When you have a picklist field on the Team Member or Employment Record object, create the field as a text field in the Job History object.
-
-
The Job History field set in the Employment Record controls which fields are tracked. Ensure the Job History field set contains the fields you want to track. If you add any fields to the Job History field set, you must create matching (same name, same type) fields in the Job History object.
NoteIf you add a field to the Job History field set but do not have a matching field in the Job History object, you will get the following error message:
Job History View and Edit pages use Visualforce pages using the field set and field types from the Employment and Team Member records. Any fields added to the field set automatically display on the Job History View and Edit pages.
-
Add the Job History related list to the page layout for the Employment Record. For more information see Page layouts, search layouts, related lists.
-
Next, configure the automated processing settings for Job History. Go to Setup, and in Quick Find enter installed, and select Installed Packages from the results.
-
In the main window, against Sage People Human Capital Management, select Configure.
Sage People displays the Configure page with the job history options:

-
Set the job history options as follows:
Option Description Job History Checkbox. If checked, changes to fields in the Employment Record Job History Field Set are saved to the Job History record for the Team Member.
Use Future Dated Job History Checkbox. If checked, new Job History records created with Effective Dates in the future are processed on the Effective Date.
When checked, the Set processed date on old Job Histories button and the Handle Future Job History Dating picklist are both activated, and a popup is displayed enabling you to run the Job History Past Date batch.
- Select the Set processed date on old Job Histories button to run the Job History Past Date batch. The batch adds today's date as the Processed Date on all pre-existing Job Histories with effective dates before today, preventing the Job History Future Date batch from executing these Job Histories for a second time.
- Use the Handle Future Job History Dating picklist to set a daily time to run the Job History Future Date batch. The Job History Future Date batch processes Job History records with Effective Dates of today.
Set processed date on old Job Histories Button. Activated when Use Future Dated Job Histories is checked. If selected, adds todays date to the Processed Date field on existing Job History records with Effective Dates up to and including today, and prevents the Job History Future Date batch from executing pre-existing future dated job histories for a second time.
Select:
- Before implementing Future Dated Job History.
- After creating a Job History record with an Effective Date in the past, for example to record a recent change to Job History for a Team Member, or when bulk loading historical job history data.
Handle Future Job History Dating Picklist and Run Now button. Used with Use Future Dated Job Histories and activated when Use Future Dated Job Histories is checked. Sets a daily time to run the Job History Future Date batch to process Job History records with Effective Dates of today. The batch runs at the time you select every day. Job History changes are processed if the effective date is:
- Today.
- After the Team Member's Start Date.
- Before the Team Member's End Date.
Select the picklist and choose the hour of the day you want the batch to run.
Select Run Now to run the batch immediately.
If you do not set a time to run the Job History Future Date batch, future dated Job Histories are not processed daily and you must use the Set processed date on old Job Histories button to run the Job History Past Date batch again in the future.
-
Select Save.
-
-
When your data file is ready:
-
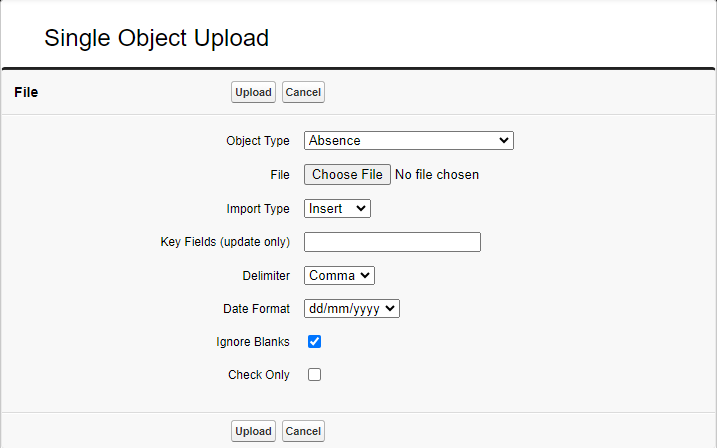
On the Data Loader Home page, select Individual Object:

Sage People displays the Single Object Upload page:
-
Complete the fields as follows:
Field Description Object Type
Picklist. The object you want to update with the data contained in the file.
File
The file you want to upload. Select Browse... to find and choose the file.
Make sure that the first field of every record in the file is the Unique Id of the Team Member to which the record applies.
Import Type
Picklist. Select the picklist and choose from:
-
Insert
To add wholly new data to Sage People. Insert creates new records.
-
Update
To modify existing records. Update adds data to existing records.
Key Fields (update only)
API field names. Enables you to selectively update records based on the content of one or more key fields when the data you want to change is for a field or fields that could apply to multiple records, such as start or end dates.
Enter the API field names for the fields you want to act as key fields. There is no need to enter Unique ID or Record Type because these fields are assumed to be Key and are used by default.
For example, to update the Deduction End Date for Benefit records where the Deduction Code is DC005, enter:
fHCM2__Deduction_Code__cas the key field. The template could include:
fhcm2__unique_id__c,fhcm2__record_type__c,fHCM2__Deduction_Code__c, fHCM2__Deduction_End_Date__cand the upload file then contains records of the form:
001024,Benefit,DC005,30/06/2014Delimiter
Picklist. The separator used between fields in the file. Select the picklist and choose from:
-
Comma
-
Tab
- Pipe
Date Format
Picklist. The format used to represent dates in the file. Select the picklist and choose from:
-
dd/mm/yyyy
-
mm/dd/yyyy
Dates must be consistently represented in either dd/mm/yyyy or mm/dd/yyyy format. Do not mix formats in a single file. The separator between date components is not important; you can use slash (/), stop (.), hyphen (-), or underscore (_). But the Data Loader expects to find dates represented in the form:
<2 digits><separator><2 digits><separator><4 digits>
...and will fail to load the file if dates do not comply.
Ignore Blanks
Checkbox. To determine how blank fields in the upload file are treated. Checked by default.
If checked, blank fields in the upload are ignored.
If unchecked, blank fields in the upload file overwrite existing field content with blanks.
Check Only
Checkbox. To validate the data file before loading.
If checked, the file is validated and not loaded. Use this setting to trap errors and fix the causes before attempting to load a file.
If unchecked, the Data Loader attempts to load the file immediately after checking if no errors are found.
-
-
Select Upload.
Sage People displays a confirmation message. The message adjust according to the Import Type:
-
When using Insert as the Import Type:
Message text: You have selected Import type 'Insert' to add new records. The data load cannot be reversed. Do you want to proceed?
-
When using Update as the Import Type:
Message text: You have selected Import type 'Update' to modify existing records. The data load cannot be reversed. Do you want to proceed?
-
-
Select:
-
Yes, Confirm to proceed with the data load
-
Cancel to abandon the data load and return to the Data Loader Home page.
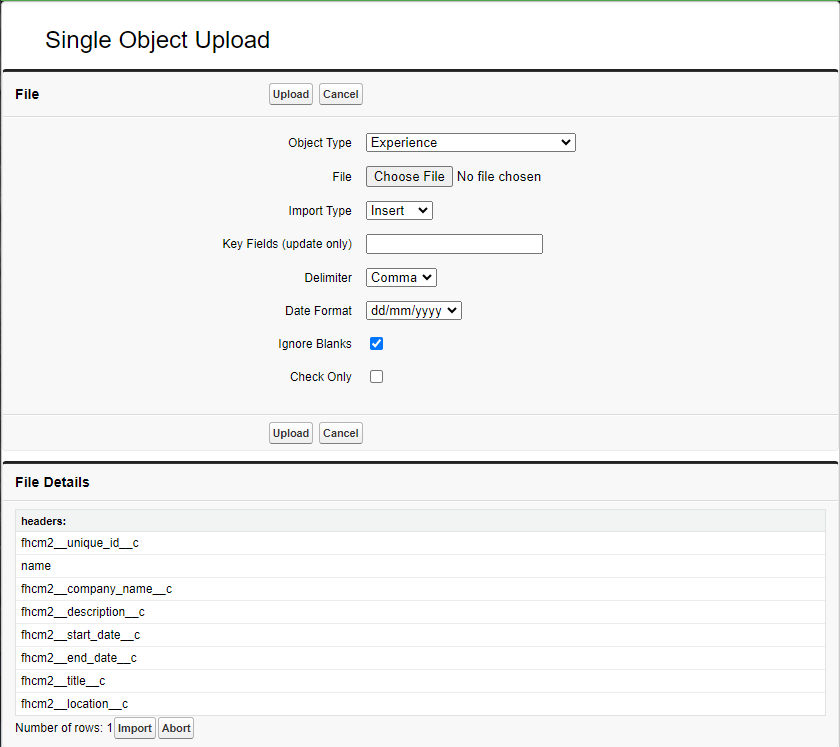
Sage People attempts to read the file and lists the file headers and number of rows in the File Details section:
-
-
In File Details, check:
-
The correct fields are listed.
-
The correct number of data records is displayed against Number of rows.
-
-
If File Details confirms that the data file contains the data you want to load, select Import to upload the data. Otherwise, select Abort.
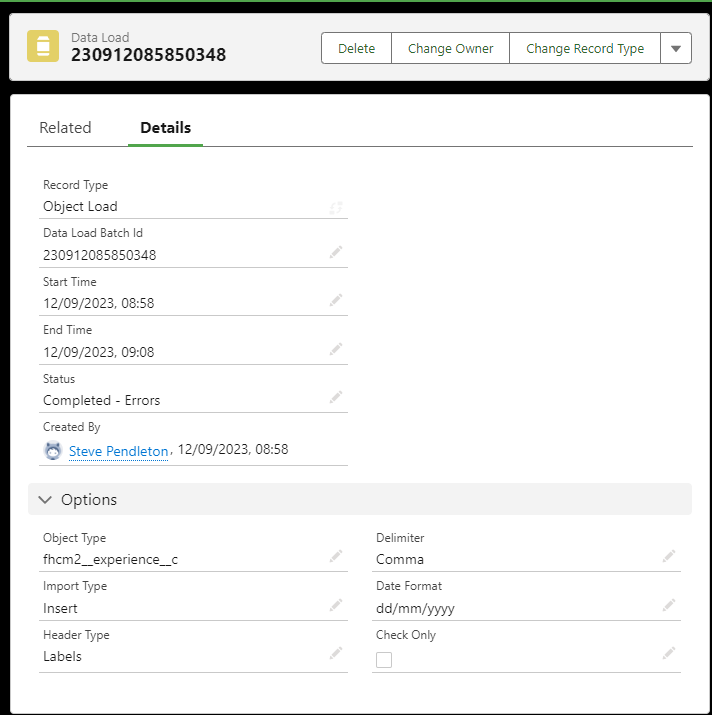
When importing, Sage People displays the Data Load Detail page:
You can use the Data Load Detail page to:
-
Follow the progress of the data load - see Status.
-
View any errors generated as part of the data load process. The error list is loaded as a text file attachment in the Notes & Attachments related list, and also sent to the email address of the user running the upload.
-
Re-run the data load.
Data Load Detail pages also provide a range of additional information and options for data loads.
-
-
Open the email sent to the email address of the user running the upload.
-
If errors were identified when Import ran, they are listed in the email. Any errors result in an aborted upload - you must fix the cause of the errors and re-run the upload.
-
If you were running a Check Only upload and no errors were found, the email subject is No Errors and the email confirms Operation Complete and the number of rows identified in the file. You can now uncheck Check Only and re-run the upload.
-
If you were running an upload with Check Only not checked and no errors were found, the email subject is Complete and the email confirms Operation Complete and the number of records imported.
-


