Overview
Snapshot reporting lets you create point-in-time reports. It does this by scheduling a source report to take any data from which you can generate a report and creates records. The records go into a new receiving object we call a Reporting Snapshot Object. Each time the scheduled report runs, the system creates a new record in the receiving object. This captures the data values the source objects hold at that time. After the system creates the records, you can report on that data. Do this by creating point-in-time reports with the report type Reporting Analytics Snapshot.

If you don't configure reporting snapshots correctly, you can't create point-in-time headcount reports.
Limitations
- The maximum number of source report columns you can map to target fields is 100.
-
When a reporting snapshot runs, it can add a maximum of 2000 new records to the target object. For this reason, a snapshot report can't contain more than 2000 team members. If you have more than 2000 team members in your organization, you need to create multiple snapshot reports. You can then filter each report to control the number of team members you export in each report. For example, you can choose to filter by country or business area. See sections Update the Reporting Snapshot Export Report and Schedule the reporting snapshot for more details.
-
You can only create point-in-time reports for a time period after you set up snapshot reporting and you scheduled the source report to run.
Troubleshooting
See Salesforce help topic on troubleshooting snapshot reporting for further troubleshooting tips. This includes snapshot error messages.
| Problem | Possible Solution |
|---|---|
| My field isn't available to select when I go to map my field in the Reporting Snapshot Field Mappings. |
Check you've added the field to the Reporting Snapshot Export Report. |
Modify fields in the reporting snapshot
Review the fields included in the reporting snapshot
The fields in the table are managed package fields in the Reporting Snapshot object.
Sage People doesn't recommend adding additional fields unless they're absolutely necessary for headcount point-in-time reporting. However, if you need to add any fields to the default mapping, see Add fields to the Reporting Snapshot object.
|
Field Label |
API Name |
Data Type |
|---|---|---|
|
Business |
Business__c |
Text(255) |
|
Country |
Country__c |
Text(100) |
|
Division |
Division__c |
Text(255) |
|
|
Email__c |
Text(255) |
|
Employment Basis |
Employment_Basis__c |
Text(100) |
|
Employment Bonus |
Employment_Bonus__c |
Percent(5, 2) |
|
Employment Commission Plan |
Employment_Commission_Plan__c |
Text(100) |
|
Employment Continuous Service Date |
Employment_Continuous_Service_Date__c |
Date |
|
Employment Contract End Date |
Employment_Contract_End_Date__c |
Date |
|
Employment Cost Code |
Employment_Cost_Code__c |
Text(100) |
|
Employment End Date |
Employment_End_Date__c |
Date |
|
Employment FTE |
Employment_FTE__c |
Number(1, 3) |
|
Employment Hours Worked |
Employment_Hours_Worked__c |
Number(3, 1) |
|
Employment Job |
Employment_Job__c |
Text(255) |
|
Employment Last Working Date |
Employment_Last_Working_Date__c |
Date |
|
Employment On Track Bonus |
Employment_On_Track_Bonus__c |
Currency(16, 2) |
|
Employment On Track Commission |
Employment_On_Track_Commission__c |
Currency(16, 2) |
|
Employment Payroll Number |
Employment_Payroll_Number__c |
Text(100) |
|
Employment Probation End Date |
Employment_Probation_End_Date__c |
Date |
|
Employment Reason For Leaving |
Employment_Reason_For_Leaving__c |
Text(255) |
|
Employment Salary Band |
Employment_Salary_Band__c |
Text(100) |
|
Employment Start Date |
Employment_Start_Date__c |
Date |
|
Employment Status |
Employment_Status__c |
Text(50) |
|
Employment Work Location |
Employment_Work_Location__c |
Text(255) |
|
First Name |
First_Name__c |
Text(100) |
|
Function |
Function__c |
Text(255) |
|
Grade |
Grade__c |
Text(50) |
|
HR Department |
HR_Department__c |
Text(100) |
|
Job Profile |
Job_Profile__c |
Text(255) |
|
Job Title |
Job_Title__c |
Text(255) |
|
Location |
Location__c |
Text(255) |
|
Manager Name |
Manager_Name__c |
Text(255) |
|
Payflow Download Status |
Payflow_Download_Status__c |
Text(50) |
|
Salary Amount |
Salary_Amount__c |
Currency(16, 2) |
|
Salary Annual Multiplier |
Salary_Annual_Multiplier__c |
Number(12, 4) |
|
Salary Change Reason |
Salary_Change_Reason__c |
Text(255) |
|
Salary Period |
Salary_Period__c |
Text(100) |
|
Salary Start Date |
Salary_Start_Date__c |
Date |
|
Surname |
Surname__c |
Text(100) |
|
Team |
Team__c |
Text(255) |
|
Unique Id |
Unique_Id__c |
Text(50) |
Add fields to the Reporting Snapshot object
- Go to Setup, and select Object Manager.
- Click Reporting Snapshot.
-
Add a field to mirror the field you want to add.
Generally fields must be the same data type as the field in the source object, except:
- You need to set picklist and formula fields as text fields
- You can map lookup fields to text fields. To map a field in the source report to a lookup field on the target object, map to the ID of the lookup object
- We don't support mirroring a text area field
Add fields to the Report Types
-
Go to Setup. In Quick Find, enter report, and select Report Types.
-
Select the label for the Team Member, Employment, Salary History report type.
-
Go to Fields Available for Reports and select Edit Layout.
-
Add any new fields to the Report Type.
- Repeat the steps for the report type Reporting Analytic Snapshots.
Update the Reporting Snapshot Export report
If you add fields to the Reporting Snapshot object, you also need to add them to the Reporting Snapshot Export report.
- Go to the Reports tab and select the Reporting Snapshot Export report.
- Select Customize. The Salesforce Report Builder displays.
- Add the fields you added to the Reporting Snapshot object to the report.
If your organization has more than 2000 team members, you need to add filters. This keeps the number of team members the system exports per report below 2000. For example, you can use Country, Business, or Division as filters.
- Apply your chosen filter to the Reporting Snapshot Export report.
- Select Report Properties.
- Amend the Report Name and Report Unique Name with details of the filter you applied. For example, change the name to Reporting Snapshot Export UK and the Unique Name to Reporting_Snapshot_Export_UK.
- Select Save.
- Select Save As to create a clone of the report.
- Enter a Report Name and Unique Name to reflect a different filter. For example, Reporting Snapshot Export US and the Unique Name to Reporting_Snapshot_Export_US.
- Select Reporting Snapshots - FULL ACCESS as the Report Folder.
- Select Save
- In the Report Builder, apply a filter to match the target group in the report name.
- Select Save and Close.
Ensure you set up the filter criteria in your report to extract the employees that you're interested in.
For example, Employee Status = Active. The report extracts only active employees every time the Reporting Snapshot runs. This lets you report on the number of active employees in an organization whenever you run the report.
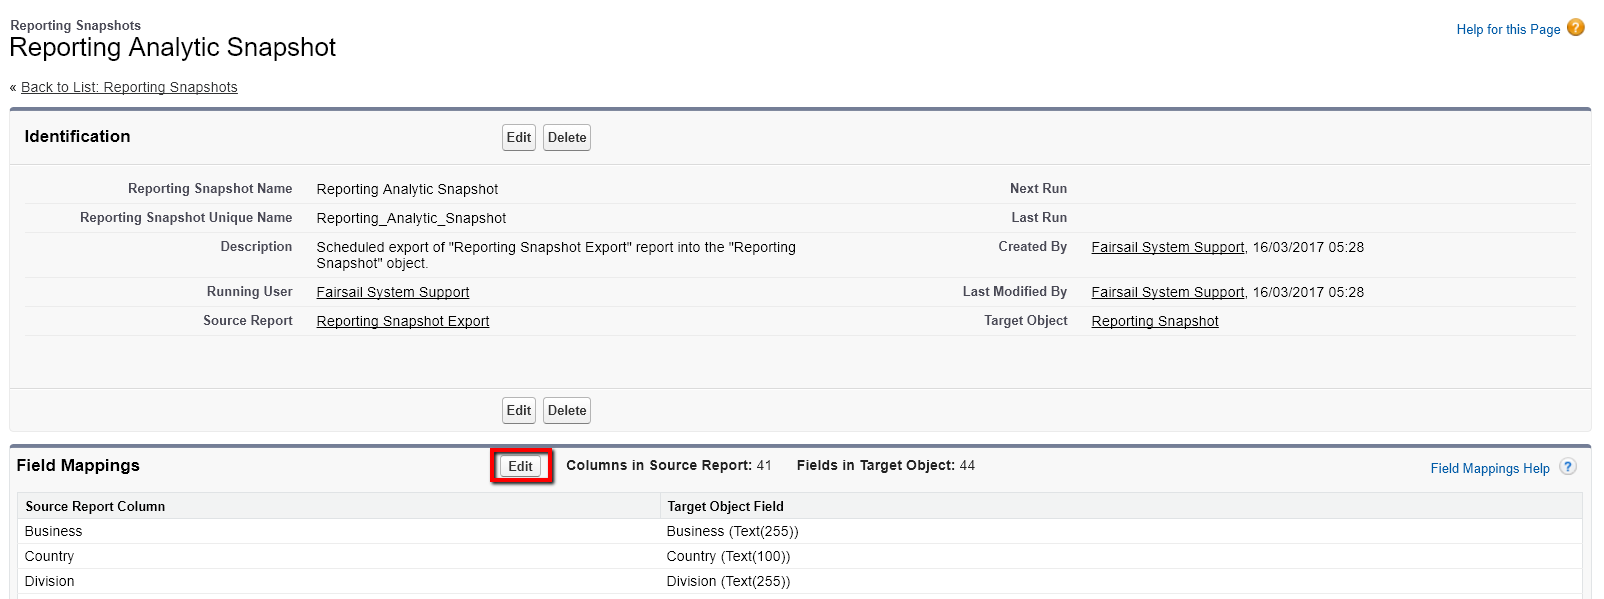
Map the new fields
- Go to Setup and select Platform Tools.
- Click Feature Settings, then Analytics.
- Select Reports & Dashboards, then Report Snapshots.
-
Select Reporting Analytic Snapshot.
-
In the Field Mappings section, select Edit.
-
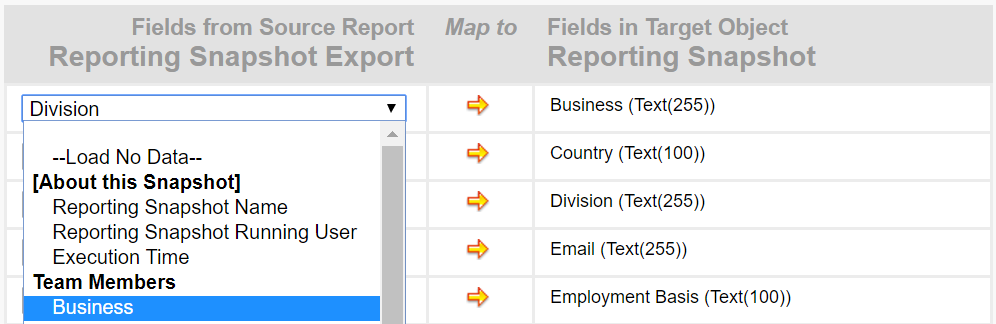
In the Reporting Snapshot Export column, select a value from a dropdown list. This is to map it to the corresponding field in the Reporting Snapshot column. In the following example, we mapped the Business field in the source report to the Business (Text(255)) field in the target object.
- Select Save when you've mapped the fields.
If your organization has more than 2000 team members and you apply filters to create multiple reporting snapshots, update the Reporting Analytic Snapshot details. Then map the fields.
-
Go to Setup and select Platform Tools.
-
Select Feature Settings, then Analytics.
-
Select Reports & Dashboards, then Report Snapshots.
-
Select Edit for Reporting Analytic Snapshot.
-
Review the details. If necessary, update Report Name, Report Unique Name, and Source Report to match a filtered report.
-
Select Save and Edit Field Mappings.
-
Update field mappings for your new field as you require.
-
Select Save.
-
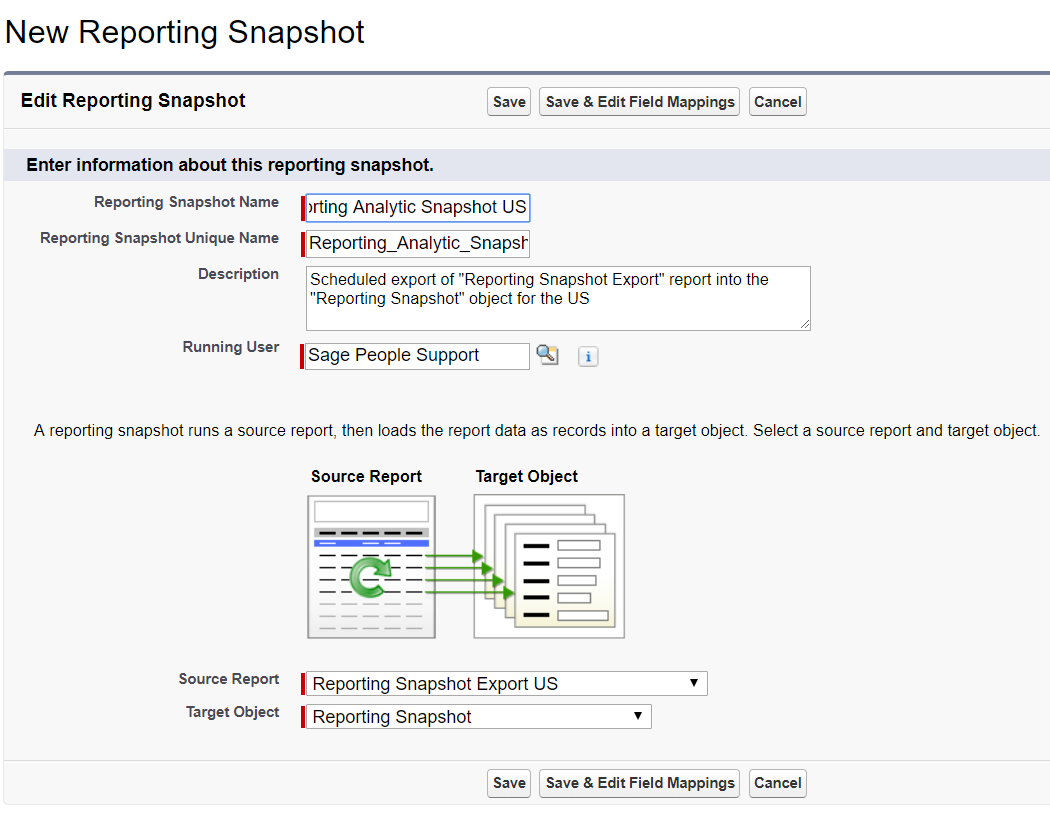
On the Reporting Snapshots page, select New Reporting Snapshot.
-
Complete the details to match another filtered report.
For example, to make a US report:
-
Select Save & Edit Field Mappings.
-
Map all the fields.
TipSee field mappings in the original or other snapshot reports if you’re unsure how to map the fields.
-
Select Save.
Schedule the reporting snapshot
- Go to Setup and select Platform Tools.
- Select Feature Settings, then Analytics.
- Click Reports & Dashboards, then Report Snapshots.
-
Select Reporting Analytic Snapshot.
-
In the Schedule Reporting Snapshot section, select Edit.

-
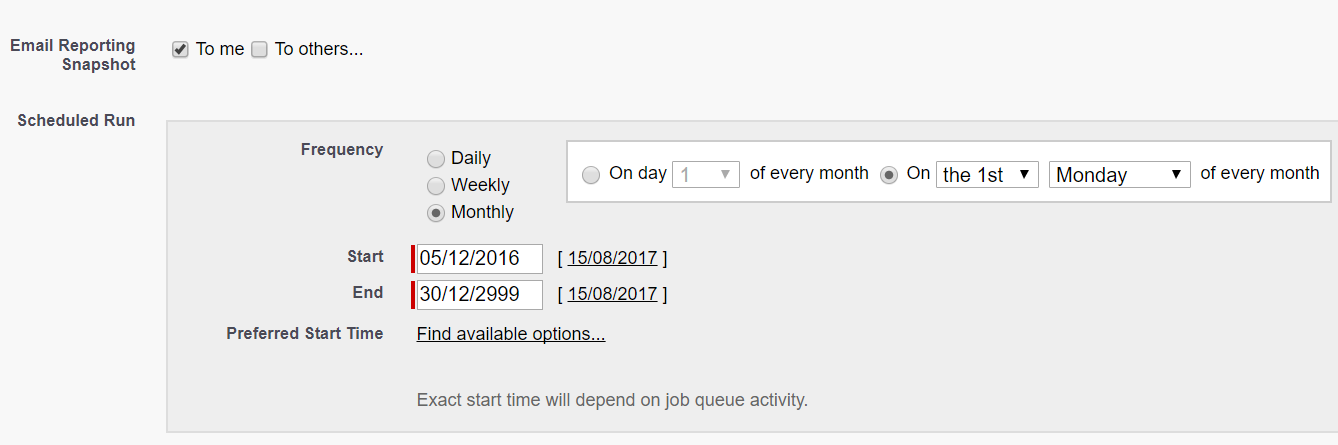
Enter the scheduling information as follows:
Field What to enter Email Reporting Snapshot Checkboxes. The users or groups who receive the Reporting Snapshot by email.
If you select Others, additional options appear. These are for you to select the groups or users to receive the Reporting Snapshot.
Scheduled Run Options to define:
-
the frequency for running the Reporting Snapshot
-
start and end dates for the schedule. You need an End Date to save the schedule
-
the start time you prefer on the day when the Reporting Snapshot runs
After the system runs the report for the first time, users can run reports on it.
In the following example, the system sends the report to the scheduling user on the first Monday of every month. This startsfrom December 2016 and ends in 2999:
-
If you have multiple reporting snapshots, schedule each one separately.
Modify the HR Manager profile
We base Snapshot Reporting on a standalone object called Reporting Snapshot. Because of this, we don't link data security to HR Department security. Users who have access to the snapshot reporting have access to all data within the report. By default, HR Administrators and HR Managers have access to all information in this report.
If your customer doesn't want to expose sensitive data from other HR departments to HR Managers, edit the HR Manager Profile. You can eliminate access to the fields with sensitive data.
If you remove HR Managers' access to fields with sensitive data, they can't access any data in those fields for point-in-time reporting.
You can restrict access to certain fields for users who otherwise access to the reporting snapshot data. Change the field level security on the users' profile:
- Go to Setup and select Administration.
- Select Users, then Profiles.
- Select the Profile where you want to restrict access to certain fields.
- In the Field-Level Security section, go to Custom Field-Level Security. Select View next to the Reporting Snapshot Object.
- Select Edit
- Select or uncheck the checkboxes in the Read or Edit columns to grant or remove access to fields.
- Select Save.
To give a profile access to all data in the reporting snapshot:
- Go to Setup and select Administration.
- Select Users, then Profiles.
- Select Edit next to the Profile you want to give access to.
-
In the Custom Object Permissions section, go to the Reporting Snapshot object. Select all checkboxes on the row to grant full access.
- Select Save.
Update the Historic Headcount reports
Two standard reports provide details about headcount in the organization. We call them both What is our Historic Headcount?. One of the reports provides full access to headcount data and another partial access.
- The What is our Historic Headcount? report in the Reporting Snapshots – FULL Access folder includes all the fields in the Reporting Snapshot Extract report
-
The What is our Historic Headcount? report in the Reporting Snapshots folder contains a partial list of fields
You can add fields to the reporting snapshot or limit access to fields in the HR Manager Profile. Ensure you add fields to, or remove fields from, the historic headcount reports so the appropriate fields are available.
View the snapshot reports
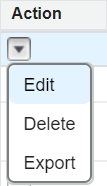
- Go to the Reports tab and find the What is our Historic Headcount? report.
-
Select Edit from the Action menu:
-
Filter the report by the Created Date field to show data the system captured on that date. You can also compare results for different time periods:

Learn more
The Reports and Analytics learning package in the Sage University includes training content on reporting snapshots