WX Translations |
Role: HR Administrator
Role: HR Manager
This step creates the Custom Labels that will be used for service and process names, or service page titles and subtitles, and applies the local translations for these labels.
Create custom labels
-
Open the Custom Labels setup page:
Go to Setup, and in Quick Find enter Custom Labels.
-
On the Custom Labels page, select New Custom Label.
Create a new Custom Label for each WX Service Name and Process Label you want to display in local languages.
-
Complete the fields as follows:
Field What to enter Short Description A brief description of the label. By default, Name is created from the Short Description and the two are typically left with the same text content, for example
WX_Pay_and_Benefits.If you are using default Name creation to create the Name directly from the Short Description, start Short Description with WX_ (that is, WX immediately followed by an underscore) to ensure WX hides the label name for the short interval while translations are loaded.
If Name is not self explanatory, use Short Description to help define the purpose of the label.
Categories Optional. Enter one or more text categories for this label separated by commas. You can use Categories to sort and filter labels. For example: "WX". Value The default text string to display when this label is selected. If you do not load translations for this label, Value is always displayed when the label is selected. Name The API key for this label. Automatically created from the Short Description, you can change the Name if you wish.
To ensure WX hides the label name for the short interval while translations are loaded, start Name with the characters WX_, for example WX_Pay_and_Benefits.
Must begin with a letter and contain only alphanumeric characters and underscores. Cannot end with an underscore or contain two consecutive underscores.
Protected Component Checkbox. Not displayed by default. If displayed, set unchecked. -
Select Save.
Sage People displays the Custom Label Detail page.
Add translations
-
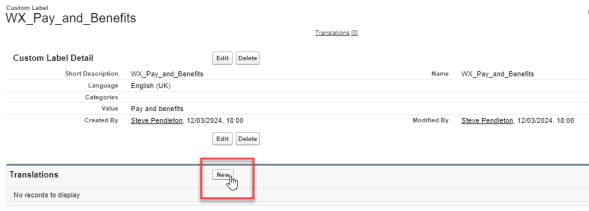
In the Translations section of the Custom Label Detail page, select New.

Sage People displays the New Translation page.
-
In the Translation Information section:
- Select the Language you want to add for this Custom Label.
- Enter the Translation Text you want to appear when the Language is selected to display this label.
-
Select Save.
Sage People displays the Translation Detail page. To add another translation, select the Master Label name to return to the Custom Label detail page.

Repeat steps 5 and 6 to add as many translations as you need. You can add a value for the default language (typically English) if you do not want the WX Service Name or Process Label to display the default Value for the Custom Label when the default language is displayed.
Next:
If you are using translations for WX Process names or service page titles and subtitles, go to WX Translations | Create a static resource file
If you are only using translations for WX Service names, go straight to WX Translations | Apply your translations.