Timesheets | Setting up work allocations
Each work allocation defines a project, piece of work, or customer against which you want team members to book their time. Typically used for employees with portable skill sets who may work on a number of different projects or product lines over a period of time. When work allocations are defined and active, team members can book their time against the projects they have worked on during a timesheet period.
A training module with some short videos on different aspects of timesheets, including Work Allocations, is available in Sage University.
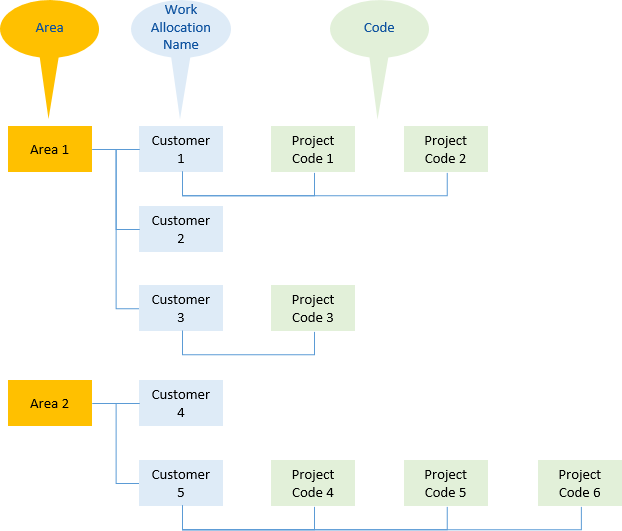
You can define work allocations as a flat set of separate projects, or in a hierarchy. By default, the Work Allocation object has fields for:
-
Area
The top level of the hierarchy. For example, a geographical area or an area of expertise. You can rename this field if you want to use a more meaningful name.
-
Work Allocation Name
The second level of the hierarchy. For example a customer name, a product line, a major project name. You cannot rename this field. Without a hierarchy, Work Allocation Name is displayed in the timesheet for the work allocation.
-
Code
The third level of the hierarchy. For example a customer project, a sub project, or a team name. You can rename this field if you want to use a more meaningful name.

You can manipulate and extend the hierarchy by adding fields to the Work Allocation object.
To create a work allocation:
-
Select the Work Allocations tab.
Sage People displays the Work Allocations Home page.
-
Select New.
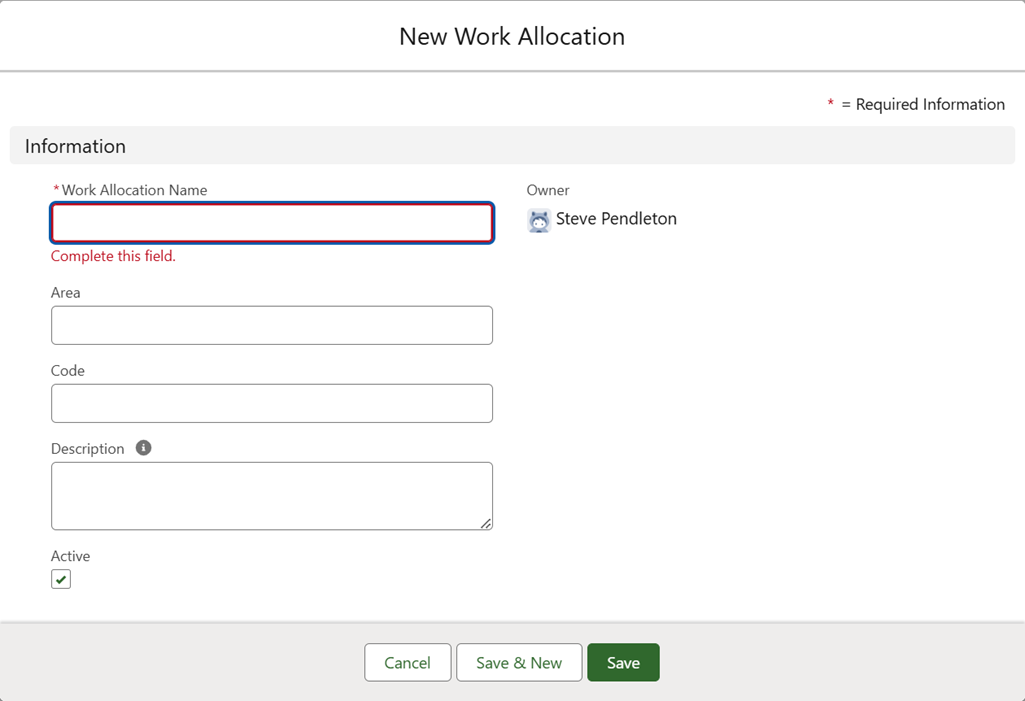
Sage People displays the New Work Allocation page:
-
Complete the fields as follows:
Field Description Work Allocation Name The name for this work allocation to appear on the WX timesheet. Work Allocation Name is used as the heading for time entries.
To set up a hierarchy use the same Name for multiple work allocations.
Area The area to which the work allocation belongs.
By default, Area acts as the top level of the hierarchy for work allocations and populates the left-most selection box on the WX timesheet.
You can have multiple work allocations with the same Area to set up a hierarchy. You can also have multiple Areas with the same Work Allocation Name.
To set up a flat set of work allocations with no hierarchy, leave Area blank and remove Area from the Work Allocation Hierarchy field set.
You can rename Area to something more meaningful for your organization.
Code By default a sub-classification of Work Allocation Name.
Code acts as the third level of the hierarchy for work allocations and populates the third selection box from left on the WX timesheet.
If Code is the lowest level of your work allocation hierarchy it must be unique within this Area and Work Allocation Name combination.
If left blank for all instances of this Area and Work Allocation Name combination, no Code selection box is displayed on the WX timesheet.
You can rename Code to something more meaningful for your organization.
Description A brief description of this work allocation. Description is displayed through the HR Manager's Portal and not in WX.
Active Checkbox. If checked, this work allocation is available for use and can be included on WX timesheets.
-
Select:
-
Save to save the work allocation and display the Work Allocation Detail page.
-
Save & New to save the work allocation and define another.
-
Cancel to discard your entries and return to the Work Allocations home page.
-
To simplify searching for work allocations when you assign them to timesheet patterns, add the Area and Code fields to the Search Layout.
- Go to Setup > Object Manager, and select the Work Allocation object.
- From the sidebar, select Search Layouts.
- Select Edit for the Default Layout.
- Move the fields you want to see in the search into the Selected Fields panel.
-
Select Save.
