To book time off for yourself:
-
In the menu select the Time Off process. This process might be named absences, vacation & absence, or something else in your organization:

-
Select New, or using the calendar, select the start and end dates for your time off.
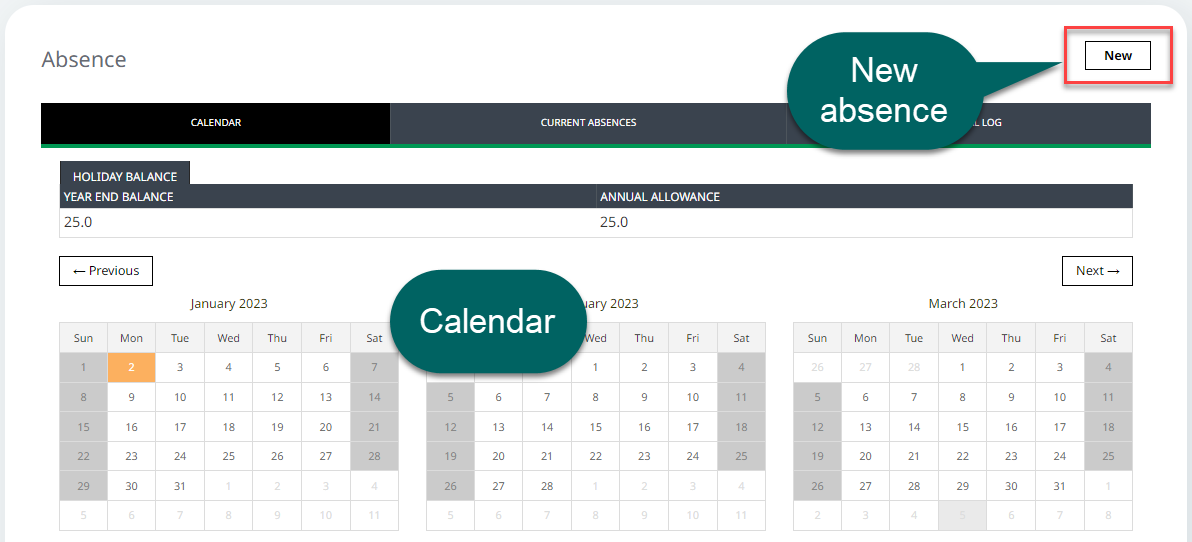
If you are booking time off and you are unsure of the end date - for example, for sickness, just select the start date.
Sage People displays the New Absence dialog:

Duration is automatically calculated. The system calculates the hours or days in the request with respect to your configured work schedule and non-working days. All your absence types use the same unit: if it is days, then entering 1 means 1 day, and if you want to book a half day you need to enter 0.5. If the Duration value is wrong you can amend it, for example if you want to book less than a full day. Your administrator can add rules to prevent you from requesting amounts less than a full day or a half day. If you have issues with this, contact your HR team for advice.
If your request coincides with time off requests for other members of your team, you can select the chevron to see the details:

-
Select the Reason picklist and choose the reason for your time off:

Time off reasons are those available for your organization and display fields appropriate for each reason. For example, booking maternity leave can display fields for Expected and Actual Arrival Dates, Return Intent, and the option to upload a supporting document.
Provisional end dates
Some absences, such as sick leave, can give you the option to set the end date as provisional. You can amend the absence request later, when you know the date that you will return to work, or your manager can set the end date when you return.
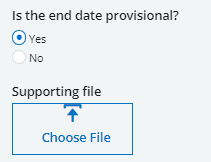
File upload
Some absences, such as sick leave, always display the Supporting file option, and other absence reasons can also include it. Supporting file enables you to upload a file, such as a doctor's note, a sick note, a medical certificate, or other document providing information about the absence required by your organization. You can upload one attachment per absence request. Your manager can view the attachment when they approve your absence. To attach a supporting document, select Choose File. WX displays the file explorer on your computer so you can select a file to attach. After you have selected the file, its file name (DoctorsNote.pdf in the following screenshot) is displayed:

If this is not the file you wanted, select Remove to select another file.
Add to Outlook calendar
Depending on your organization's configuration, some absences allow you to select whether to add the absence to your Outlook calendar. If you have this option, the Add to Outlook Calendars box is selected by default.
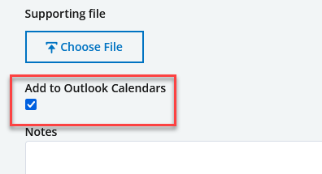
With the option selected, when the absence is approved, an event will be added to your calendar, and your manager will receive an invite for the absence event in their own calendar. You can clear the Add to Outlook Calendars box to disable calendar events for this absence request.
Absence balance and notes
Sage People displays balance information and a space where you can add Notes:
 Note
NoteIf you are booking an absence in the past, balance details are not displayed.
Select the arrow to display full balance details:

-
Enter any notes you want to add to the request. Notes are displayed to your manager when you submit the request.
-
Select Save.
After saving, the request is submitted to your manager for approval. The request is displayed on your calendar as Pending until approved:

When approved, your calendar display changes:

Warnings and errors when submitting your absence request
Your administrator can configure rules to apply to the duration and frequency of individual time off requests, or the total amount taken for a time off reason in a set period of time to align with your organization's absence policies. Rules can alert you to a potential issue, or block you from submitting a request as you have entered it. Follow the advice in the message you see, and contact your manager or HR team if you need more details about your organization's absence policies. Some messages can be used with multiple different thresholds, so your administrator may have defined generic messages such as "Maximum allowance reached" or "Your request has exceeded your current balance.". If your administrator has not defined a specific message for your organization, the default messages "Default Absence Alert message" and "Default Absence Block message" are used.
Contact your HR team for advice when you get an alert or block message if it is not clear to you why you are getting it, or what to do to resolve the issue.
Alerts are for information and can be used to trigger notifications outside of the self service portal. Alerts display as warnings, as shown in the following example, and you can continue to save the request:

Block messages stop you from saving the request unless you change the details of the request so it no longer meets the block limit. Block messages are displayed as errors as shown in the following example:

Error messages from rules defined by your administrator first display after selecting Save but you cannot save the request unless you change the details of the request so it no longer matches the error condition. The error message for each rule is defined by your administrator. These messages are displayed as errors as shown in the following example:

The following are examples of the kinds of rules your administrator can configure. The actual limits in your organization are likely to be different:
-
The maximum duration of an individual time off request. Maximum durations can be different for different time off reasons.
For example, you are blocked from submitting a request for more than 15 days of vacation.
-
The maximum number of requests for a specific reason within a set period.
For example, you are blocked from submitting more than 6 requests for sickness absence in the past 12 months to today, regardless of the duration of each individual instance.
-
The total maximum number of days or hours for a specific time off reason across a period.
For example, if you have had 21 days of sickness absence in the past 12 months to today, regardless of the duration of each individual instance, you are blocked from submitting another request for sickness absence.
-
The minimum duration of an individual time request.
For example, your administrator blocks you from submitting requests for a half day, or if half days are permitted, you cannot submit a request for 0.33 days.
Your administrator can also configure rounding rules for balances in a number of ways. Rounding rules combined with settings to prevent negative balances before the reset for the next year can mean you are unable to request time off for the full remaining balance you see in WX. Contact your HR team if you need more information.
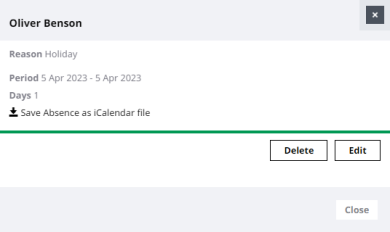
Change or delete an absence request
You can edit a pending request by adding notes, but you cannot change the start or end dates, or the reason for the request. To change the date or reason, delete the pending request and submit a new request.
If you need to amend the details for a request after it has been approved, you must delete it and submit a new request.
To retract a request for a future absence, select the absence in your calendar and select Delete.