Formulas | Create a formula field
To create a formula field:
-
Go to Setup > Object Manager, and select the object where you want to add the new formula field.
-
From the left sidebar select Fields & Relationships.
-
Select New.
-
Select the field's data type as Formula and then select Next.
-
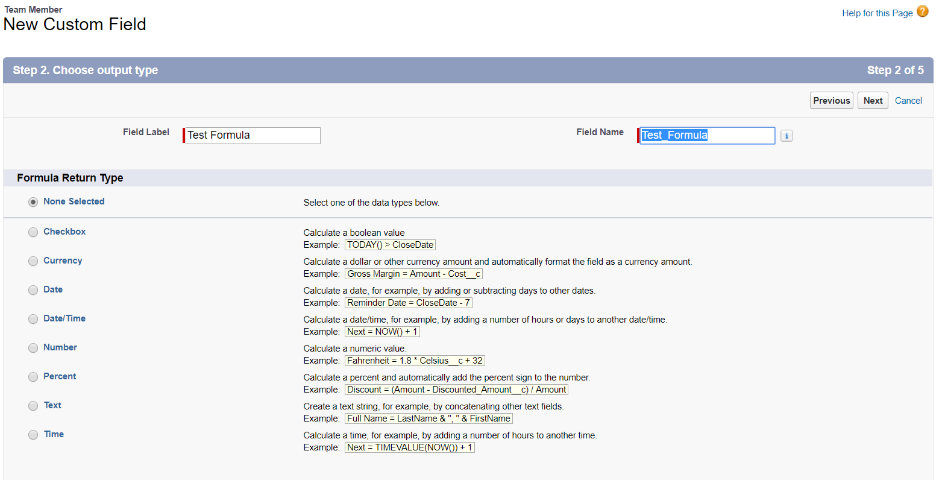
Select the data type for output returned by the formula:
-
Select Next.
-
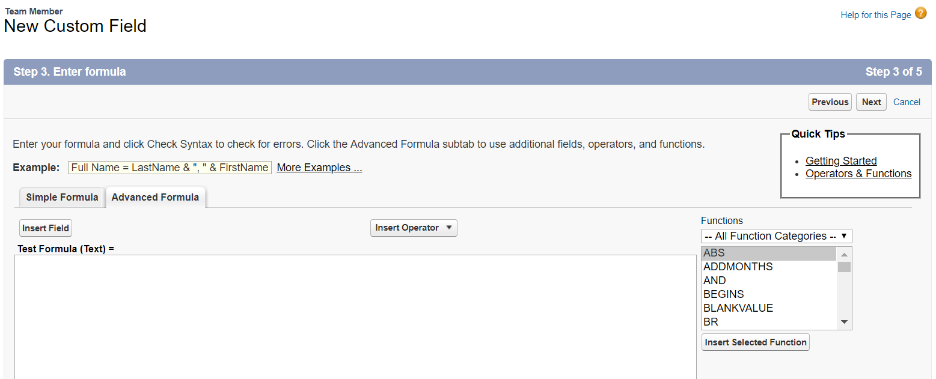
In the formula editor, select the Advanced Formula tab if it is not already selected:
The Advanced Formula tab gives you access to the formula functions list:
-
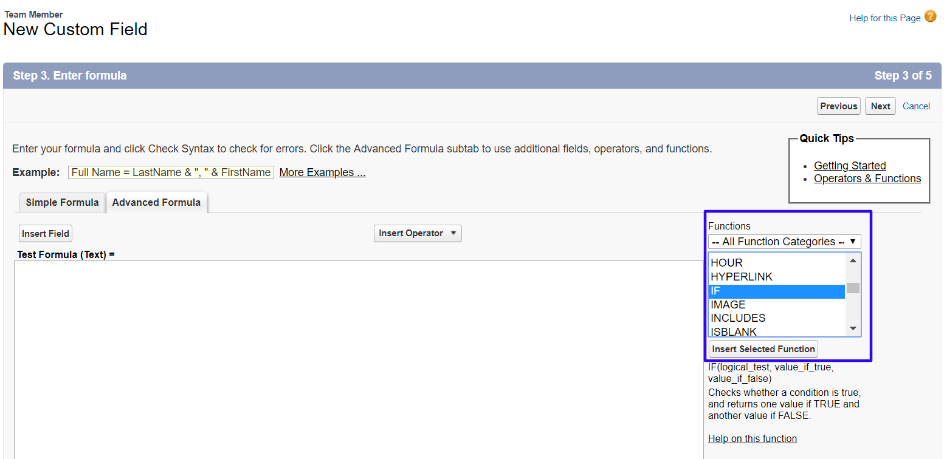
Insert a function by selecting a function from the list on the right, as shown in the following the screenshot:
When you select a function, an explanation is displayed underneath the function selection box to describe how the function works. When you have found the function you want to use, select Insert Selected Function, or double click the function to insert it.
-
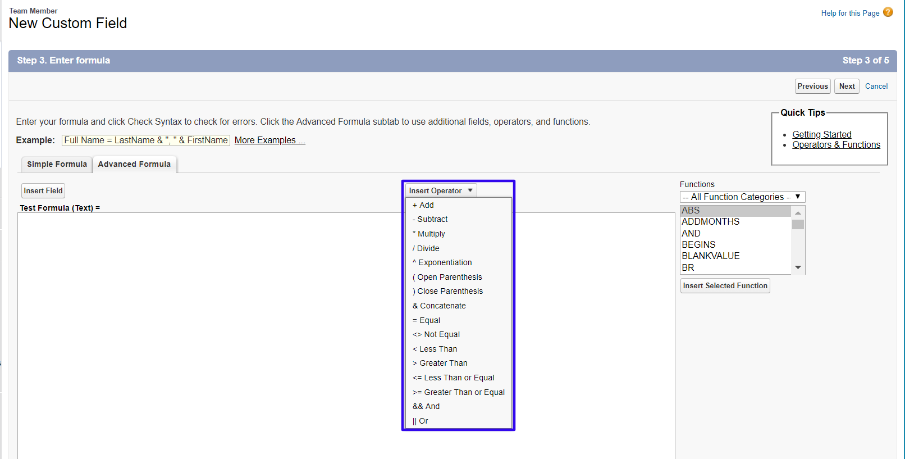
Insert an operator by selecting the Insert Operator button and then selecting the operator you want to insert as shown in the following screenshot:
-
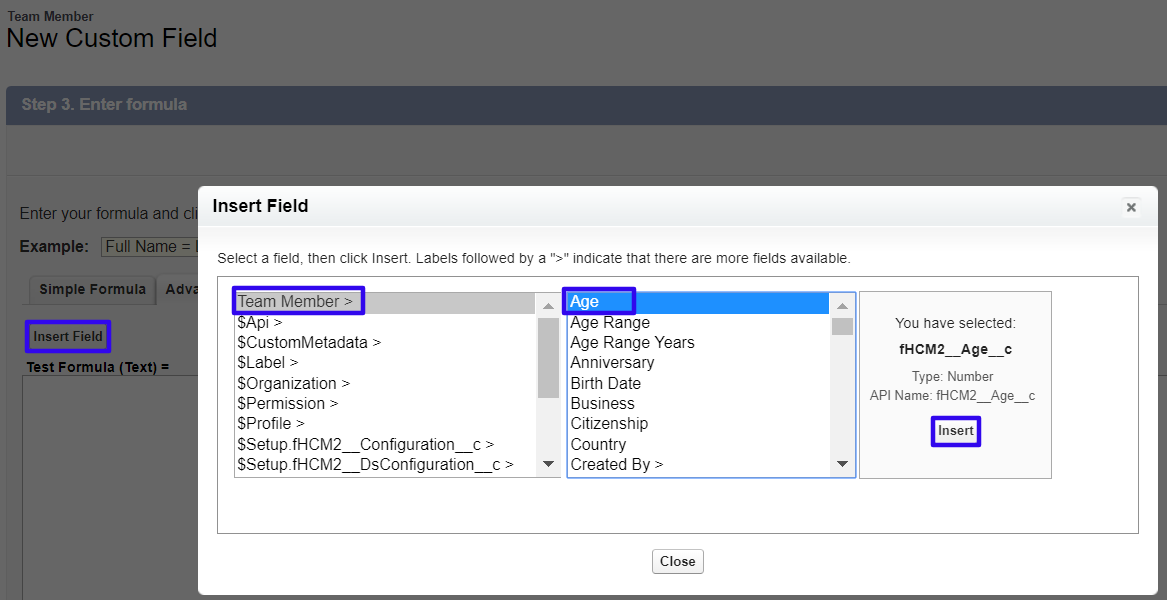
Insert a field by selecting the Insert Field button, choosing the field you want to insert and select Insert, as shown in the following screenshot:
When inserting a field, the formula editor initially displays fields on the object where you are creating the new field, but you can select fields on objects with a relationship with the object hosting the formula field.
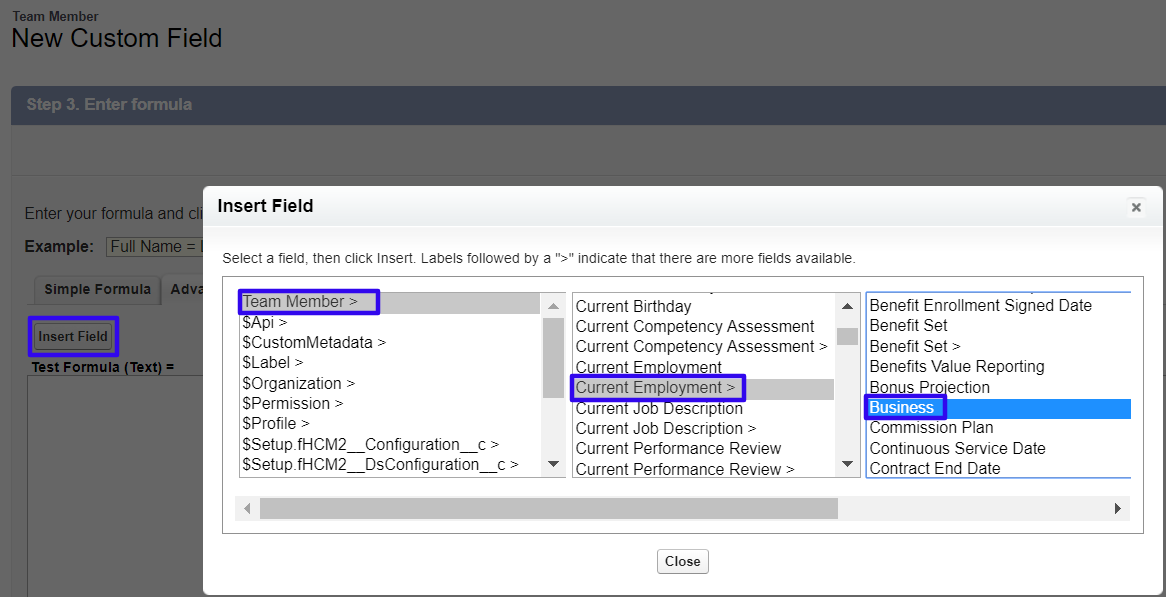
To access fields on related objects, look for fields with an arrow, which indicates that an additional panel of fields opens, as shown in the following screenshot:
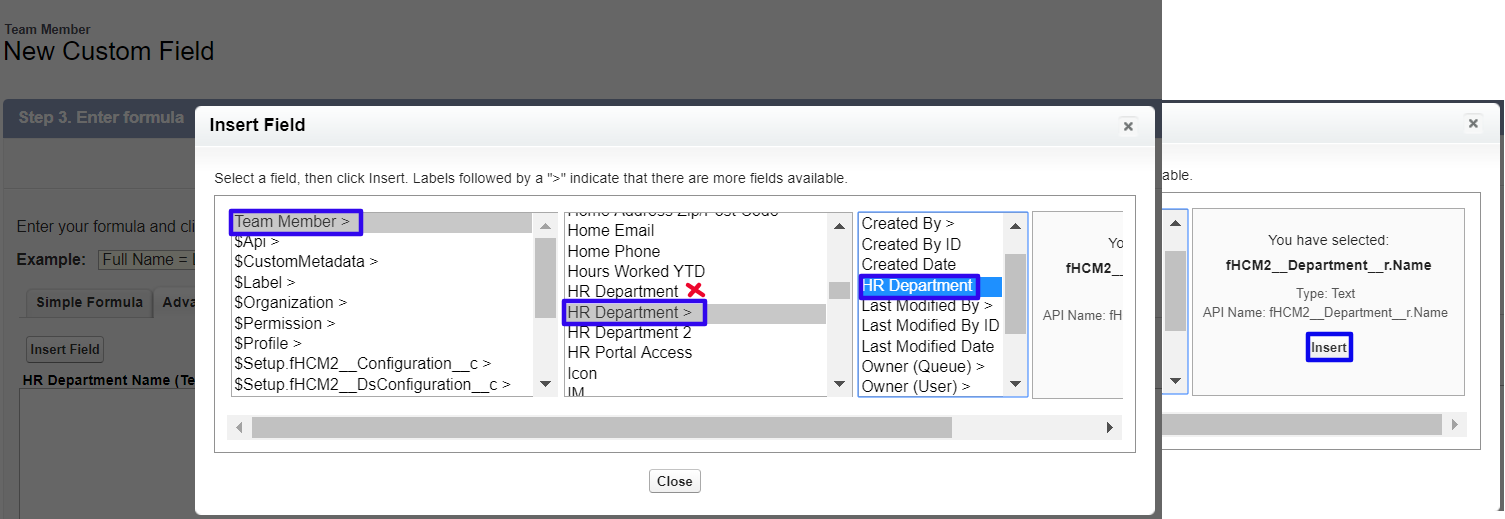
If you select the actual lookup relationship, such as the Current Employment or Current Job Description without the arrows in the preceding screenshot, the formula returns the unique 15 character Salesforce ID of the field. If you want to use the related object's name, select the field with the arrow to access the fields, and choose the name field, as shown in the following screenshot for the HR Department related object:
The format of a field name is different when you select it from a related object. For example, the 2 preceding screenshots display:
-
The Age field from the Team Member object for a formula hosted in the Team Member object
-
The Business field from the Employment Record object for a formula hosted in the Team Member object.
Because the Age field example has the field and the formula in the same object, the Age field does not specify the Team Member object in its name. The Business field comes from a related object, Employment Record, so the relationship is indicated with an r:
- fHCM2__Age__c
- fHCM2__Current_Employment__r.Business__c
-
-
-
After inserting the formula, select the Check Syntax button to check for any errors in the formula. If your formula contains syntax errors, the error messages typically indicates what the problem is. Typically errors are caused by one or more of the following:
- Brackets: A syntax error displays when you have an inconsistent number of left brackets to right brackets.
- Values: Missing quotation marks around a value leads to a syntax error.
- Output type: If the formula returns a different output data type from the one you have specified when creating the formula field. For example if your formula outputs text when you have selected a number output data type
- Custom fields: Syntax errors can be caused by field names inserted without specifying the relationship, or with field names entered by hand with spelling errors. Use the Insert Field button in the formula editor to ensure field names are inserted correctly.
- Optionally, enter a description and help text for the formula field. Entering these values can help other users understand what the formula does.
-
If the output type of your formula is number, currency, or percent, indicate if blank values are to be treated as zeroes or blanks:
In general, it is best to select Treat blank fields as blanks.
If you select Treat blank fields as zeroes, the
ISBLANK,ISNULL,BLANKVALUE, orNULLVALUEfunctions are not available for the formula, because the formula populates a 0 as the value if the referenced fields have no values.When choosing the blank field handling option, also consider any reports that include the formula field and think about how zero values impact any further analysis you want to perform.
-
Select Next.
-
Define the field level security for the formula field. By default, all profiles are selected for access. If some profiles do not need access to the field, uncheck the checkbox next to the word Visible to deselect all profiles, and then individually check the profiles to grant access. You can change these settings at a later date by going into the field level security settings for each profile. Then select Next.
-
Select the standard Salesforce page layouts where you want to display the field. By default, the option to add to the standard page layout is checked. Fields are typically added at the end of the first section on the page layout. You can customize this later by editing the page layout. Then select Next.
-
Select Save to complete your formula, or Save & New to create another custom field on the same object.
You can now test the formula field to validate the results are what you expect. You can:
-
Create a list view to view the field in multiple records
-
Run a report to view the field in multiple records
Validating the expected results of the formula field is important because a formula's syntax may be correct, but the results not what you are expecting. Remember to check all the scenarios used in the formula.
Referring to a specific record in a formula
If you want to refer to a specific record in the formula, use the Salesforce ID to identify the record.
For example, if you want to apply a specific condition to team members associated with a specific HR Department, your formula includes a condition like the following example:
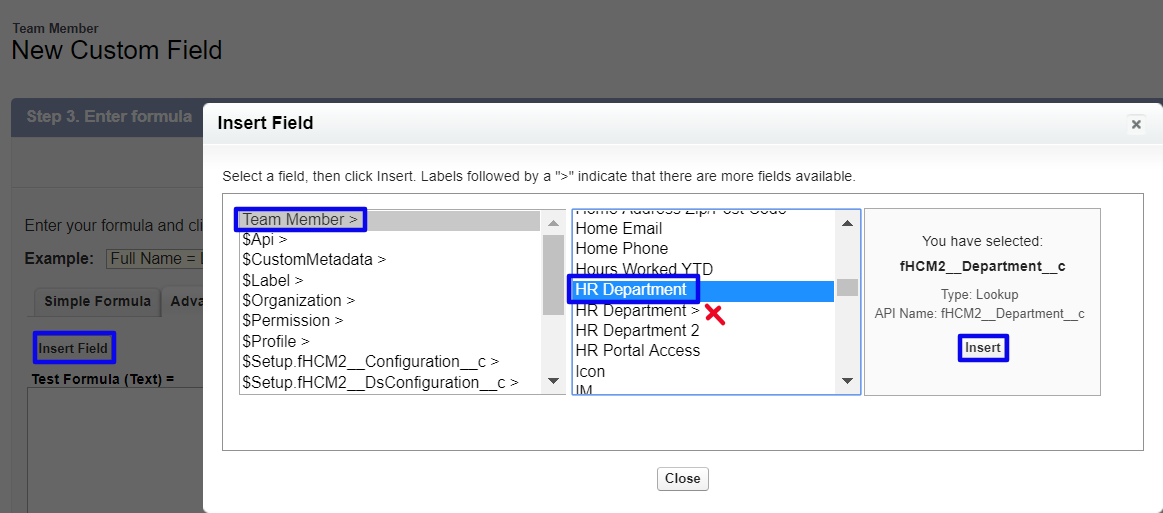
To insert the field into the formula, select the lookup field the field without an arrow next to it:
Once inserted, select the operator equals and then enter the Salesforce ID in quotation marks:
Custom Field = "Salesforce ID"
To find a record's Salesforce ID:
-
For an individual record, go to that record and copy the Salesforce ID from the URL in the browser address bar:
-
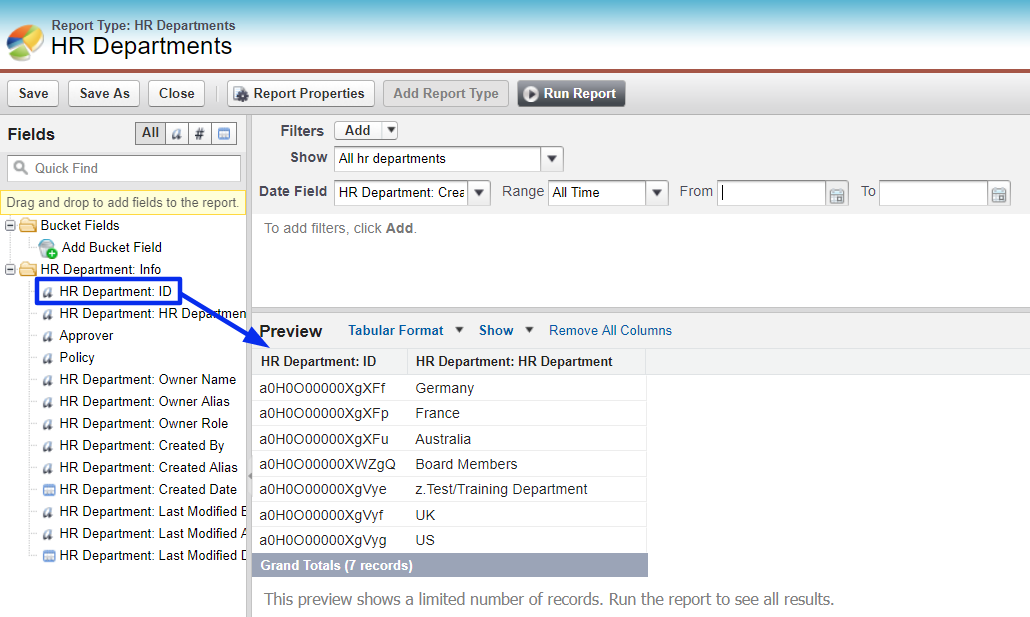
If you need multiple Salesforce IDs, use a report.
-
If you need the 18 digit Salesforce ID, you can create a formula field on the record using the function
CASESAFEID(Id).
