Forms | Troubleshooting
HCM forms are not sending
If form email notifications are not being sent, confirm you have verified the Organization-Wide Email Address for the organization. Go to Setup > Email > Organization-Wide Addresses.
See Organization wide email addresses.
Unable to send or bulk send forms for a specific profile
If you are unable to send forms manually using Send Form or bulk send, check you have enabled the TeamMemberFormExtensionController Apex class for the relevant profile.
-
Select Setup > Users > User Management Settings
-
Select Enable beside Enhanced Profile User Interface:
-
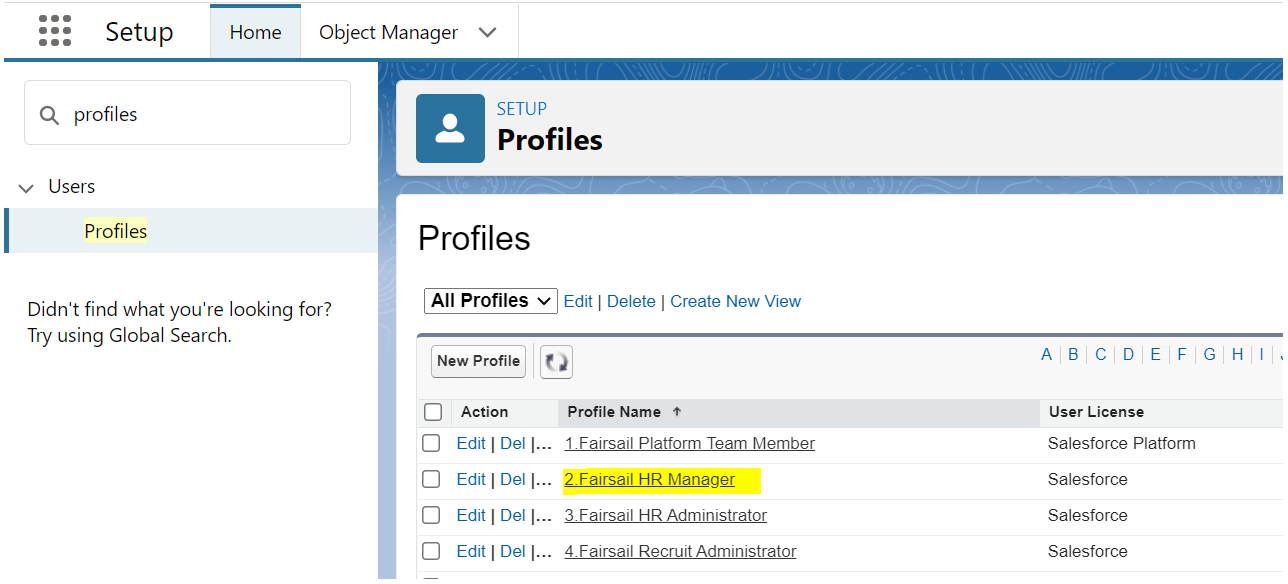
To enable Apex class access, select Users > Profiles and select the profile you want to change (for example Fairsail HR Manager):
-
Select Apex Class Access.
-
Select Edit.
-
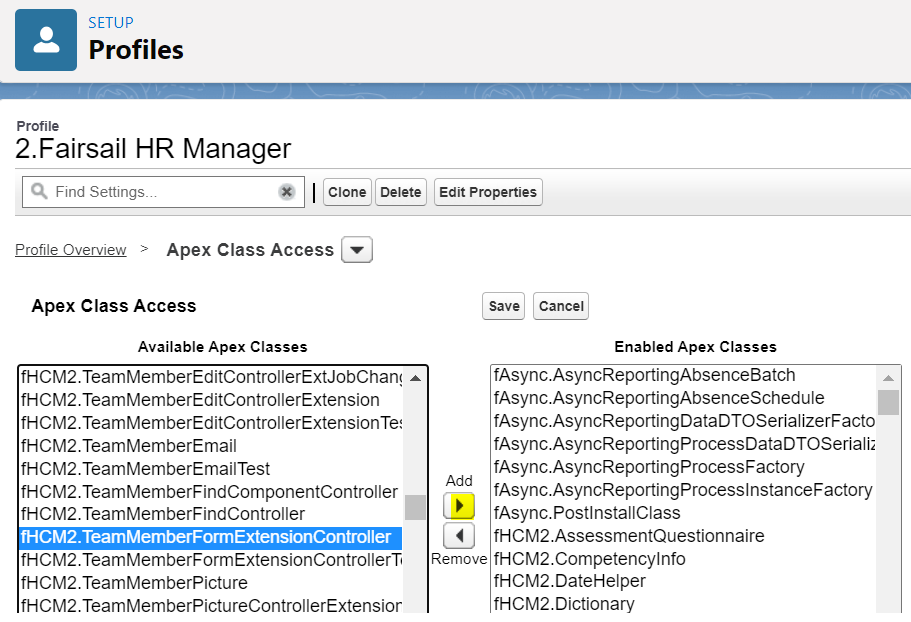
Select fHCM2.TeamMemberFormExtensionController from Available Apex Classes and add it to Enabled Apex Classes:
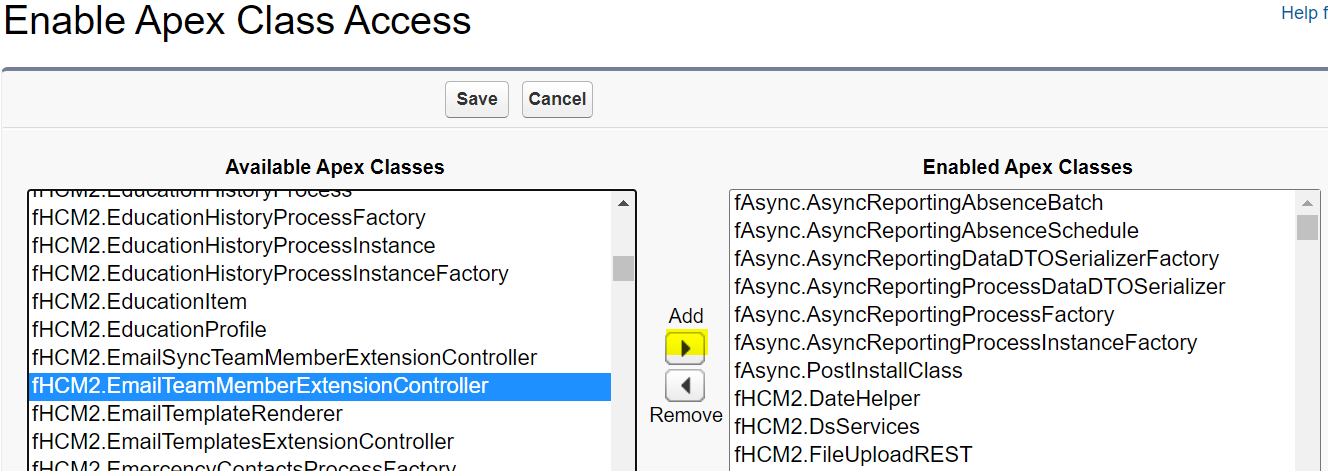
To enable bulk send, enable the fHCM2.EmailTeamMemberExtensionController Apex class:
-
Select Save.
-
When added, revisit step 1 and Disable the Enhanced Profile User Interface setting.
The relevant profile can now send forms via the button on the Team Member record:
See Send forms manually (HCM).
The Send Form button does not work for forms linked to the Absence object
The Send Form button only functions for forms with a link relationship to the Team Member or Employment objects. To send forms linked to Absence or other objects, create an Action Event.
See Using Action Events (HCM).
The form is not visible to managers
Make sure the form has been made available to managers via its action event and form definition settings. See Form action events.
If some managers are still unable to see the form in WX, ensure that the Team Member name, User name, and Actor name are all in sync. Differences in the name can cause the form to not be visible.
The Team Member name is not appearing in the Actions list
When a form is triggered by an action event, the Team Member name does not appear as the "Subject" in the Actions list.
To make the Team Member name appear in the list, ensure you must create a Flow that automatically updates the record with the Team Member name.
-
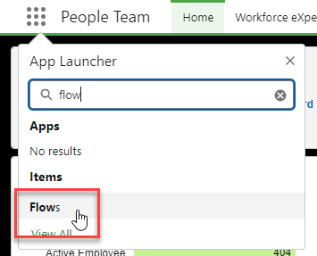
In the HR Manager portal, open the App Launcher and select Flows.
-
Select New.
-
Select Start From Scratch.
-
Select Record-Triggered Flow.
-
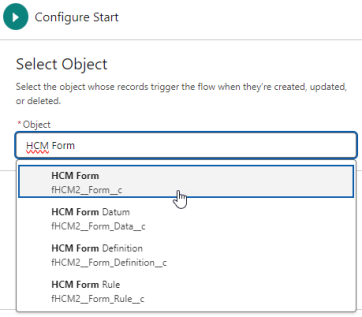
Under Select Object, search for and select the object: HCM Form (fHCM2__Form__c).
-
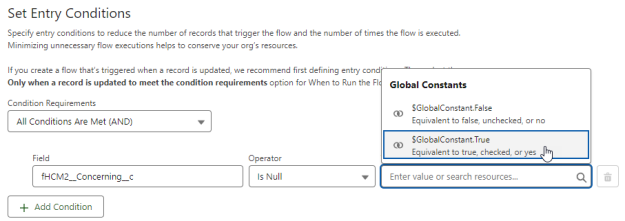
Under Set Entry Conditions:
-
For Condition Requirements, select All Conditions Are Met (AND).
-
In the Field box, search for and select the Concerning field (fHCM2__Concerning__c)
-
Select the Operator Is Null
-
For Value, select $GlobalConstant.True.
-
-
Leave Optimize the Flow for set to Actions and Related Records.
-
In the Flow diagram on the left side of the screen, select the Plus (+) node immediately below the Start box.
-
In the Add Element box, select the Update Triggering Record shortcut.
-
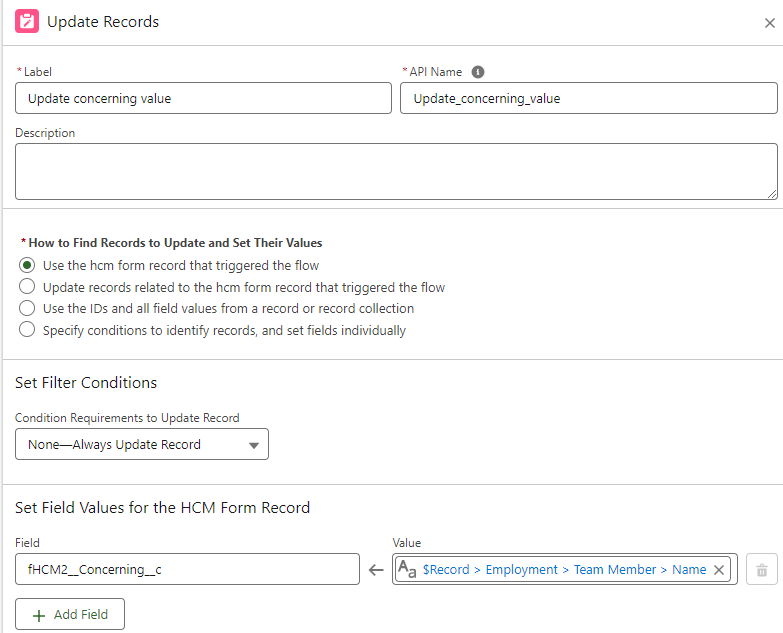
In the Update Records panel on the right of the screen, enter a Label, for example "Update Concerning Value".
-
An API Name is automatically generated from the text you enter.
-
Leave the other settings in the panel at their defaults, and in Set Field Values for the HCM Form Record, search for and select the Concerning field (fHCM2__Concerning__c)
-
For Value, construct a path to find the Team Member name. Type or select the following path:
{!$Record.fHCM2__Employment__r.fHCM2__Team_Member__r.Name}
-
Select Save and enter a Flow Label, for example "Set Concerning Value for HCM Form". An API Name is automatically generated from the text you enter.
-
Select Save.
-
To make the flow active, select Activate.
For more information, see Using Action Events (HCM).
Picklist fields do not map to the object record defined in your data link rule
If picklist values are not saved correctly to the object record as defined in your data link rule, ensure that all required values are assigned to the "Active" Record Type.
-
Go to Setup > Object Manager, and select the object you want to check.
-
Select Record Types from the menu.
-
Select Active.
-
Select the picklist you want to update.
-
Move any fields you want to use from the Available Values box to the Selected Values box.
-
Select Save.
The form does not display updated colors or logo
If the form has been tested prior to updating the logo or CSS branding, try clearing your cache and/or viewing the form in a different browser.
Checkboxes display as a broken image icon
If this occurs, try changing the question type in the form definition to checkboxhtml.
The 'completed' message does not appear at the end of the form
When specifying a message to display when the form is completed, ensure you enter the New Message ID as "completed", all in lowercase, without quotation marks. If you enter "complete", the message is not displayed.
See New Message.
Form rule: "Too many fields" error
When creating a data link rule, you see this error message:
--Too many fields. Use advanced mode--
This error can occur because the Visualforce page has reached its object limit; the maximum number of fields it is able to display. Select Advanced rule and copy the API name(s) for all fields in the form.
"This site cannot be reached" error message
When attempting to access a form, users see this message:
This site cannot be reached. <site_name>’s server IP address could not be found.
Check the URL for the form. The URL should be in this format:
https://myorg.my.salesforce-sites.com/hr/ fhcm2__form/?id=Tj1zuPtYGt3qcq9TYpF7a_EQnZkADgi79mu
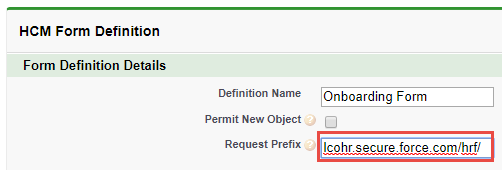
This error typically occurs if the /hr/ path has been omitted from the end of the Request Prefix field. In the example above, the Request Prefix field should read:
https://myorg.my.salesforce-sites.com/hr/
"Site under construction" error message
When accessing a form site, users see a "<site_name> is under construction. Stay tuned." message.
Check the URL contains forward slashes between .com/hr/fHCM2
If the forward slash is missing, edit the HCM Form Definition and add / as the last character in the Request Prefix field:
"Authorization Required" error when accessing a form
If users see this message when opening the form:
Authorization Required: you must first log in or register before accessing this page.
-
Ensure you have enabled guest user access for your Salesforce site. See Create a Salesforce site for forms.
-
Check your HCM form definition picklist values are the same as the picklist values for any fields you are linking to via data links.
-
Check your Recruit form definition for any custom fields with API names exactly matching a managed package field without the package prefix. For example
Salary__candfRecruit__Salary__c. If necessary, edit the API names of your custom fields.
"Authorization required" error when submitting a form
If users see this message when submitting the form:
Authorization Required: you must first log in or register before accessing this page.
If you are using page conditions, confirm that this is configured correctly, using the correct syntax. See Page conditions.
To assist with more detailed troubleshooting, you can access a detailed error message for this issue by following the steps below.
Step 1: Capture the Encoded ID from the form
-
Navigate to the Team Member record of the Team Member experiencing the error
-
On the Team Member record, navigate to the HCM Forms related list, select the Name of the form that is receiving the error upon submission:
-
Copy the Encoded ID from the form. Paste the ID into Notepad or similar.
Step 2: Capture the URL from the Form Definition
-
In a separate tab, navigate to HCM Form Definitions.
-
Select the Definition Name of the form that is receiving the error.
-
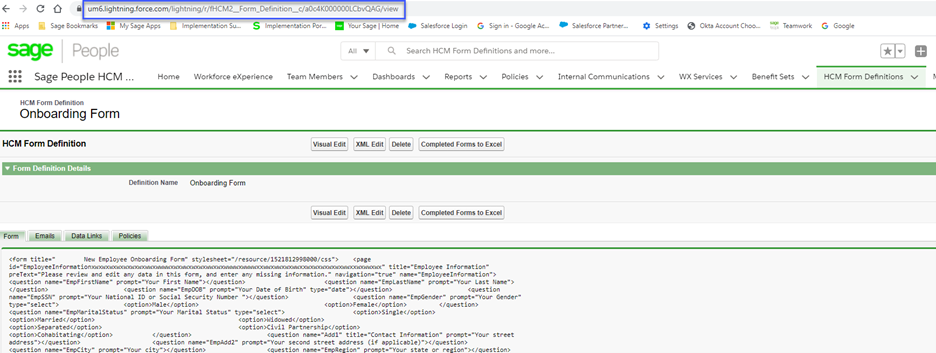
Copy the URL of the Form Definition. Paste the URL into Notepad or similar.
Step 3: Build an internal URL to view the form
-
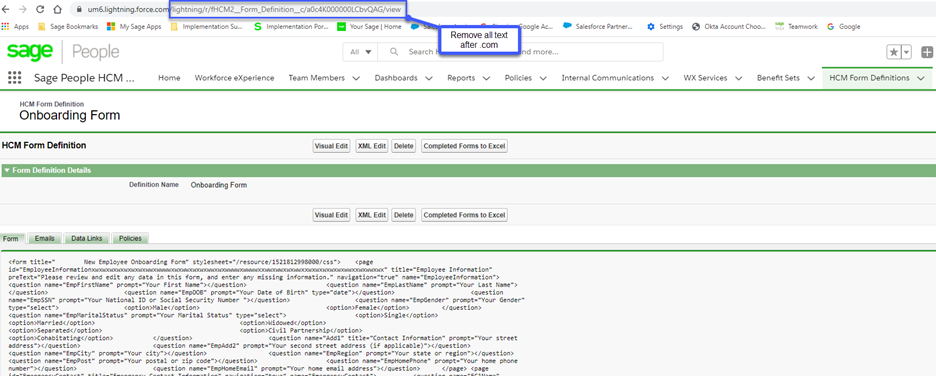
In the HCM Form Definition URL, remove everything after
.com -
Replace the text after .com with the following text:
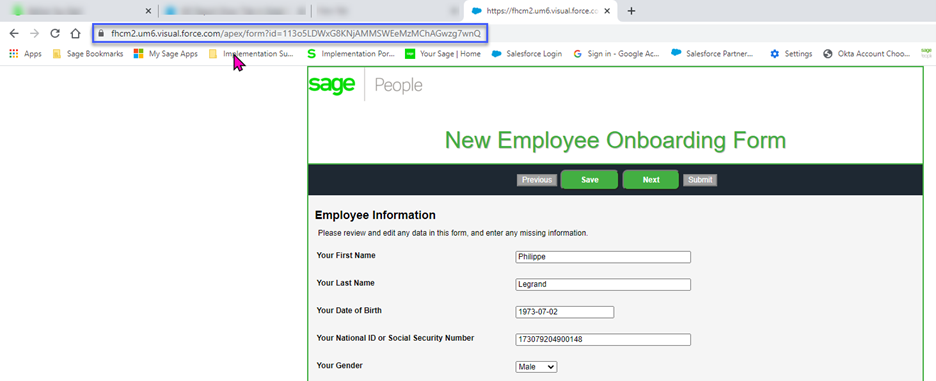
/apex/fhcm2__form?id= -
Add the Encoded ID from the form that you captured in Step 1.
-
Enter the newly created URL into your browser:
-
The form that is receiving the error will appear on the screen. Select Next on the form to page through until you reach the submit page. Submit the form.
-
A detailed error message will then display on the screen to assist with troubleshooting:
Review the detailed error message. You can contact Sage People support or your implementation partner for assistance, providing this information.
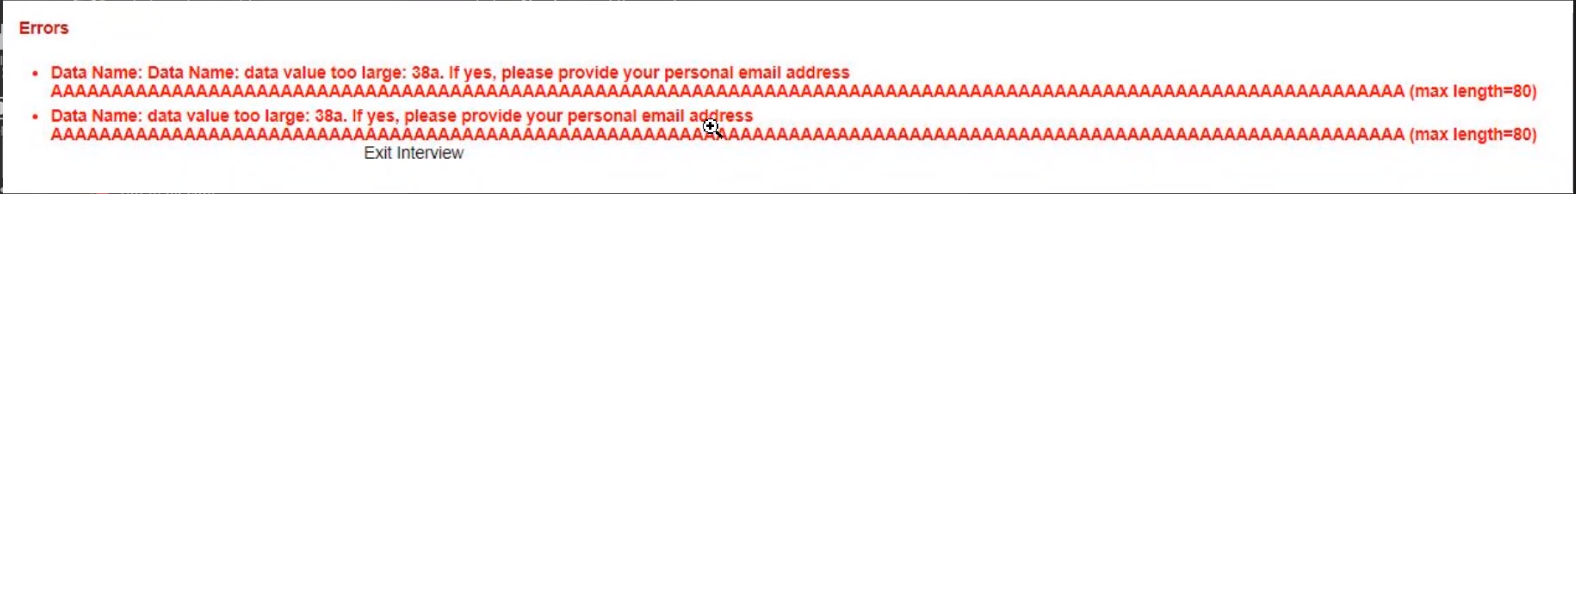
In the example shown above, the error relates to a data value exceeding the 80 character limit.
"Data value too large" error when submitting a form
When users submit a form, they see the following data length limit error:
Data Name: Data value too large.
Amend the question prompts on your Form Definition to 80 characters or less. While the system may allow you to save longer prompts, if you exceed 80 characters, an error message will appear when the form is used.
"Invalid token" error message
Users see the following error message:
Error: Invalid token "<part_of_field_name>" at expression end in <field_name>.
This error means that the question name has a space or an invalid character. Remove the space or invalid character and resave the form definition.
You can also check that the data links don't have any spaces or invalid tokens.
See New question.
The Value field is truncated in reports
When trying to report on Forms, the Value field is truncated so the full value cannot be exported.
Use the Long Value field instead of the Value field in the report. When exported, the full value will show even if it doesn't show in the report on screen.
Forms not working in a sandbox
See Sandbox creation and use | Actions after sandbox creation and refresh for the steps to correct Site URLs for forms after sandbox refresh.
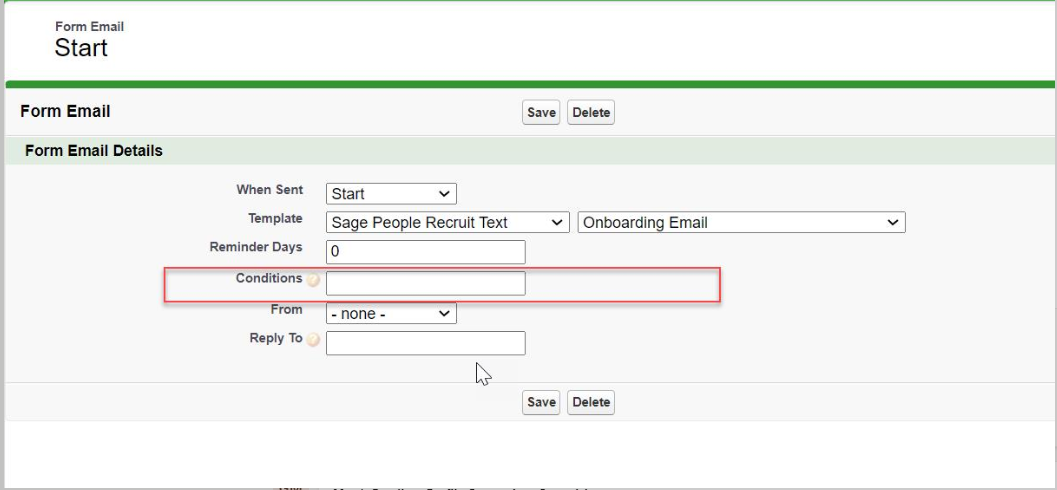
A condition added to a Recruit Form Email does not work
The Condition field on the Recruit Form Email page is deprecated and should not be used.
Candidate reference request emails are not sending, forms are not completing
-
On the Candidate page go to the References related list and ensure Send Email is checked:
If not, select the picklist at the right of the row and choose Edit, then check Send email in the Information section of the Reference Details edit page.
-
Check the form definition and ensure the Emails tab includes:
-
When Sent set to Start
-
The correct email template
-
Review the selection stage you use to get references:
-
Remove the form from Form for Candidate.
-
Remove Start Stage Email Template.
-
Go to the vacancy and select Edit. Ensure Reference Form Definition is populated.
Referee data populated incorrectly
When the form used to collect reference information data links for 3 referees but information for only 2 referees is collected, the Referees list can display the third referee with other information, such as the candidate's unique ID:
If you do not need 3 referees, remove the third set of data links from the form definition so the Referees list displays with correct information:

