Generic SSO Setup |
Configure SSO service provider
Prerequisites:
-
If required, set up a custom Salesforce domain before setting up SSO.
-
If both single sign-on and logging in with a username and password are required—typically, SSO for active employees and logging in with a username and password on the org's login page for pre boarders—then the Salesforce org domain must be my.salesforce.com.
-
In the SSO service provider, create the app for users to access the Sage People org.
For example, in Microsoft Azure, go to Active Directory > Enterprise Applications > New application > Non-gallery application section, select Add, and then add an application from the gallery.
Other providers may have Sage People specific apps.
- Select Configure Single Sign-On.
- Choose SAML-based Sign-on from the picklist.
- Enter your Sage People org’s Salesforce URL in both Identifier and Reply URL fields (one of these may also be referred to as Entity ID).
Tip
G-Suite requires an ACS URL which can be taken from the Sign On URL provided in Salesforce after completing the Salesforce steps below. When first creating the SSO app, simply enter the org domain URL and update this later.
- Configure your single sign-on provider to direct team members signing in to WX:
Enter your Sage People org’s WX URL in Sign on URL or Start URL:
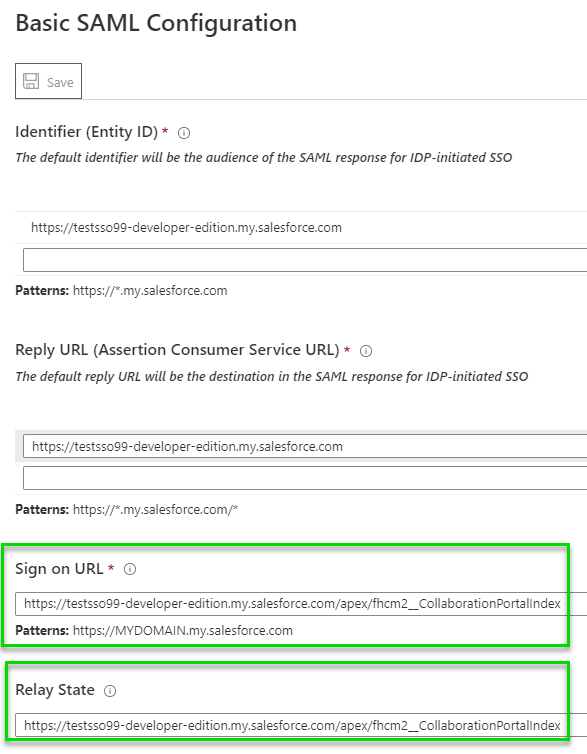
https://xxx.my.salesforce.com/apex/fhcm2__CollaborationPortalIndex. Replacexxx.my.salesforce.comwith the org's custom domain.- Enter your Sage People org’s WX URL in Relay State (where applicable):
https://xxx.my.salesforce.com/apex/fhcm2__CollaborationPortalIndex. Replacexxx.my.salesforce.comwith the org's custom domain.
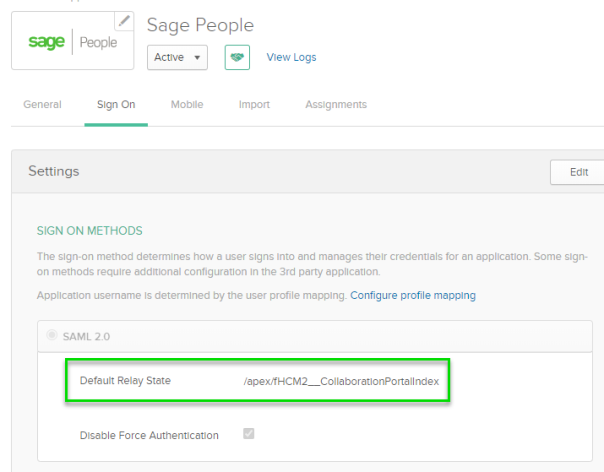
NoteIn Okta, Default Relay State is simply
/apex/fhcm2__CollaborationPortalIndexas shown in the screenshot. Okta does not require a full string, because it passes the relay state end point URL in the SAML assertion:
In Azure, enter the Sign On URL and Relay State as shown in the screenshot. Both the Relay State and the Sign on URL in full need to be configured in Azure to force the user to WX:

- Copy and note the custom metadata link.
- Download the certificate and save.
- Select Save.
- Provision the app to all users who require access to it.