PDF Templates | Create a Salesforce site to support PDFs
You must create a Salesforce site to support PDFs that are:
-
Sent as a result of an action event
OR
-
Included in a batch
OR
-
Sent using the Send PDF button from a record, if greater than 4000 characters long.
NoteUsing Preview on the Send PDF page to view a PDF before sending can add invisible characters to the PDF, increasing the character count. PDFs at or near the 4000 character limit can be pushed over the limit and will not send if you do not have a supporting Site.
If you are not sure your PDFs will remain below 4000 characters, set up a supporting Site to ensure they can be sent.
To set up a site to support PDFs:
- Create a Salesforce site to support PDFs
- Configure Visualforce page access for the site
- Configure guest user access
- Register the site URL on the HCM Configure page.
- Add a Remote Site for the site.
Create a Salesforce site
The URL for your site is in the form: http://xxxx.my.salesforce-sites.com/yyyy
where xxxx is your organization's My Domain subdomain and yyyy is the URL path for your site.
To create a Salesforce site to support PDFs:
-
Go to the Sites setup page:
Go to Setup, and in Quick Find enter Sites.
-
Salesforce automatically creates a site domain using your organization's custom domain. If you have not done so already, read and accept the Salesforce Sites Terms of Use and select Register My Salesforce Site Domain.
- Select New:

-
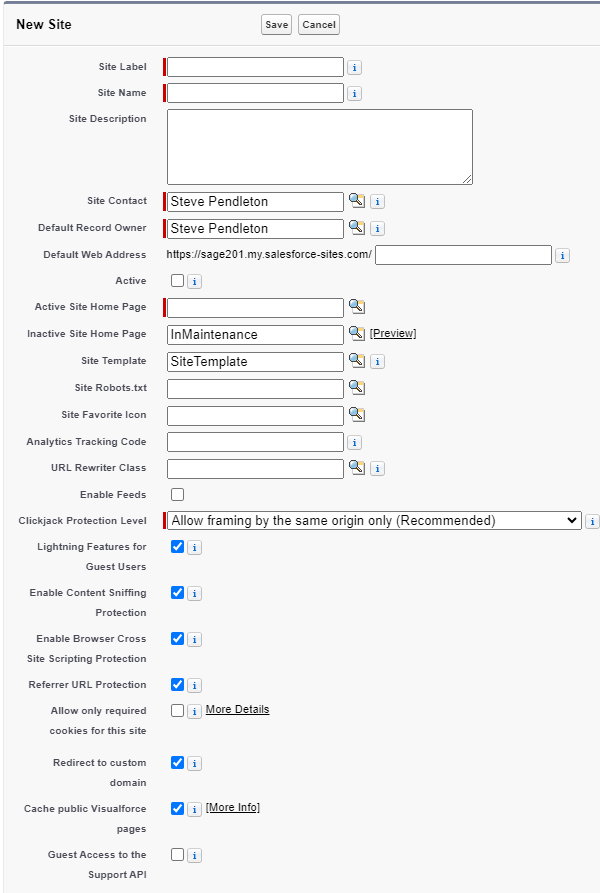
Salesforce displays the Site Edit page:
-
Give the site a Label and optional Description. The Name field is automatically generated from the label.
-
In the Default Web Address field, enter the URL path for the site (for example: pdf). This will be the public URL used to access your site by external users.
-
Mark the site as Active to make it available. If you are not ready to publish the site, you can edit the site later to make it active.
-
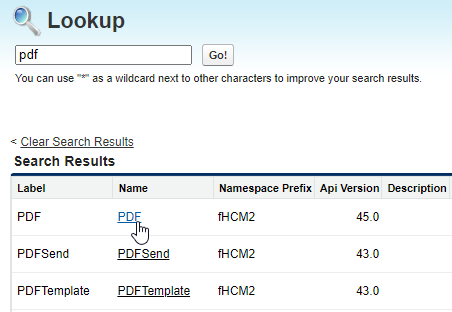
For the Active Site Home Page, select the Visualforce page for the site. Select Lookup
 and search for PDF. Use the default page unless you have created an alternative.
-
Leave the other fields set at their defaults unless you have a requirement to adjust advanced settings for the site.
-
Select Save.
Sage People displays the Site Details page for the new site.
Configure Visualforce page access
Next we must configure Visualforce page access to make site template pages accessible through this site.
On the Site Details page for the new site:
-
Scroll down to the Site Visualforce Pages Related List and select Edit.
-
On the Enable Visualforce Page Access page, select the following pages from the list of Available Visualforce Pages and Add them the the list of Enabled Visualforce Pages:
- fHCM2 FormPDF
- fHCM2 PDF Send
- fHCM2 PDF Template
- fHCM2 PDF TemplateEdit
-
Select Save.
The list of Site Visualforce Pages includes a number of default pages to handle standard conditions in addition to the PDF-specific pages you have added.
Configure guest user access
Next we must configure public access settings to allow guest users to access this site.
On the Site Details page for the new site:
-
On the Site Details page, select Public Access Settings.
Sage People displays the Profile page created for the site you have defined. The Profile is assigned to a Guest User License.
-
On the Profile page, select Edit.
Sage People displays the Profile Edit page.
-
Scroll down to the Custom Object Permissions section, and set the following permissions:
Custom object Permissions to grant Read
Create
Edit
Delete
View All
Modify All
Employment History
Yes
None
None
None
None
None
PDF Templates
Yes
Yes
None None None None PDF Template Sections
Yes
Yes
None None None None Team Member
Yes
None
None
None
None
None
-
Select Save.
Register the site URL
Next, register the site URL on the HCM Configure page to associate the site you have created with your HCM organization's Send PDF function.
-
Go to Setup, and in Quick Find enter installed and select Installed Packages from the search results.
-
Beside the Human Capital Management package, select Configure.
Sage People displays the HCM Configure page.
-
In the Sites URL field enter the complete URL for the PDF site in the form:
http://xxxx.my.salesforce-sites.com/yyyy
where:
-
xxxx is your company identifier.
-
yyyy is the site suffix. This is the part of the Default Web Address you entered when completing the Site Edit page at the start of this procedure.
Ensure you specify the correct protocol - http or https - in the URL. Your organization's main site and this remote site must use the same protocol.
The Site URL on the HCM Configure page must exactly match the Remote Site URL in the Remote Site Settings.
-
-
Select Save.
Add a Remote Site
Finally, add Remote Site settings for the site you have created to allow your Salesforce organization to call the external site.
-
Go to Setup, and in Quick Find enter remote and select Remote Site Settings from the search results.
-
On the All Remote Sites page select New Remote Site.
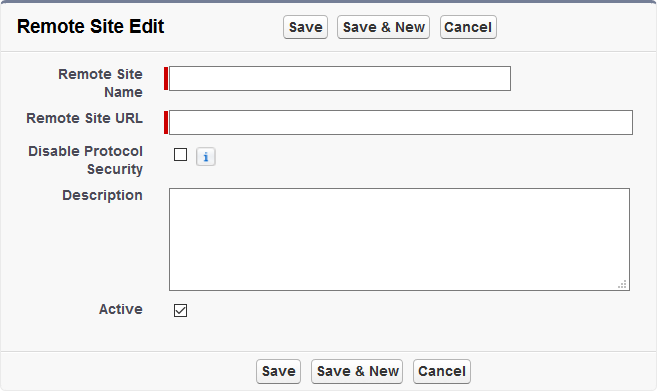
Sage People displays the Remote Site Edit page:
- Complete the fields as follows:
Field Description Remote Site Name
The name you want to display for the Remote Site. Enter a name that makes the site's function easy to identify, for example:
PDF
Remote Site URL
The URL for the Salesforce site you defined at the start of this procedure, without the suffix. For example, if the complete URL is:
https://xxxx.my.salesforce-sites.com/yyyy
enter:
https://xxxx.my.salesforce-sites.com
Ensure you specify the correct protocol - http or https. The protocol for the remote site must correspond with that for your organization's main site.
Make sure the Remote Site URL is exactly the same as the Site URL on the HCM Configure page.
Disable Protocol Security
Checkbox. Check to enable the Remote Site to be used for both HTTP and HTTPS sessions.
Description
A brief description of the site's function to ease identification. For example:
Supports Sage People Action Event PDFs.
Active
Checkbox. Select to activate the Remote Site.
-
Select Save.
Your org is now set up to enable you to send PDFs from Action Events, through batches, and by using the Send PDF button on a record when the PDF is greater than 4000 characters long.

