The Payroll Line object and the Inbound Staging Line object can both act as an intermediary between an imported data file and a Payflow Batch, or between the imported file and Sage People HCM objects. Both objects enable Sage People data to be synchronized with one or more external sources.
- Use Payroll Line to upload payroll-specific data for payslips. Most of the fields in the Payroll Line object have parallel fields in the Team Member, Employment Record, or Salary objects.
- Use Inbound Staging Line to upload all non payslip data. For Training object fields you must use Staging Line - you cannot use Payroll Line to map to Training data fields.
Note
You can upload training data to create new, or update existing Team Member Training records. A typical workflow is as follows:
- Team Members with no previous Training records complete training modules on an external system.
- The external system generates a CSV file containing all data fields required for the Team Member's Training record.
- The CSV file is exported to the Payflow SFTP site and imported to Sage People, with new Training records created as needed.
Every field you want to use from an upload file must be mapped to a Payroll Line or an Inbound Staging Line; unmapped fields are ignored.
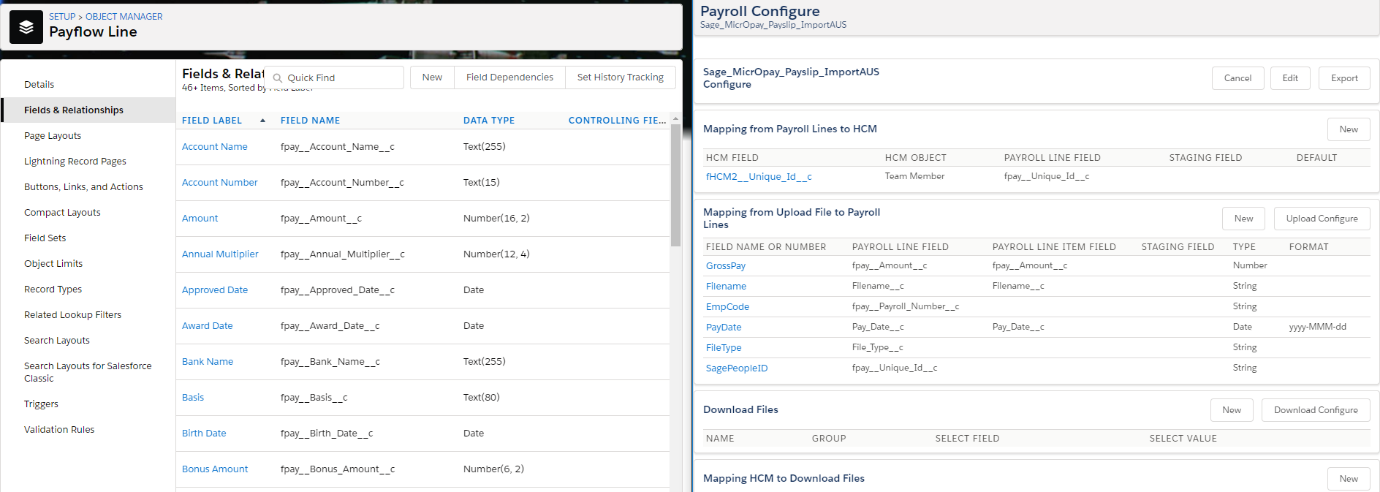
Create any fields required to receive data from the Payflow that are not already in the Payflow Lines Object, paying attention to the format of the incoming data. To create a field, go to: Setup > Object Manager > Payflow Lines > Fields & Relationships > New.
For example, if there was no Amount field on the Payflow Lines object to receive GrossPay, as in the screenshot below, a currency field would need to be created to match the format.
When mapping fields to the Payroll Line object, you can compare the data brought in by the Payflow service with the corresponding fields in the Payflow Lines object that will receive the data.
Use two screens to bring the Object Manager and Payroll Configure pages up together, or split the screen in 2 to view both windows for comparison:
Ensure that your source data does not contain special characters, and that there are no validation rules on the mapped fields, such as requiring unique values. Special characters and validation rules can cause the import to fail and records will not be created.
To map an upload file:
- On the Payflow Service Console for the Service, select Configure:
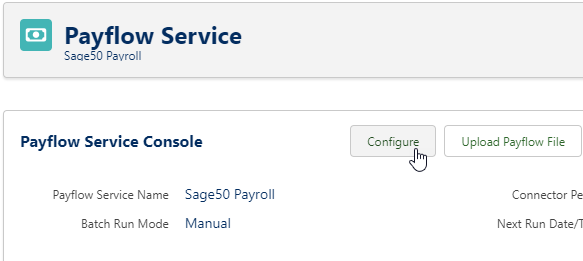
Sage People displays the Configure page for the Payflow Service.
- In the Mapping from Upload File to Payroll Lines section, select New.
Sage People displays the Configure page.
-
Complete the fields as follows:
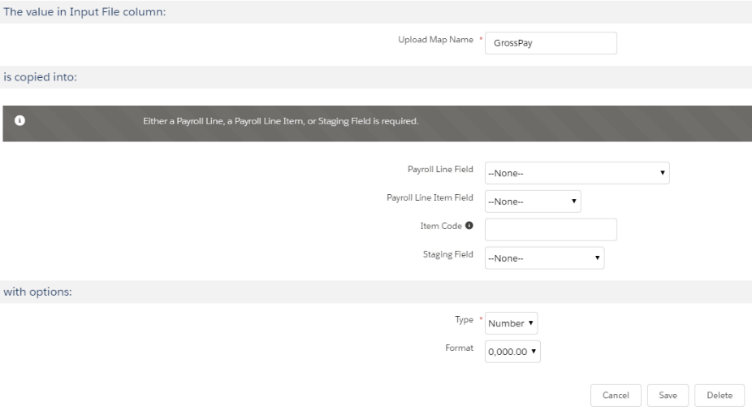
The value in Input File column: section
Field Description Upload Map Name
The name of the field in the upload file.
-
Complete the fields in the is copied into: section as follows. You are prompted to enter a Payroll Line, a Payroll Line Item, or a Staging Field. Use Payroll Lines for payslip data, use Staging Fields for non-payslip data.
Field
Description
Payroll Line Field
Picklist. The name of the field in the Payroll Line object you want to use to map Upload Map Name.
Select the picklist and choose the field.
If the field is not supplied by default with Payflow you can add it as a custom field.
Payroll Line Item Field
Picklist. The name of the field in the Payroll Line Item object you want to use to map Upload Map Name.
Item Code
Staging Field
Picklist. The name of the field in the Inbound Staging Line object you want to use to map Upload Map Name.
-
Complete the fields in the with options: section as follows:
Field Description Type
Picklist. The type of data this field contains. Select the picklist and choose from:
- String
- Date
- Number
- Boolean
Not added by default to the picklist. To add Boolean to the picklist:
- Go to Setup > App Setup > Create > Objects and select the Upload Map label.
- In the Custom Fields & Relationships section select the Type Field Label.
- Scroll down to the Picklist Values section and select New.
- Add the picklist value Boolean and select Save.
Boolean is added to the picklist for the Type field.
Format
Picklist. The format of the data this field contains. This is a dependent picklist with the content determined by the Type selected.
Select the picklist and choose the format for the data.
Data of type Email has no selectable format; the field is expected to contain a valid email address of the form:
<local_part>@<domain_name>
- Select Save.
Sage People displays the Payflow Service Configure page with the mapping you defined added to the list of fields in the Mapping from Upload File to Payroll Lines section.
- Repeat the mapping process until every field that you want to use from an upload file is mapped to a Payroll Line.