Create and apply Permission Sets
Permission Sets are required to enable and control appropriate levels of access to data for both administrators and candidates.
To create the Permission Set for administrators:
-
Go to Setup > Users > Permission Sets.
-
Select New.
-
Complete the fields as follows:
Field What to enter Label Enter Candidate Portal Admins. API Name Automatically completed for you using the Label you entered. Description Enter a brief description, for example: To enable administrator access to the Candidate Experience Portal. Session Authentication Required Checkbox. Leave unchecked. License Leave the default value None. -
Select Save.
Sage People displays the detail page for the newly created Permission Set.
- In the System section select System Permissions.
- On the System Permissions page select Edit.
-
In the System section scroll down and select:
- Manage Multi-Factor Authentication in API
- Manage Multi-Factor Authentication in User Interface

-
Select Save.
You are asked to confirm.
-
Select Save.
Now add the Candidate Portal Admins Permission Set to the Candidate Portal Admin Group:
-
Go to Setup > Users > Permission Set Groups.
-
On the Permission Set Groups page select the Candidate Portal Admin Group.
Sage People displays the Candidate Portal Admin Group page.
-
In the Permission Sets section select Permission Sets in Group.
-
Select Add Permission Set.
-
Select the Permission Set you have just created: Candidate Portal Admins.
-
Select Add.
The Permission Set is added to the group and Sage People displays a confirmation message:

Now assign the Candidate Portal Admin Group to administrators:
-
Go to Setup > Users > Users.
-
Select the administrator user.
-
On the User detail page select Permission Set Group Assignments.
-
Select Edit Assignments.
-
In the list of Available Permission Set Groups select Candidate Portal Admin.
-
Select Add to add the group to the list of Enabled Permission Set Groups.
-
Select Save.
To create the Permission Set for candidates:
-
Go to Setup > Users > Permission Sets.
-
Select New.
-
Complete the fields as follows:
Field What to enter Label Enter Candidate Portal Custom Permissions. API Name Automatically completed for you using the Label you entered. Description Enter a brief description, for example: To enable candidate access to the Candidate Experience Portal. Session Authentication Required Checkbox. Leave unchecked. License Leave the default value None. -
Select Save.
Sage People displays the detail page for the newly created Permission Set.
- In the System section select System Permissions.
- On the System Permissions page select Edit.
-
In the System section scroll down and select Run Flows:

-
Select Save.
You are asked to confirm.
-
Select Save.
-
Return to the Permission Set Overview page.
Now add access permissions to the Account and Contacts standard objects:
-
On the Permission Set Overview page select Object Settings.
-
On the Object Settings page select the Object Name for Accounts.
-
On the Accounts page select Edit.
-
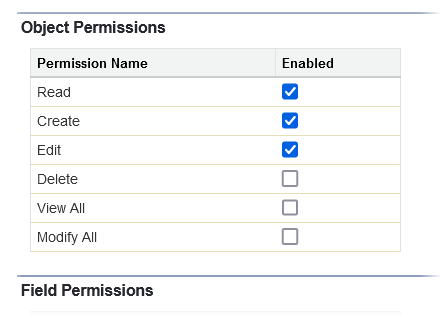
In the Object Permissions section select the Enabled checkboxes for Read, Create, and Edit:
-
Select Save.
-
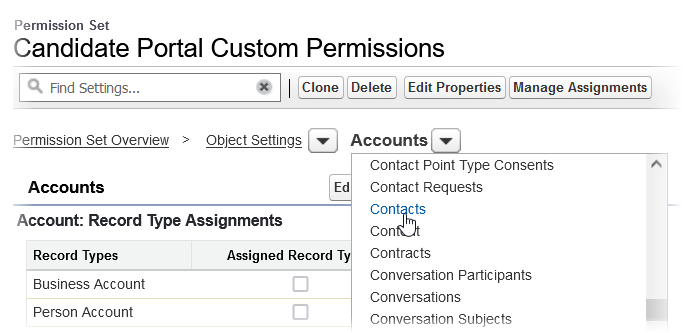
On the Candidate Portal Custom Permissions page for Accounts, select the object picklist and choose Contacts:
-
On the Contacts page select Edit.
-
In the Object Permissions section select the Enabled checkboxes for Read, Create, and Edit.
-
Select Save.
-
You can now exit the Permission Set.
Now add the Candidate Portal Custom Permissions Permission Set to the Candidate Portal Group:
-
Go to Setup > Users > Permission Set Groups.
-
On the Permission Set Groups page select the Candidate Portal Group.
Sage People displays the Candidate Portal Group page.
-
In the Permission Sets section select Permission Sets in Group.
-
Select Add Permission Set.
-
Select the Permission Set you have just created: Candidate Portal Custom Permissions.
-
Select Add.
The Permission Set is added to the group and Sage People displays a confirmation message: