In Salesforce Lightning Experience, you can subscribe to reports and dashboards. When you subscribe to a report or dashboard, the report is run or the dashboard is refreshed according to the schedule you set, and you can opt to receive an email notification. For report subscriptions, you can also define conditions for the notification.
Limitations
Salesforce sets a maximum limit for the number of report and dashboard subscriptions a user can have:
-
maximum of 7 report subscriptions
-
maximum of 7 dashboard subscriptions
Salesforce Lightning Experience report subscriptions are not supported for:
-
historical trending reports
-
joined reports
-
conditional highlighting does not display in subscription emails
-
images specified in custom formula fields
The following limitations apply to dashboard subscriptions:
-
dashboard filters are not applied to emailed dashboards
-
dynamic dashboards (dashboards which change depending on the dashboard viewer) do not support subscriptions
-
funnel chart total values are not included in the subscription emails
-
subscriptions do not refresh dashboards where the dashboard refers to a report with a unique count or field-to-field filter
Settings and permissions
Salesforce made changes to report and dashboard folder sharing in their Spring '22 release, retiring Legacy Folder Sharing and making Enhanced Folder Sharing enabled by default. If you have an older org, and you switch to the Salesforce Classic interface, you can go to Setup > App Setup > Customize > Reports & Dashboards > Folder Sharing. There you can see the option for enabling Enhanced Folder Sharing, which is now enabled by default. If you have a newer org, this setting is no longer required and therefore not available.
Subscribing to reports and setting up report subscriptions for others requires permissions as follows:
-
Subscribe to Reports
-
Subscribe to Reports: Add Recipients
-
Subscribe Reports: Send to Groups and Roles
-
Subscribe to Reports: Set Running User
Subscribing to dashboards and setting up dashboard subscriptions for others requires permissions as follows:
-
Subscribe to Dashboards
-
Subscribe to Dashboards: Add Recipients
-
Subscribe to Dashboards: Sent to Groups and Roles
If you use permission sets, to check the permission sets you want to have access to report or dashboard subscriptions, go to Setup > Administration > Users > Permission Sets and select a permission set. On the Permission Set details page, in the System section, select System Permissions, and scroll through the list. Note you cannot make changes to packaged Sage People permission sets. You can create a separate permission set for these permissions and assign it to the users who need it separately, or to add them to your custom permission sets.
To check and update the profiles you want to have access to report or dashboard subscriptions, go to Setup > Administration > Users > Profiles and select a profile. In the Profile details, select Edit and scroll to the Administrative Permissions section. Review the permissions. If you make changes, select Save.
Subscribe to a report
To subscribe to report:
-
When viewing the report, select Subscribe from the More actions button:
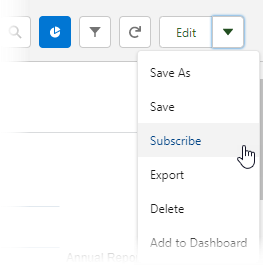
Sage People displays the Edit Subscription dialog, where you can schedule when the report runs, who are the recipients of the notifications, and set the user running the report. You can also add conditions for when the report notifications are sent.
-
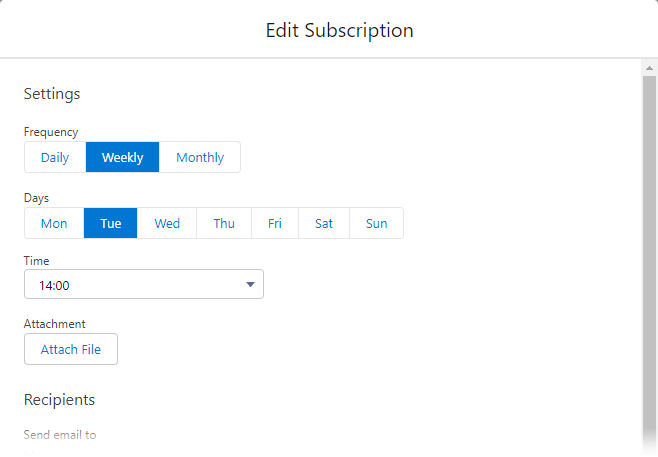
In the Settings section, define the schedule for when the report runs:
-
Frequency:
-
Daily
Choosing Daily displays the Time picklist. Select the time of day for running the report.
-
Weekly
Choosing Weekly displays Days with a button for each weekday, and the Time picklist. Select the weekday and the time of day for running the report.
-
Monthly
Choosing Monthly gives you the option of selecting relative days, or specific days. For example:
-
Relative: Third Wednesday
-
Relative: Last Monday
-
Specific: Last Day
-
Specific: Dates: 1 and 15
After selecting the day, select the time of the day for running the report.
-
-
-
-
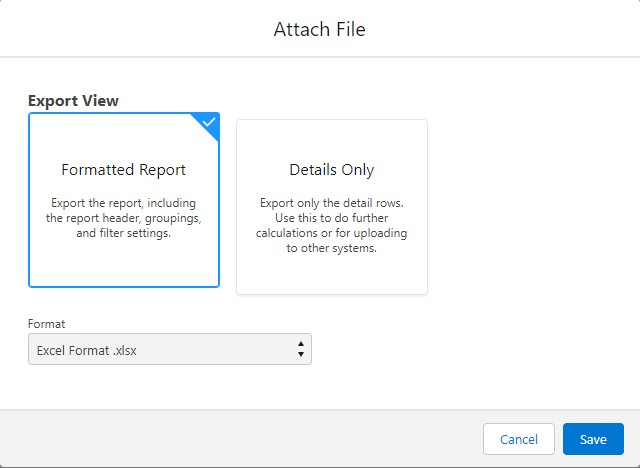
In the Settings section you can also select if you want an exported report file included in the notification email. If you want a file included, select Attach File and then on the Attach File dialog:
-
select Formatted Report to receive a Microsoft Excel format file in the email. This is the default option if you want to include a file.
-
select Details Only to receive the detail rows in a comma-separated (CSV) file. You can choose which encoding to use to ensure the file is compatible with other systems if you are exporting the report to use the data elsewhere.
Attached files are subject to Salesforce size limits.
Select Save to save your attachment settings.
-
-
In the Edit Subscription dialog, Recipients section you can choose additional recipients for the report. Select Edit Recipients to subscribe other users, roles or public groups to the report.
You can also remove yourself as a recipient.
Subscribing others to the report requires the Subscribe to Reports: Add Recipients permission, and adding groups or roles as subscribers requires the Subscribe Reports: Send to Groups and Roles permission.
If you add others, check the report folder is shared with the user, role, or public group.
-
On the Edit Recipients dialog, first select the Entity type, and then search for the user, role, or public group you want to add as subscribers, then select Add:
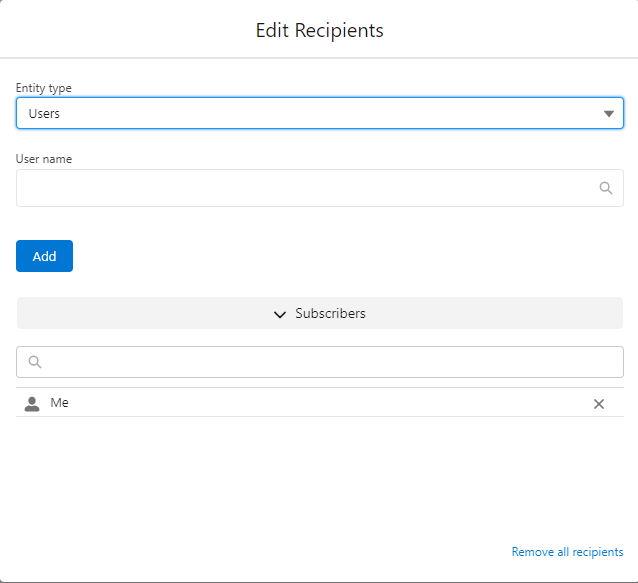
When you have finished adding all the recipients you want to add, close the dialog.
TipWhen selecting groups or roles as recipients, bear in mind a maximum of 500 email notifications are sent for one report subscription.
-
On the Edit Subscription dialog, Run Report As enables you to specify if the report is run as you, or choose another user. All subscribers see the same data in the report as the Run As user.
When you select Another Person, you can search for the other person's name to select it:
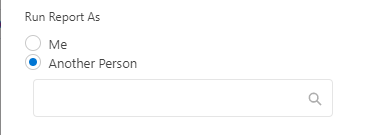
Changing the Run Report As user requires the Subscribe to Reports: Set Running User permission.
-
Optionally, in the Conditions section, you can set conditions for the report notifications:
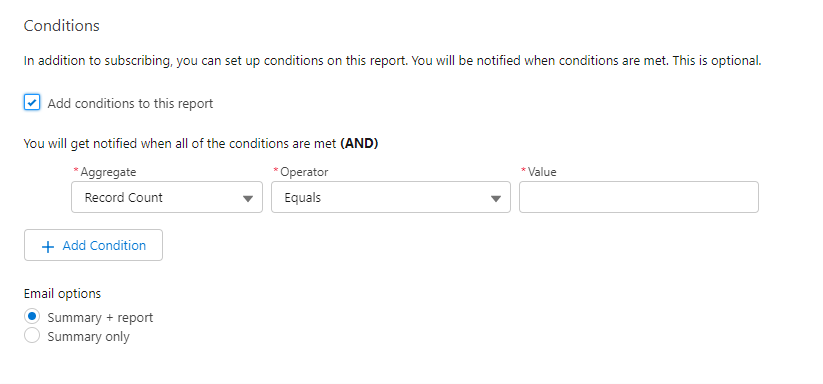
If you set conditions, they are evaluated after the report is run to decide if the report notifications are sent. Conditions have aggregate, operator, and value fields. The options available for aggregate depend on the report column types. Record count is always available, and other options, such as sums, averages, maximum or minimum values, can be available for columns with numeric data or calculations.
To add a condition, select Add conditions to this report, and then enter details for the condition. You can add another condition by selecting Add Condition. A report subscription can have a maximum of 5 conditions.
-
Select Save.
The report is now run according to the schedule you set, and notifications sent according to the schedule and conditions, if you set any.
Subscribe to a dashboard
To subscribe to a dashboard:
-
When view the dashboard, select Subscribe.
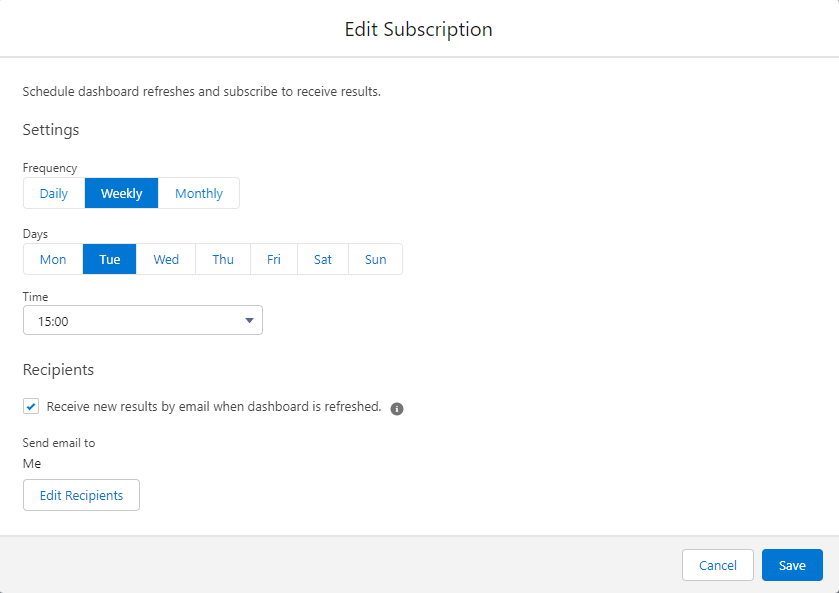
Sage People displays the Edit Subscription dialog:
-
In the Settings section, define the schedule for when the dashboard is refreshed and notifications sent.
-
Frequency:
-
Daily
Choosing Daily displays the Time picklist. Select the time of day for running the report.
-
Weekly
Choosing Weekly displays Days with a button for each weekday, and the Time picklist. Select the weekday and the time of day for running the report.
-
Monthly
Choosing Monthly gives you the option of selecting relative days, or specific days. For example:
-
Relative: Third Wednesday
-
Relative: Last Monday
-
Specific: Last Day
-
Specific: Dates: 1 and 15
After selecting the day, select the time of the day for running the report.
-
-
-
-
In the Recipients section, Receive new results when dashboard is refreshed is selected by default. You can:
-
deselect the Receive new results when dashboard is refreshed checkbox if you do not want notifications
-
select Edit Recipients if you want to subscribe others to this dashboard.
Adding subscriptions for others requires Subscribe to Dashboards: Add Recipients and Subscribe to Dashboards: Sent to Groups and Roles permissions.
If you add others, check the dashboard folder is shared with the user, role, or public group.
On the Edit Recipients dialog, first select the Entity type, and then search for the user, role, or public group you want to add as subscribers, then select Add:

When you have finished adding all the recipients you want to add, close the dialog.
-
-
Select Save.