Creating a new Internal Communication
You can display up to 20 internal communications in the carousel in Sage People.
Add a new internal communication
-
Select the Internal Communications tab.
Sage People displays the Internal Communications Home page.
-
Select New.
Sage People displays the Internal Communication page:

You can complete:
- Just the Basic Options and save. The Internal Communication is displayed by default to everyone who has access to the hosting WX Service
- The Basic Options and the Advanced Options to define a more restricted target audience
-
On the Basic Options tab, give a name to the Internal Communication:
Field What to enter Internal Communication Name The name you want to use for this Internal Communication. This doesn't display to end users through WX. The title that appears to users in WX is the process label for this internal communication.
You can use letters, numbers, and spaces. The system doesn't support special characters.
-
On the Basic Options tab, complete the fields in the Tile Information section to define the tile content. These options define how tiles will display in the carousel.
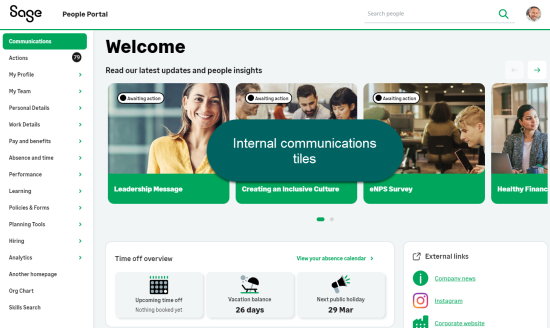
Field What to enter Tile Type The type of Tile you want to create for this Internal Communication. Select the picklist and choose from:
-
Image: displays an image in the tile that links to the detail page for the Internal Communication
-
Image Click Through: displays an image in the tile that links to an external URL. Image Click Through tiles don’t have a detail page
-
YouTube: lets you embed a YouTube video in the tile.
-
Video: lets you embed a video in the tile by including a direct link to the video URL
-
Twitter: lets you embed an X (formerly Twitter) feed in the tile by including the feed ID
-
External Link: displays the link you enter as an icon within the external links component on the WX homepage. Unlike other Internal Communications tiles, this tile type doesn’t appear separately on the homepage. External Links don’t have a detail page
NoteWe deprecated some legacy tile types, such as Rich Text, External Website, and HTML in an earlier release. You can still use these types as detail page types for internal communication pages. You can't use them for tiles in the internal communications carousel.
If the picklist doesn't display the full set of values, you can add them. In summary:
-
Go to Setup , and select Internal Communication.
- From the sidebar, select Fields & Relationships and then select the Tile Type Field Label.
- In the Values Related List, select New.
- Add the missing values exactly as given.
- Select Save.
External Website Url Displays if you select Image Click Through
For Image Click Through tiles, the system uses the URL as a hyperlink on the embedded image.
For External Link tiles, the link displays using your selected icon in the external links component of the WX homepage.
Enter the full URL of the web page in the form:
https://www.example.com
Website URLs are subject to your organization's access policy. Ensure you've authorized your intended target audience to access the site you want to use.
If you want the tile to display a clickable email address, enter mailto:<email address>. What happens when users click the link depends on the email setup on the device. When you set a default email application, selecting the link opens a new email in the default application. It has the specified email address in the To field.
Video Url Displays if you select Video as the Tile Type.
Enter the full URL of the video you want to display in the tile, in the form:
https://www.example.com/filepath/filename
Make sure the video source enables the hosted videos to embed on other websites. Look for the Embed Code or Share icons.
The video URL must use the HTTPS protocol.
If you specify a video to run in the Internal Communication tile, be aware that some Team Members can navigate directly to the Detail view. This means they'll bypass the Tile. If the video is essential viewing, display it in the Detail view as well as, or in place of the Tile.
Video URLs are subject to your organization's access policy. Make sure you've authorized your intended target audience to access the video you want to use.
Image Displays if you select Image or Image Click Through as the Tile Type.

Select Choose File, find and select the image you want.
Tile images display responsively, adapting to the browser window size you’re viewing. This preserves the image aspect ratio.
Choose an Icon Displays if you select External Link as the Tile Type.
The icon that displays for the link in the external links component on WX homepages. Choose an icon for the link using the dropdown menu. The system sorts available icons in the list, with generic icons at the top and brand icons at the bottom.
Twitter ID Displays if you select Twitter as the Tile Type.
The unique X (formerly Twitter) ID for the account you want to link to this Internal Communication.
NoteOn 30 June 2023, X (formerly Twitter) changed its terms of use for third-party access. Some customers experience issues with embedded timelines when using the Twitter Internal Communication type. X feeds can load differently than you expect, and a message stating "Nothing to see here" sometimes displays.
Link Color Displays if you select Twitter as the Tile Type.
The hexadecimal (hex) code for the color you want to use for the Twitter link. Enter the code in the form:
#RRGGBB
where:
RR is the hex code for the red component of the color.
GG is the hex code for the green component of the color.
BB is the hex code for the blue component of the color.
For example, royalblue is represented by:
#4169E1
Dark Theme Displays if you select Twitter as the Tile Type.
Checkbox. If you check this, the X (formerly Twitter) feed displays in dark mode.
YouTube Video ID Displays if you select YouTube as the Tile Type.
The unique identifier for the YouTube video you want to link to this Internal Communication. YouTube supplies this. The YouTube Video ID displays as the string of characters following the = sign towards the end of the URL for the video:

If you specify a video to run in the Internal Communication Tile, be aware that some Team Members can navigate directly to the Detail view. This means they'll bypass the Tile. If the video is essential viewing, display it in the Detail view as well as, or in place of the Tile.
Render Tile As Player Displays if you select YouTube as the Tile Type.
Checkbox. If you check this, the YouTube video player renders within the Tile and users can play the video in the Tile. They can do this without having to access the Detail view. If you don't check this, you must access the Detail view to play the video. You can't play the video directly from the Tile view.
-
-
On the Basic Options tab, complete the fields in the Detail Information section to configure a detail page for the communication. If you configure a detail page, users can click through from the tile to find more information.
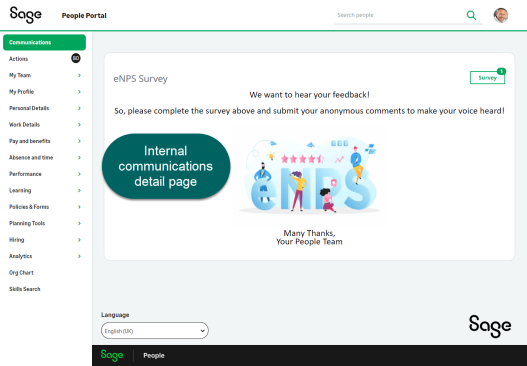
These options define how the detail page for the communication displays, if you configure one:
Field What to enter Detail Type The type of Detail page you want to create for this Internal Communication. Detail content displays when users select the tile.
Select the picklist and choose from:
- Rich Text: formatted text that can contain images and links
- Image: an image file that you can upload
- Image Click Through: an image that links to an external URL
- Video: an embedded video hosted on an external site, using the video's direct URL
- YouTube: an embedded YouTube video, using the video's unique identifier
- External Website: embeds content from an external URL that you specify
- Twitter: an embedded X (formerly Twitter) feed, using the X (formerly Twitter) ID
- HTML: renders HTML markup in the detail page
NoteYou can no longer use the types Rich Text, External Website, and HTML for tiles in the internal communications carousel. You can still use them as internal communication detail pages.
If the picklist doesn't display the full set of values, you can add them. In summary:
-
Go to Setup , and select Internal Communication.
- From the sidebar, select Fields & Relationships and then select the Detail Type Field Label.
- In the Values Related List, select New.
- Add the missing values exactly as given.
- Select Save.
If you don't want to display a detail page for a tile, leave Detail Type at its default value. Leave the content fields empty. The tile won't link to a detail page.
Detail Content Displays if you select Rich Text as the Detail Type.
A text input field with standard formatting buttons:

Enter the text you want to appear in the Detail view. You can also embed links and pictures:

If you want the Detail view to contain an image and no text, in Detail Type select Image or Image Click Through.
External Website Url Displays if you select External Website or Image Click Through as the Detail Type.
-
For External Website detail pages, the web page embeds in an iframe in the detail page
-
For Image Click Through detail pages, the URL is a hyperlink on the embedded image
Enter the full URL of the web page in the form:
https://www.example.com
Website URLs are subject to your organization's access policy. Ensure you've authorized your intended target audience to access the site you want to use.
When using an External Website detail page, the website must:
- Allow display in an iframe. If it doesn't, a refused to connect message displays
- Use the HTTPS protocol
Video Url Displays if you select Video as the Detail Type.
Enter the full url of the video you want to display in the Detail in the form:
https://www.example.com/filepath/filename
The video URL must use the HTTPS protocol.
If you specify a video to run in the Internal Communication tile, be aware that some Team Members can navigate directly to the Detail view. This means they'll bypass the Tile. If the video is essential viewing, display it in the Detail view as well as, or in place of the Tile.
Video URLs are subject to your organization's access policy. Make sure you've authorized your intended target audience to access the video you want to use.
Image Displays if you select Image or Image Click Through as the Detail Type.
Select Choose File, find and select the image you want to use.
A preview of the image displays below Detail Image Aspect Ratio.
Detail Image Aspect Ratio Displays if you select Image or Image Click Through as the Detail Type. Use to help you choose an image fitting the Detail View.
Picklist. Select the picklist and choose the aspect ratio you want to use for the image on the Detail View. You'll commonly use the aspect ratios for images.
The page displays a mask on the image, indicating how you want to crop the image for WX display at the aspect ratio you selected. The mask covers the part of the image you want to hide. If your image shows significant masking, the Detail View will include white space as it resizes responsively.
Sage People doesn't let you resize the image. Use image manipulation software to produce an image fitting the aspect ratio of the Detail View.
Twitter ID Displays if you select Twitter as the Detail Type.
The unique X (formerly Twitter) ID for the account you want to link to this Internal Communication.
NoteOn 30 June 2023, X (formerly Twitter) changed its terms of use for third-party access. Some customers experience issues with embedded timelines when using the Twitter Internal Communication type. X feeds can load differently than you expect, and a message stating "Nothing to see here" sometimes displays.
Link Color Displays if you select Twitter as the Detail Type.
The hexadecimal (hex) code for the color you want to use for the Twitter link. Enter the code in the form:
#RRGGBB
where:
RR is the hex code for the red component of the color.
GG is the hex code for the green component of the color.
BB is the hex code for the blue component of the color.
For example, royalblue is represented by:
#4169E1
Dark Theme Displays if you select Twitter as the Detail Type.
Checkbox. If you check this, the X (formerly Twitter) feed displays in dark mode.
YouTube Video ID Displays if you select YouTube as the Detail Type.
The unique identifier for the YouTube video you want to link to this Internal Communication. YouTube supplies this. The YouTube Video ID displays as the string of characters following the = sign towards the end of the URL for the video:
If you specify a video to run in the Internal Communication Tile, be aware that some Team Members can navigate directly to the Detail view. This means they'll bypass the Tile. If the video is essential viewing, display it in the Detail view as well as, or in place of the Tile.
HTML Displays if you select HTML as the Detail Type.
Enter the HTML you want to render in the Detail View. You don't need to include
<html>,<head>, or<body>tags.To avoid creating a potential security vulnerability, don't embed hyperlinks in your HTML. Use the Rich Text or Image Click Through Detail Types instead.
If your Detail View content is image only with no click through, use the Image Detail Type.
-
On the Advanced Options tab, complete the fields in the Audience Definition section as follows:
 Tip
TipThe system treats any fields you complete in the Audience Definition section as AND conditions, not as OR conditions. For example, you've selected the audience as both a Policy and a Group. Only team members associated with the policy and members of the group can see the internal communication. If you've only associated a team member with the policy but not a member of the group, they don't see the internal communication.
Field What to enter Team Member Target the communication to specific team members by entering the team member name and a Level Down setting. Then select Save. Repeat to add further team members.
To look up team members, select Team Member Lookup
 to search and select one team member at a time. To add another team member, select Save after each selection. As you add team members, their names appear under the field.
Use with the Exclude Team Member setting to prevent the communication from showing to the named team members.
Enter a number in the Level Down field to define the number of reporting levels below the named team members to include (or exclude). You must enter a value in this field if you select named team members. To target the communication to specific employees and not their direct reports, enter 0.
If you want more than 10 team members to receive this internal communication, Sage People recommends adding the team members to a Group. You can then select the Group as the audience. For more information about groups,
Exclude Team Member Checkbox. Use with Team Member. If you check this, the team members you've selected are unable to view this communication.
Level Down Use with Team Member. The number of levels of the company hierarchy below Team Member you want to view (or exclude from) this communication.
The system requires this if you've populated the Team Member field.
Set to 0 (zero) if you want this Internal Communication to target the team members you named and not their direct reports.
For example, to control visibility of the Internal Communication when a Team Member is the CEO:
-
Level Down = 0
Only the CEO can view
-
Level Down = 1
The CEO and CEO's direct reports can view
-
Level Down = 2
The CEO, their direct reports, and the direct reports of those direct reports can view
Is Manager Target the communication to managers only.
Checkbox. If you check this, the Internal Communication is only visible to those team members who have direct reports. When you select this option, team members who don't have direct reports don't see the communication.
Ensure that you also select the Show To Team Member in the Advanced Options tab.
Policy Target the communication to employees in a specific policy or multiple policies.
Enter the name of the policy or policies assigned to the Team Members you want to view this Internal Communication. Select Policy Lookup
, find and select one Policy at a time. When selecting more than one Policy, select Save after each selection to add the Policy. As you add Policies, their names appear to the right of the field.Leave blank if you don't want to define the target audience by their Policy.
Policy Group Target the communication to employees in multiple policies, linked by Policy Group.
Enter the name of the Policy Group or Groups you assigned to the Team Members you want to view this Internal Communication. Enter the name of one Policy Group at a time. When adding more than one Policy Group, select Save after each entry to add the Policy Group. As you add Policy Groups, their names appear to the right of the field.
Leave blank if you don't want to define the target audience by their Policy Group.
Group Target the communication to a group of employees.
The name of the Groups containing the team members you want to view this internal communication. Select Group Lookup
, find and select one Group at a time. When selecting more than one Group, select Save after each selection to add the Group. As you add Groups, their names appear to the right of the field. For more information about groups,
Leave blank if you don't want to select the target audience by Group.
Group Type Target the communication to multiple employee groups, linked by group type.
The name of the group types containing the team members you want to view this internal communication. Select Group Type Lookup
, find and select one group type at a time. When selecting more than one group type, select Save after each selection to add the group type. As you add group types, their names appear to the right of the field. For more information about group types, see Adding a group type. Leave blank if you don't want to select the target audience by group type.
Employment Start Date Checkbox and dependent fields. If you check this, you can select the target audience by their Employment Start Dates. Use one of the two options to specify a range:
-
A number of days ago
To specify a rolling window relative to today. Use positive values with the lowest value first. For example:
-
Between 1 and 7 days ago
to target employees starting in the last week
-
Between 7 and 14 days ago
to target employees starting in the week before last
-
-
A date range
To specify a fixed calendar period. Select the fields to display a calendar and choose a date. Enter the earliest date in the first field. For example:
-
Between 1 August 2017 and 31 August 2017
to target all employees starting in the month of August 2017
-
Between 1 January 2016 and 31 December 2016
to target all employees starting in 2016
-
Employment End Date Checkbox and dependent fields. If you check this, you can select the target audience by their Employment End Dates. Use one of the two options to specify a range:
-
A number of days in the future
To specify a rolling window relative to today. Use positive values with the lowest value first. For example:
-
Between 1 and 28 days in the future
to target employees ending employment in the next four weeks
-
Between 1 and 90 days in the future
to target employees ending employment in the next three months
-
-
A date range
To specify a fixed calendar period. Select the fields to display a calendar and choose a date. Enter the earliest date in the first field
Alternative to completing the fields in the Audience Definition section, you can create an internal communication multi filter associated to the internal communication. For more information, see Internal Communication Multi Filters
-
-
Complete the fields in the Visibility Definition section as follows:
Field What to enter Show To Manager Not in use.
TipTo target a communication to managers only, select both Is Manager (under Audience Definition) and Show to Team Member.
Show To Other Not in use.
Show To Team Member Checkbox. The system checks this by default. You need to check this for the Internal Communication to be visible to any team members (including managers) in WX. If you clear this checkbox, the communication doesn't display.
Show On Mobile Only Checkbox. If you check this, the Internal Communication is visible on the Sage People Mobile app only.
-
On the Advanced Options tab, complete the fields in the Scoring Definition section as follows:
Field What to enter Scale The Scale recipients of this Internal Communication use when providing scored feedback.
You need this to display a Score button on the Internal Communications Detail view. Selecting Score on the Internal Communication displays the Review Internal Communication view with a picklist of the Scale values. If you use this, specify an existing scale in your organization's Scale Library. Scales typically include those you use to measure proficiency, expertise, frequency, and agreement.
To generate an Action for the Team Member to respond to this Internal Communication, use the Score Has Action checkbox. You'll find this on the WX Process Instance page.
-
Select Save.
Sage People displays the Internal Communication Detail page with Related Lists for: