Absence and Vacation |
Change to the vacation year
Sometimes organizations want to change the start and end date of the vacation year. For example, if an organization undergoes a merger, the original entities may have had different vacation cycles and want to settle on a shared vacation year. As a result, it can be necessary to change the vacation year in the system.
Sage People can accommodate this change but there are several steps to follow to ensure this change does not impact team members’ vacation entitlements.
The implementation steps use an example where the vacation year changes from one between January 1 and December 31 to one between June 1 and May 31.
Before making the change, consider the timing and existing absence requests:
-
Avoid taking action too far before the new start date of the vacation year unless you are also preventing the new vacation bookings between the action date and the start of the new vacation year. New absence requests affect the balances.
-
Communicate the change to employees in time, including any periods when they are unable to make new vacation requests.
-
If the change occurs in the middle of the old vacation year, consider the different kinds of balances employees can have at the start of the new vacation year start date:
- Employees who did not use any leave between January 1 and May 31 move to the new vacation year with the balance they have accrued and then start a new 12 months' accrual from June 1 for the new vacation year.
- Employees who had used all the accrued entitlement between Jan 1 to May 31 move to the new vacation year with a zero balance and then start a new 12 months' accrual from June 1 for the new vacation year.
- Employees who had used their entire annual entitlement by June 1 move to the new vacation year with a negative balance. Accrual from June 1 initially reduces the negative balance.
Steps to implement
Before implementing the change for everyone, test the scenario with test users in the production org, or in sandbox.
For testing:
- If you test in Production, consider copying the absence accrual pattern, renaming it and applying it as an override on the Employment Record of your test team member.
- When you are satisfied with the testing on your standard absence accrual rule for vacation, repeat the test on other vacation rules.
- Make sure you test any complex absence accrual rules for vacation.
-
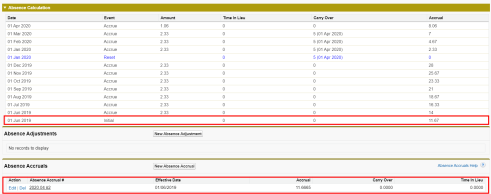
In a sandbox or using a test user in production, start by reviewing a team member's accrual record a month before the new vacation year starts. The following example shows a team member has accrued 11.67 days up to June 1, the start date of the new vacation year:
-
Log in to WX as the test user and verify balances in WX.
-
In another browser window, go to the absence accrual pattern you're using in the test and select the absence accrual rule for vacation.
-
On the Absence Accrual Rule page, select the Generate Accruals button.
-
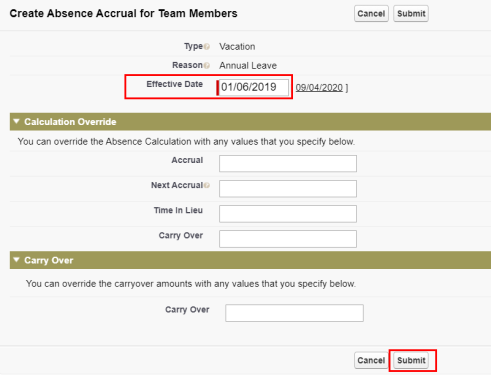
On the Create Absence Accrual for Team Members page, for Effective Date enter the date for the new vacation year start. In the following example it is 01/06/2019 (June 1 in the UK date format).
The Effective Date is the only field you need to complete:
-
Select Submit.
Sage People creates an Absence Accrual Transaction for all team members assigned to that absence accrual rule:
The process runs as a batch job and sends you an email when completed.
The absence accruals generated for all team members assigned the same Absence Accrual Rule act as backstop transactions.
-
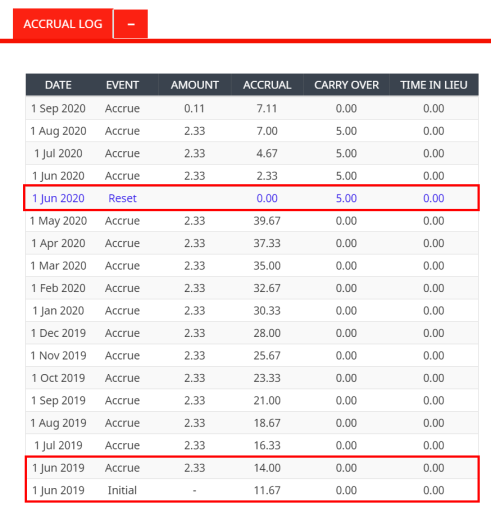
When the accrual generation process has finished, go back to the test user's Accrual Log:
Note how June 1 displays a Reset event with the amount of 11.67 and an accrual of 2.33, so the total on July 1 is 16.33, same as originally.
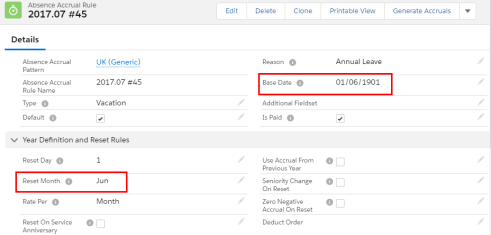
- Go to the browser tab where the absence accrual pattern is open and change the values of Base Date and the Reset Month to reflect the new vacation year start date:
-
Log back into WX as the test employee. Note how the following screenshot shows the Annual Allowance remains at 28 but the Year End Balance is 39.5, reflecting the total of the normal accrual added to the 11.5 days accrued during the first five months of the year, from Jan 1 to May 31:
-
Book a vacation day for the test employee for a date after the June reset, such as September 1 and view the Accrual Log.
In the following screenshot, note the initial transaction and accrual on June 1, 2019 and the reset on June 1, 2020, accruing at 2.33 per month as normal throughout the year:
NoteIn effect, generating accruals and then changing the vacation year has given the employee a single 17 month leave year, with the accrual from the January to May period and the new June to May vacation year. Accruing 2.33 days per month for 17 months results in a balance of 39.6 days. After the first June 1 reset event the vacation year and accrual awards return to normal.
- When you are satisfied with the testing you can proceed to make the change to all vacation rules in production:
- Select the Generate Accruals button for all the vacation absence accrual rules where you want to change the dates. This creates the backstop transactions to ensure the accruals remain correct.
- After the accruals have generated, amend the Base Date and Reset Month for each of vacation absence accrual rules.


