If your organization uses Continuous Feedback in Performance Reviews and you want to reports to include the team member and manager names, you need to create a custom report type as a template for reports.
Create a custom report type
-
In the HR Manager portal, go to Setup > Platform Tools > Feature Settings > Analytics > Reports & Dashboards > Report Types.
Sage People displays the Custom Report Types page. If you see a section titled What is a Custom Report Type on the page, select Continue.
-
On the All Custom Report Types page, select New Custom Report Type.
Sage People displays Step 1. Define the Custom Report Type:

-
Complete the fields in the Report Type Focus section as follows:
Field Description Primary Object Picklist.
Select Performance Review Feedback.
-
Complete the fields in the Identification section as follows:
Field Description Report Type Label The name of the custom report type.
Label is displayed to users when they select a report type for a new report.
Report Type Name Automatically completed by Sage People based on the Report Type Label.
Must begin with a letter, contain alphanumeric characters and underscores only.
Description Enter the purpose and characteristics of this custom report type.
Description is displayed to users when they select a report type for a new report.
Store in Category Picklist. Select the category in which this custom report type is included. Categories are displayed on the Create Reports screen.
Typically Other Reports.
-
In the Deployment section, In Development is selected for Deployment Status by default. Changing the status to Deployed makes the custom report type available for all users.
-
If you are still developing the report type, leave status as In Development, and then select Next.
-
If you are ready to deploy the report type, change the status to Deployed, and then select Next.
Sage People displays Step 2. Define Report Records Set:

-
-
Select Save.
Sage People displays the details of the custom report type you just created. By default, all fields in the objects are included in the custom report type.
-
To make more fields available for reports, in the Fields Available for Reports section, select Edit Layout.
-
From the field selection panel on the right, select Add fields related via lookup.
-
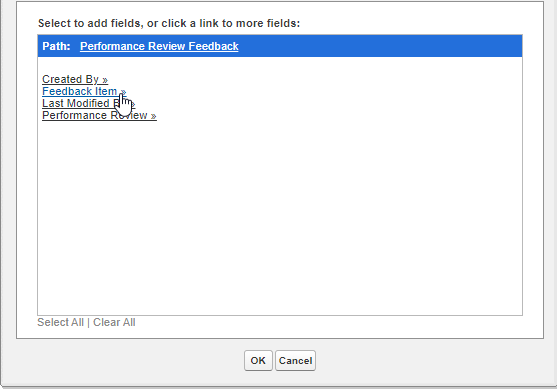
Select Feedback Item:
-
Select the fields you want to make available for reports and select OK. Including the Reviewer field brings the manager name to the report type.
-
From the field selection panel on the right, select Add fields related via lookup, then select Performance Review, select the Team Member field, and any other fields you want to make available for the Continuous Feedback reports and select OK.
You can also access additional Team Member fields through Performance Review if you need them for the custom report type.
-
If you want to change the display name of a field, select the field on the layout and then select Edit Properties.
-
When you are finished with the layout, select Save.
Create a report
-
In the HR Manager portal, go to Reports tab.
-
Select New Report.
-
On the Create Report dialog, select the All category, and then search for continuous.
-
From the search results, select the custom report type created for Continuous Feedback, and then select Start Report.
If you get multiple search results, the Details section includes the objects in the report type, and the Fields section lists the fields available for reports in the report type.
-
On the report builder screen, select Filters from the left sidebar.
-
Change the default filters as follows:
-
Created Date: change to All Time or a custom time period
-
-
Select the Outline tab and add columns as follows:
-
Performance Review: Team Member: Name
-
Feedback Item: Reviewer: Name
-
Last Modified Date
-
Feedback Item: Comment
-
Feedback Item: Actions
You can also add other columns from the fields available in the custom report type, and change the order in which the columns are displayed.
-
-
When you are happy with the report, select Save & Run and complete the fields to name the report and choose the folder where it is stored. Then select Save.