Creating a download file specification
You can use a download file configuration in Sage People to create one or more data files, each with its own set of data. Multiple files let you separate the different types of information.
Resolution
- Select the Payflow Services tab.
Sage People displays the Payflow Services Home page.
- Select the Payflow Service Name for which you want to create the download file.
Sage People displays the Payflow Service Console for the Service.
- On the Payflow Service Console, select Configure.
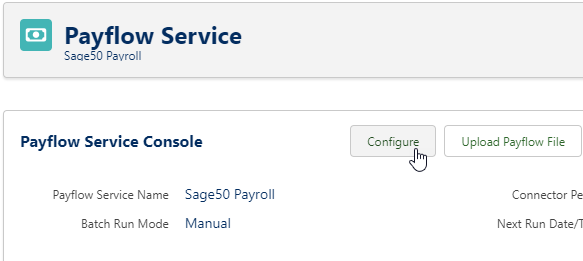
Sage People displays the Configure page for the Payflow Service.
- In the Download Files section, select New.
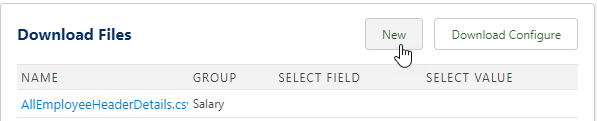
Sage People displays the Download File Configure page.
- Complete the fields in the Details section as follows:
Field Description Download File Name
The name of the file you want to create. Include the file extension, such as .csv, .tsv, or .txt to indicate the type of file.
You can include formulas to insert values into the file name:
- {!count}
Inserts the number of rows contained by the file. For example:
myfilename{!count}.csv
produces the file name:
myfilename284.csv
for a file containing 284 rows
- {!now,yyyy-MM-dd}
Inserts the current date. You can use standard Java date and time pattern strings to insert dates and times in a range of formats. For example:
myfilename{!now,MM-dd}.csv
produces the file name:
myfilename11-25.csv
for a file downloaded on November 25
Sage People applies the GMT time zone when it produces the date. It does this even if you set your org to a different time zone
- {!repeat,xxx,n}
Repeats the string xxx n times, where:
- xxx is any character string
- n is an integer
For example:
myfilename{!repeat,A,3}.csv
produces the file name:
myfilenameAAA.csv
Record Length
Number of bytes. If the file you donwload must be in records of fixed length, specify the length. Exclude file delimiters. For example, the record includes four fixed length fields which you specified as 12 characters each. The Download Record Length will be set to 48.
A value you specify here overrides the Download Record Length given in the Download Configuration.
For variable length records, leave this field blank.
Header
Supplemental data to place at the start of the file, preceding the body. Some file formats require this. You'll typically use header content to provide column headings for the content of the download. Enter the header content here.
To ensure Header content displays on its own row, enter \r\n as the final characters of your Header. This inserts a return and line break.
You can include formulas to insert values into the Header:
{!count}
Inserts the number of data records the file contains
{!now,yyyy-MM-dd}
Inserts the current date. You can use standard Java date and time pattern strings to insert dates and times in a range of formats. Sage People applies the GMT time zone when it produces the date. It does this even if you set your org to a different time zone
{!repeat,xxx,n}
Repeats the string xxx n times, where:
xxx is any character string
n is an integer
If you leave Header blank, the system places the names of the fields the file contains at the start of the file
To exclude all column headings from the download enter:
{!"}
Footer
Supplemental data to place at the end of the file, following the body. Some file formats require this. Also known as the trailer. Enter the footer content here.
You can include formulas to insert values into the Footer:
{!count}
Inserts the number of data records contained by the file
{!now,yyyy-MM-dd}
Inserts the current date. You can use standard Java date and time pattern strings to insert dates and times in a range of formats. Sage People applies the GMT time zone when it produces the date. It does this even if you set your org to a different time zone
{!repeat,xxx,n}
Repeats the string xxx n times, where:
xxx is any character string
n is an integer
Record Prefix
A text string to insert before each data record in the download file. Record Prefix can include:
- More than one line: insert \r\n
- Tab markers: insert \t
Record Postfix
A text string to insert after each data record in the download file. Record Postfix can include:
- More than one line: insert \r\n
- Tab markers: insert \t
Remove Empty Fields
Checkbox. If you check this, the system removes empty fields at the end of the record. Empty field removal starts at the end of the record and works back until it finds a field containing a value. You can use Remove Empty Fields to truncate fixed-length records carrying no data. You can do this in one or more fields at the end of the record.
If you don't check this, the system doesn't change records ending with empty fields.
Suppress End of Record/Loop
Checkbox. If you check this, records containing repeated groups of fields that would generate a new record after each group, retain the field groups in a single record. For example, to retain multiple benefits within a Team Member record instead of generating a new record for each group of benefit fields. If you check this, you can control when the system generates new records manually. Do this by using the New Record After checkbox when defining the mapping between Sage People fields and the download file.
Group
Picklist. The data grouping you want to use in the file. The value you select in Group controls the names and content of the remaining fields in the Detail section.
Select the picklist and choose from:
Salary
Displays Employment Select and Job History Select fields and associated value fields. This if for you to qualify the download file using fields from those objects
Bonus
Displays Team Member Select, Employment Select and Job History Select fields and associated value fields. This is for you to qualify the download file using fields from those objects
Benefits
Displays Team Member Select, Employment Select and Job History Select fields and associated value fields. This is for you to qualify the download file using fields from those objects
Beneficiaries
Displays Team Member Select, Employment Select and Job History Select fields and associated value fields. This is for you to qualify the download file using fields from those objects
Additional fields display for Subgroup Field and Subgroup Value
Dependants
Displays Team Member Select, Employment Select and Job History Select fields and associated value fields. This is for you to qualify the download file using fields from those objects
Additional fields display for Subgroup Field and Subgroup Value
Absence
Displays Team Member Select, Employment Select and Job History Select fields and associated value fields. this is for you to qualify the download file using fields from those objects
Timesheet
Displays Team Member Select, Employment Select and Job History Select fields and associated value fields. This is for you to qualify the download file using fields from those objects
Additional fields display for Subgroup Field and Subgroup Value
Training
Displays Team Member Select, Employment Select and Job History Select fields and associated value fields. This is for you to qualify the download file using fields from those objects
More information is available in Configuring Groups and Subgroups.
Select 1
Picklist. The data field within the Group you use for the download file. This is a dependent picklist. The Group you select determines the content.
Salary Group
Select 1 & 2 display fields from the Team Member object
Bonus
Select 1 & 2 display fields from the Bonus object
Benefits Group
Select 1 & 2 display fields from the Benefit object
Beneficiaries Group
Select 1 & 2 display fields from the Benefit object
Subgroup Field displays fields from the Beneficiary object
Dependants Group
Select 1 & 2 display fields from the Beneficiary object
Subgroup Field displays fields from the Benefit object
Absence Group
Select 1 & 2 display fields from the Absence and Absence Accrual objects
Timesheet Group
Select 1 & 2 display fields from the Timesheet object
Subgroup Field displays fields from the Time Report object
Training Group
Select 1 & 2 display fields from the Training object
More information is available in Configuring Groups and Subgroups.
Select 1 Value
The value of Select 1. Data must match this value to include in the download file.
If you specify a value in Select Field and leave Select Value blank, you can include data in the download file. This is only if the value of the field you select is blank.
For logical NOT use !
For example:
- ! France specifies: include data if the field you select contains any value other than France
- ! on its own specifies: include data if the field you select contains any value other than blank
Select 2
Picklist. A second data field within the Group the system uses for the download file. Use to further qualify the data you want to download.
Select 2 works in addition to Select 1. Data values in the record must match Select Value AND Select Value 2 before you download a record.
You'll commonly use this to select records based on the value of Download Status.
Select 2 Value
The value of Select 2. Data must match this value for the system to include it in the download file.
Subgroup Field
Displays when you select Dependants, Beneficiaries or Timesheet in Group. This is a dependent picklist. The Group you select determines the content.
- Beneficiaries Group
Subgroup Field displays fields from the Beneficiary object
- Dependants Group
Subgroup Field displays fields from the Benefit object
- Timesheet Group
Subgroup Field displays fields from the Time Report object
Picklist. Select the picklist and choose the field to display as the subgroup in the download file.
More information is available in Configuring Groups and Subgroups.
Subgroup Value
Displays when you select Dependants, Beneficiaries or Timesheet in Group.
The value of the field you select in Subgroup Field. Data must match this value for the system to include it in the download file.
Synchronization section
Changes Only
Checkbox.
If you check this, the system includes records in the download file. This is only when they include field values that you changed since the most recent download batch of the previous payroll period. Changes to any field trigger inclusion of the record.
You can ensure the inclusion of fields that where you have deleted values. Do this by setting the default value of that field to something not normally be held in the field. For example, null, blank, or - (hyphen). This lets Payflow identify the field as changed when running the first download after the change. Subsequent downloads correctly identify no change.
If you don't check this, the system includes all records in the download file whether you changed them or not.
You can use this field with Changes Only at the field level. For example:
- With file level Changes Only unchecked
- Fields with Changes Only checked show values in the download file only when you change the value from the last download; they're otherwise blank
- Fields with Changes Only unchecked always show values in the download file
- With file level Changes Only checked
- The system doesn't include records with no changes in the download file. This is regardless of the field level Changes Only setting
Key Object 1
Picklist. The object Sage People Payflow uses with Key Field 1 to match records so that it can check for changes.
If left blank, Key Object 1 defaults to the Employment Record.
Key Field 1
Picklist. The field in Key Object 1 Sage People Payflow uses to match records so that it can check for changes. This is a dependent picklist. Key Object 1 determines the content.
- {!count}
-
Complete the fields in the Deduplication section as follows:
Field Description Dedupe Field
Picklist. The data field within the Group you use to ensure that the system doesn't select duplicate data for the download file. If you use this, the system only selects the latest record.
This is a dependent picklist. The Group you select determines the content.
-
Complete the fields in the Synchronization section as follows:
Field Description Changes Only
Checkbox.
If you check this, the system includes records in the download file. This is only when they include field values that you've changed since the most recent download batch of the previous payroll period. Changes to any field trigger inclusion of the record.
You can ensure inclusion of fields where you've deleted values. Do this by setting the default value of that field to something not normally be held in the field. For example, null, blank, or - (hyphen). This lets Payflow identify the field as changed when running the first download after the change. Subsequent downloads correctly identify no change.
If you don't check this, the system includes all records in the download file whether you changed them or not.
You can use this field with Changes Only at the field level. For example:
- With file level Changes Only unchecked
- Fields with Changes Only checked show values in the download file only when you changed the value from the last download; they're otherwise blank
- Fields with Changes Only unchecked always show values in the download file
- With file level Changes Only checked
- The system doesn't include records with no changes in the download file. This is regardless of the field level Changes Only setting
Key Object 1
Picklist. The object Sage People Payflow uses with Key Field 1 to match records so that it can check for changes.
If left blank, Key Object 1 defaults to the Employment Record.
Key Field 1
Picklist. The field in Key Object 1 Sage People Payflow uses to match records so that it can check for changes. This is a dependent picklist. Key Object 1 determines the content.
- Select Save.
Sage People displays the Configure page for the Payflow Service. Towards the bottom of the page is the Mapping HCM to Download Files section. When you first create a download file specification, this section is empty. You're now ready to define the mapping for the download files you've created.