Adding a new Payflow service
To add a new Payflow service:
-
Select the Payflow Services tab.
Sage People displays the Payflow Services home page.
The Payflow Services home page is configurable and may display a different set of fields from those included in the screens shown here.
TipTo change the page layout:
- Go to Setup > Objects and Fields > Object Manager.
- Select the Label associated with the
fpay__Payroll_Service__cAPI Name - typically Connector Service or Payflow Service. - On the left menu select Page Layouts.
- On the Page Layouts page select Payroll Service Layout.
- Drag the fields you want into or out of the page layout as required.
- Select Save.
-
Select New:

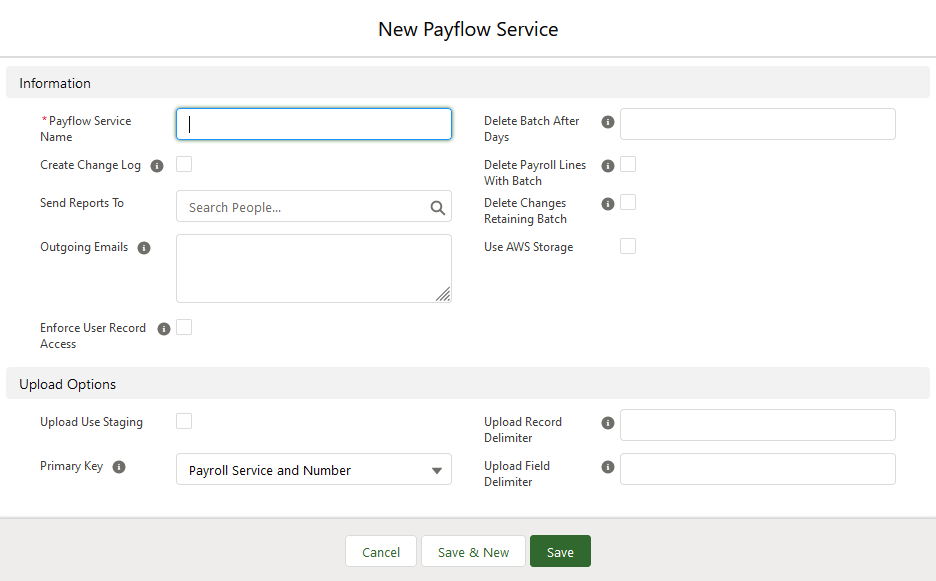
Sage People displays the New Payflow Service page:
-
Complete the fields as follows:
Field Description Payflow Service Name A name for the service. Do not include spaces.
Payflow Service Name is used on the Payflow Services Home page and to identify the originating service for batches.
Create Change Log Checkbox. If checked, Payflow logs the changes identified by the service each time a batch runs. The log file is linked to the batch in the Files Related List, and in the Notes & Attachments Related List if you have them both displayed on the Batch page layout.
This checkbox is not displayed by default. Add it to the page layout using the instructions earlier in this procedure.
Send Reports To The name of the Sage People user to receive download reports. Use Lookup if necessary. Outgoing Emails Not displayed by default. You can add the field to the page layout. The email addresses you want to receive the files resulting from this Service. For multiple addresses enter each address on a new line. Enforce User Record Access Checkbox. If checked the Service selects records the Service User is permitted to access and omits all others.
Before enabling the Enforce User Record Access checkbox for existing Payflow Services:
-
Check the HR Department access assigned to all users without Administrator level access who have responsibility for running Payflow Services.
-
Ensure all Team Members who you expect to be processed by a Service are assigned to an HR Department accessible by the user running the Service. Data for Team Members who are not assigned to an HR Department accessible to the user running the Payflow Service will be omitted.
If users running Payflow Services do not have access to required Team Members through their HR Departments, you can:
- Assign additional HR Department access to the user running the Payroll Service.
- Assign the Payroll Service to a different user with the necessary level of access.
Delete Batch After Days Not displayed by default. You can add the field to the page layout.
Number of days after which Payflow batches are deleted.
For example, if set to 0 all previous batches for this service are deleted after the current one has run; only the latest batch is kept. If set to 7 all batches for this service over a week old are deleted.
Useful for constraining the amount of data held, and particularly valuable for managing changes only download data which can accumulate quickly.
Delete Payroll Lines With Batch Not displayed by default. You can add the field to the page layout.
Checkbox. If checked, Payroll Lines linked to a batch are deleted when the batch is deleted. If not checked, deleting a batch does not delete associated Payroll Lines.
Useful in managing the volume of stored Payflow data.
Delete Changes Retaining Batch Not displayed by default. You can add the field to the page layout.
Checkbox. If checked, when deleting old batches the change history is deleted but the batch output files are retained.
Useful in reducing space-consuming history data without deleting output data.
SFTP Service
Enter the name of the SFTP provider to use for this service, provided by your account manager. The service name you enter must exactly match the value you were provided.
-
The value for customers that use the legacy SFTP staging server for file transfer is
CompleteFTP.
Leave blank for services that do not use SFTP for file transfer.
This field is not displayed by default. If required for your organization, add the field to the
fpay__Payroll_Service__cpage layout. See the instructions in step 1.Use AWS Storage Not available in all countries - check with Sage People before use. If this option is not displayed you can add it to the Payroll Service Layout (
fpay__Payroll_Service__c) page layout.Checkbox. If checked, you can use AWS storage for managed file transfer. See Using Amazon Web Services for file transfer.
If you are creating a service to upload data to Sage People you can complete the Upload Options now, or you can leave the Upload Options fields blank and complete them later when you fully define the upload. Field definitions are given in Configuring an upload.
-
-
Select:
-
Save to save the service and close the service page. Sage People displays the Payflow Service Console for the service you just added:
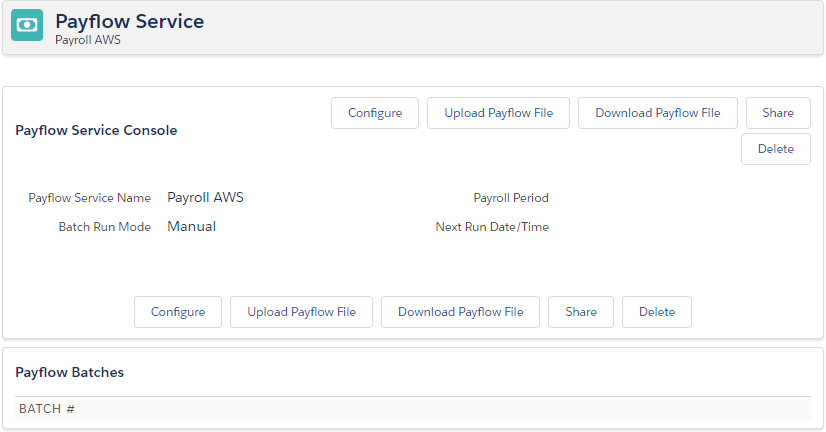
You can now set up the service by selecting Configure and adding download and upload configuration details.
-
Save & New to save this service and add another.
-
Cancel to discard your changes and return to the Payflow Services Home page.
-