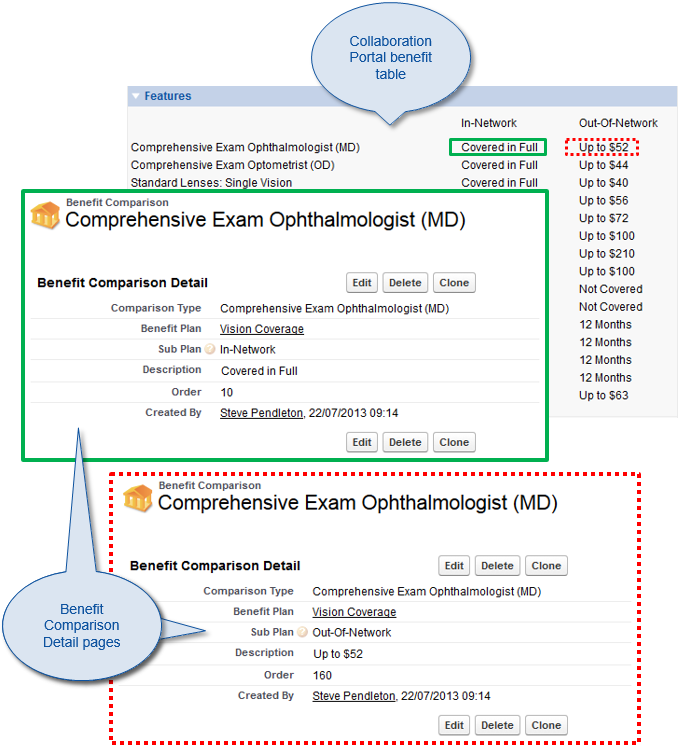
Benefit Comparisons enable you to present alternatives within a single Benefit Plan. The alternatives can be presented as Sub Plans, with each Sub Plan displayed in one column of the WX benefit table.
For example, a vision coverage plan may offer different cost options for in-network and out-of-network providers for each available solution. Define pairs of Comparisons for each option available, using an in-network Sub Plan and an out-of-network Sub Plan. Benefit Comparison Sub Plans are then presented in WX in parallel columns.
Comparisons must be set up in multiples of two or more - you cannot compare a single option with itself.
To define a Benefit Comparison:
- Select the Benefit Suppliers tab.
Sage People displays the Benefit Suppliers Home page.
- Select the name of the Benefit Supplier hosting the plan for which you want to define a Benefit Comparison.
Sage People displays the Benefit Supplier Detail page.
- In the Benefit Plans related list, select the name of the plan for which you want to define a Benefit Comparison.
Sage People displays the Benefit Plan Detail page.
- In the Benefit Comparison section, select the drop-down menu.
- Select New
-
Sage People displays the New Benefit Comparison Edit page.
-
Complete the fields as follows:
Field
Description
Comparison Type
The name of the option within the plan for which you are creating two or more comparisons.
Comparison Type must be identical for each Benefit Comparison that applies to the same option. Sage People uses Comparison Type to match options and ensure that options with the same Comparison Type and different Sub Plans are displayed on the same row in different columns of the WX benefit table.
Benefit Plan
The name of the plan to which this Benefit Comparison applies.
Defaults to the Plan you selected earlier in this procedure. To change Benefit Plan, select Benefit Plan Lookup , find and select the correct plan.
Sub Plan
Picklist. Each Sub Plan is displayed in one column in the WX benefits table for this Benefit Plan.
Select the picklist and choose the Sub Plan for this Comparison. By default, the picklist contains two values:
- In-Network
- Out-Of-Network
Use Setup > App Setup > Create > Objects to add more values to the Benefit Comparison object, Sub Plan picklist.
You must specify a different Sub Plan for each option with the same Comparison Type.
Description
The description you want to appear in WX for this Benefit Comparison.
Use the content editing tool bar to control the appearance of the description in WX. You can insert links and images if you want.

Order
Number. The order in which this Benefit Comparison is displayed in the WX benefit table. Lower numbers are displayed before higher numbers.
Comparison Type is used to ensure that options for different Sub Plans are displayed on the same row in the WX benefit table, so Order is only important to control the order of items in the first Sub Plan column. You do not need to specify an Order number for options in the second and subsequent Sub Plans.
-
Select:
- Save to save the Benefit Comparison.
Sage People displays the Benefit Comparison Detail page.
- Save & New to save the Benefit Comparison and display another New Benefit Comparison Edit page.
- Cancel to discard your changes and return to the Benefit Plan Detail page.
- Save to save the Benefit Comparison.