Mass Update enables you to update a single field for a selected group of Team Members. You can update fields in the following records:
-
Team Member
-
Employment
-
Salary
For an update to a single field with no associated further processing, most mass updates can be handled in a single transaction. If you want to process several hundred team members, or the field you are updating initiates further processing when changed, expect to process team members in batches.

For each type of mass update the wizard guides you through the process:
-
Update Team Members
-
Update Employment Records
-
Update Salary Records
Steps in Update Team Members and Update Employment Records:
-
Step 1: Confirm records to be updated.
-
Step 2: Select the field to be updated from a picklist.
-
Step 3: Enter a new value for the field.
-
Step 4: Confirm the changes and select Update.
Steps in Update Salary Records:
-
Step 1: Confirm records to be updated.
-
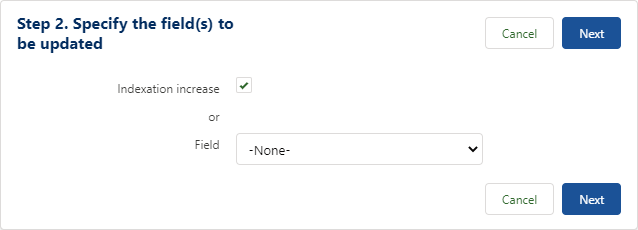
Step 2: Select the field to be updated from a picklist, or select the Indexation increase checkbox:
-
Step 3: Enter a new value for the field, or apply a percentage salary increase to all selected Team Members:
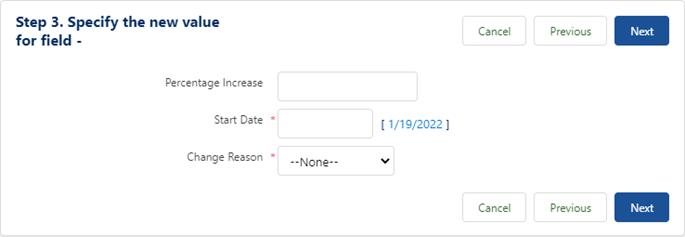
Enter:
-
the Percentage Increase you want to apply to all selected Team Members.
-
the effective Start Date for the increase.
-
the Change Reason.
-
-
Confirm the change and select Update.
Mass Update example: Move Team Members to a new team
Restructuring in your organization results in moving the Information Systems team to the IT team:
-
Create a Team Member view of all those in the Information Systems team.
-
Select all those members by selecting the check box at the head of the list.
-
Select Mass Update.
-
In the Mass Update Wizard, select Update Team Members:

The Mass Update Wizard prompts you for the field you want to change.
-
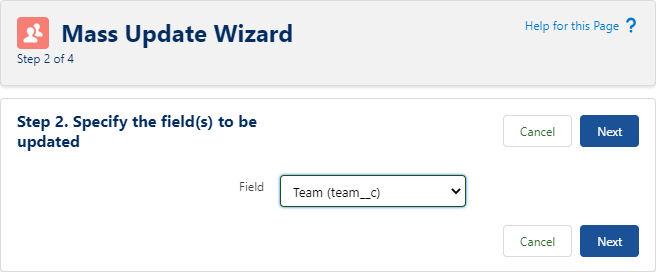
Select the picklist, choose Team, and select Next:
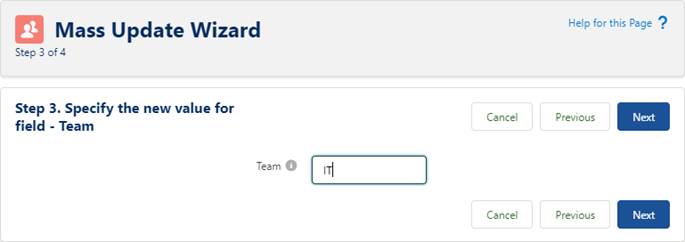
The Mass Update Wizard prompts you for the new value of the field.
-
Enter IT as the new value for the Team field. This value will be applied to all the selected Team Members. Select Next:
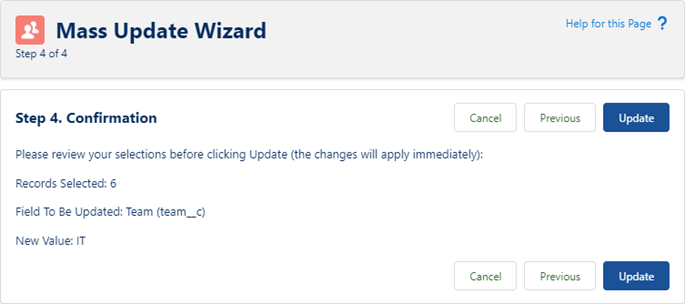
The Mass Update Wizard prompts you for confirmation before the change is applied. Select Previous if you want to make adjustments, select Cancel to drop out of the Wizard and cancel the change. You cannot stop the change when you complete step 4 of the Wizard.
-
Select Update to make the changes:
Mass Update example: Award % salary increase to multiple Team Members
You want to award a fixed percentage cost of living salary increase to all Team Members in your Paris office:
-
Create a Team Member view of all those with Location: Paris.
-
Select all those members by selecting the check box at the head of the list.
-
Select Mass Update.
-
In the Mass Update wizard, select Update Salary Records:

The Mass Update wizard prompts you for the field you want to change.
-
Select the Indexation Increase checkbox and select Next:

The Mass Update Wizard prompts you for the new value of the field.
-
Enter the Percentage Increase you want to award, the Start Date for the new salaries, and a Change Reason:
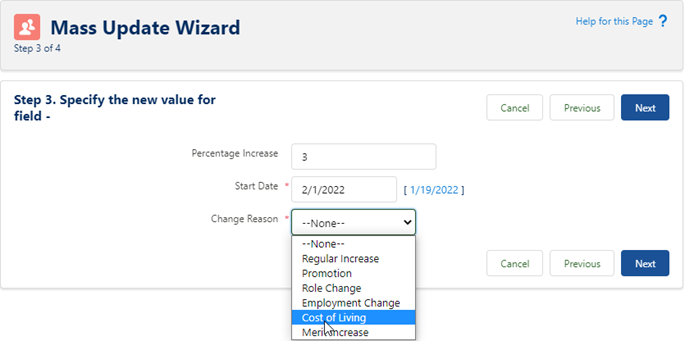
The percentage you specify is applied to the Team Members' old salary to calculate the new salary.
These values will be applied to all selected Team Members. Select Next.
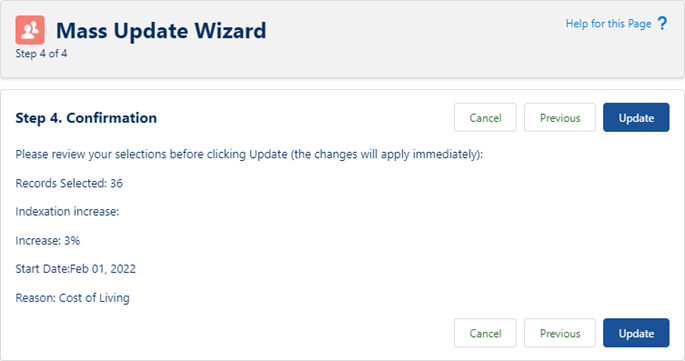
The Mass Update wizard prompts you to confirm before applying the change. To make adjustments, select Previous; to drop out of the wizard and cancel the change, select Cancel. You cannot stop the change when you complete step 4 of the Wizard.
-
Select Update to make the changes:
