Constraints apply conditions to templates enabling you to control when a template can be used. You can set up multiple constraints to apply to a single template, and you can also use one constraint for multiple templates.
- All conditions specified in a single constraint must be satisfied for the constraint to apply.
- When a template has multiple constraints, if any constraint is satisfied the template can be selected for a performance review.
Constraints are held in the Constraint Library.
To define constraints:
- Select the Constraint Library tab.
- On the Constraint Library Home page, select New.
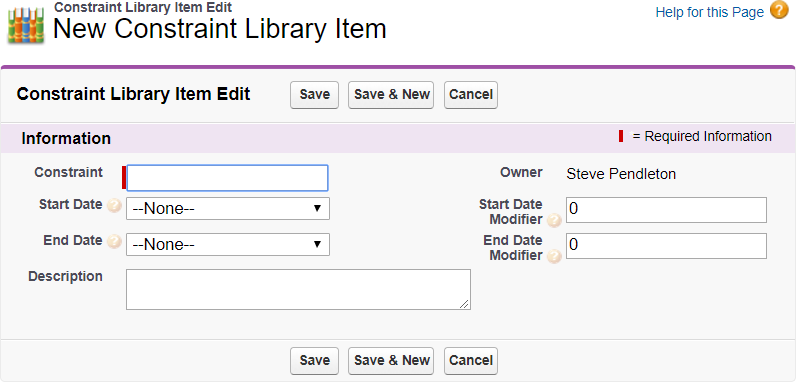
Sage People displays the New Constraint Library Item page:

-
Complete the fields as follows:
Field What to enter Constraint
A name for the constraint. The Constraint Name is displayed in the Constraints related list on the Template Library Item Detail page. Use a name that makes the constraint easy to identify in a list.
Start Date
The date you want this Constraint to take effect. The constraint is satisfied when today is on or after the start date.
Select the picklist and choose from the available values:
- Current Year Start Date
As set in the policy.
- Current Year End Date
- Employment Start Date
- Probation End Date
If the picklist does not display the full set of values, you can add them; in summary:
- Go to Go to Setup > Object Manager, and select Constraint Library Item.
- From the sidebar select Fields & Relationships.
- In the list of fields, select the Start Date field label.
- In the Values related list, select New.
- Add the missing values exactly as given.
Start Date Modifier
Number of days you want added to or subtracted from the Start Date to offset the effective start date for this constraint. Unsigned numbers are taken as positive offsets. Use - (minus sign) to indicate a negative offset.
End Date
The date you want this constraint to stop taking effect. The constraint is satisfied when today is on or before the End Date.
Select the picklist and choose from the available values:
- Current Year Start Date
As set in the policy.
- Current Year End Date
- Employment Start Date
- Probation End Date
If the picklist does not display the full set of values, you can add them; in summary:
- Go to Go to Setup > Object Manager, and select Constraint Library Item.
- From the sidebar select Fields & Relationships.
- In the list of fields, select the End Date field label.
- In the Values related list, select New.
- Add the missing values exactly as given.
End Date Modifier
Number of days you want added to or subtracted from the End Date to offset the effective end date for this constraint. Unsigned numbers are taken as positive offsets. Use - (minus sign) to indicate a negative offset.
- Current Year Start Date
-
Select:
- Save to save the constraint and return to the Constraint Library Home page.
- Save & New to save the constraint and display a blank Constraint Library Item Edit page to create another constraint.
- Cancel to discard your changes and return to the Constraint Library Home page.
Saved constraints are immediately available to use with templates. To use constraints with your templates you must link them together.