Salesforce Lightning Experience:

Salesforce Classic interface:

Change Picture enables you to load a picture to be visible for a Team Member throughout Sage People, including WX.
-
On the Team Member Picture page, select Choose File to find the image you want to use:

-
Choose a picture with a file size no bigger than 200KB, and ideally 190 pixels wide by 250 pixels high. To work well, the proportions must be close to 4:5, width:height. You can use standard file formats for photos, including jpg, png, gif, and tiff.
The file name is displayed in the Picture field.
-
When you have found the picture you want to use, select Save.
If you leave upload new picture blank and Picture set None, Sage People uses a standard silhouette:

You can also email a picture to Sage People for automatic loading to the Team Member's record. You will need:
- The unique email address for uploading pictures for your company, available from Sage People Support. Note that this is different from the email address Sage People issues for uploading notes and attachments.
-
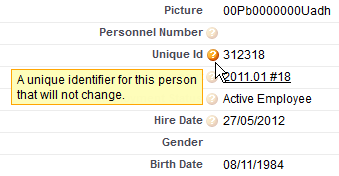
The Team Member's Unique Id to ensure that the picture is applied to the right person. You can find the Unique Id on the Team Member record in the Team Member Detail section:

- Ask Sage People Support for your company's unique email address for uploading Team Member pictures.
- Save the picture with the file name of the Team Member's Unique ID and the standard file extension for your jpg, png, gif, or tiff. Make sure the file is not bigger than 200KB.
- Compose the email:
- The content of the Subject line is not important because Sage People uses the attachment name to assign the picture to the right Team Member.
Add the attachment. You can add multiple picture files, with each file up to 200KB and the total email size up to 10MB. Make sure that each file is named with the Unique ID of the Team Member to whom it applies, followed by the dot extension of the file type for the picture.
Any text in the body of the email is ignored.
- Send the email.